Revision history
| Rev. | Date | Description |
|---|---|---|
| 1.0 | 2022-11-01 | Initial release. |
| 2.0 | 2022-12-02 | Replacement of figures and addition of explanations due to UI renewal. |
| 2.1 | 2022-12-14 | Added user management feature explanation and permission list. |
| 2.2 | 2022-12-20 | Settings - Added explanations of domain settings. |
| 2.3 | 2023-01-06 | Added explanation of the tag feature. |
| 2.4 | 2023-03-07 | Added explanations of the tag-based server search and the bulk update server settings. |
| 2.5 | 2023-06-12 | Added explanations of the notification settings and the bulk user invitation. |
| 2.6 | 2023-09-28 | Assets - Added explanation of network list. |
| 2.7 | 2024-02-14 | Replacement of figures and addition of explanations following UI changes. |
| 2.8 | 2024-04-11 | Added explanation of the product list. |
| 2.9 | 2024-06-06 | Updated permissions list. |
| 3.0 | 2024-06-28 | Added explanation of vulnerability scanning feature. |
| 3.1 | 2024-09-02 | Added explanation of cloud service management. |
| 3.2 | 2025-06-20 | - Added explanations of KEV and vulnerability countermeasure detection. - Updated explanation of the selection of security check targets. |
| 3.3 | 2025-12-05 | - Added explanation of profile changes (including language selection). |
| 3.4 | 2026-03-12 | - Added section for downloading vulnerability list (including the options). |
| 3.5 | 2026-06-16 | - Added section for vulnerability notes. - Updated downloading vulnerability list options. |
| 3.6 | 2026-10-14 | - Added section "Change user roles". - Added section "Identity verification for Supervisor operations". - Allowed "Supervisor" as the role. |
Getting started with CAAV
Log in
-
Please proceed to the login screen via the URL below and enter your login ID and password.
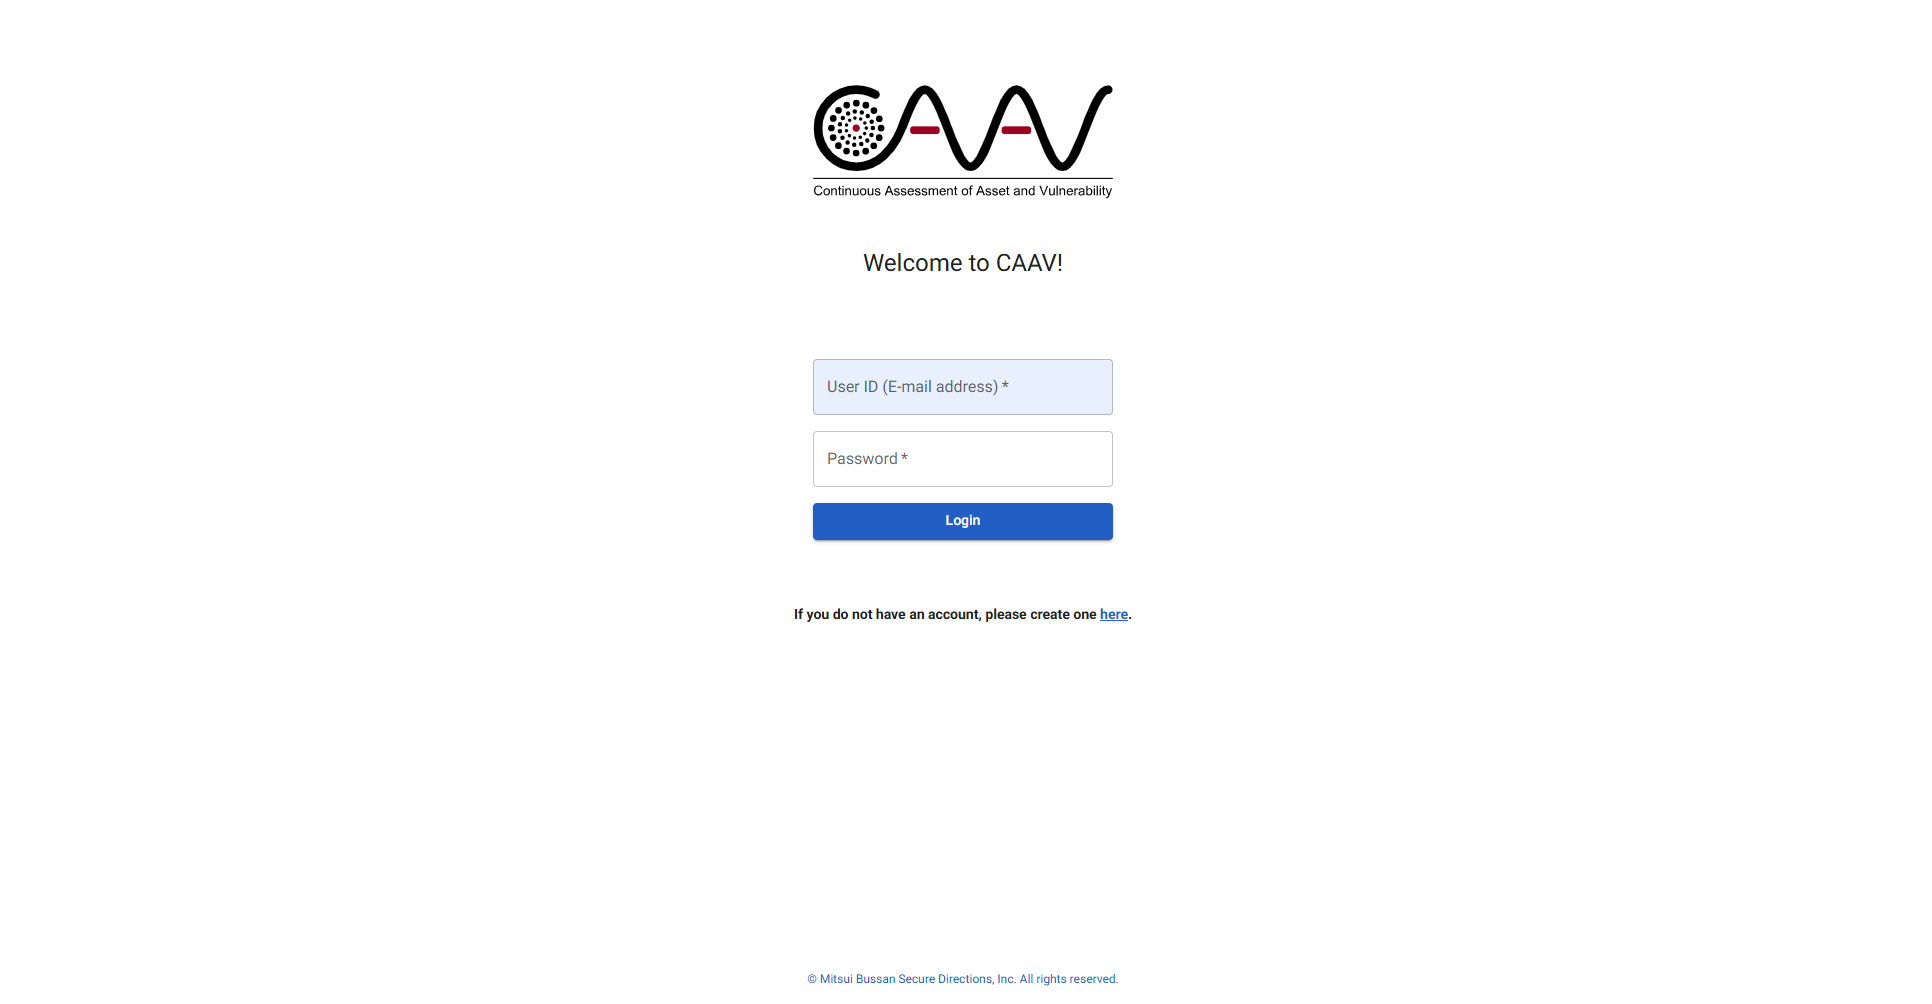
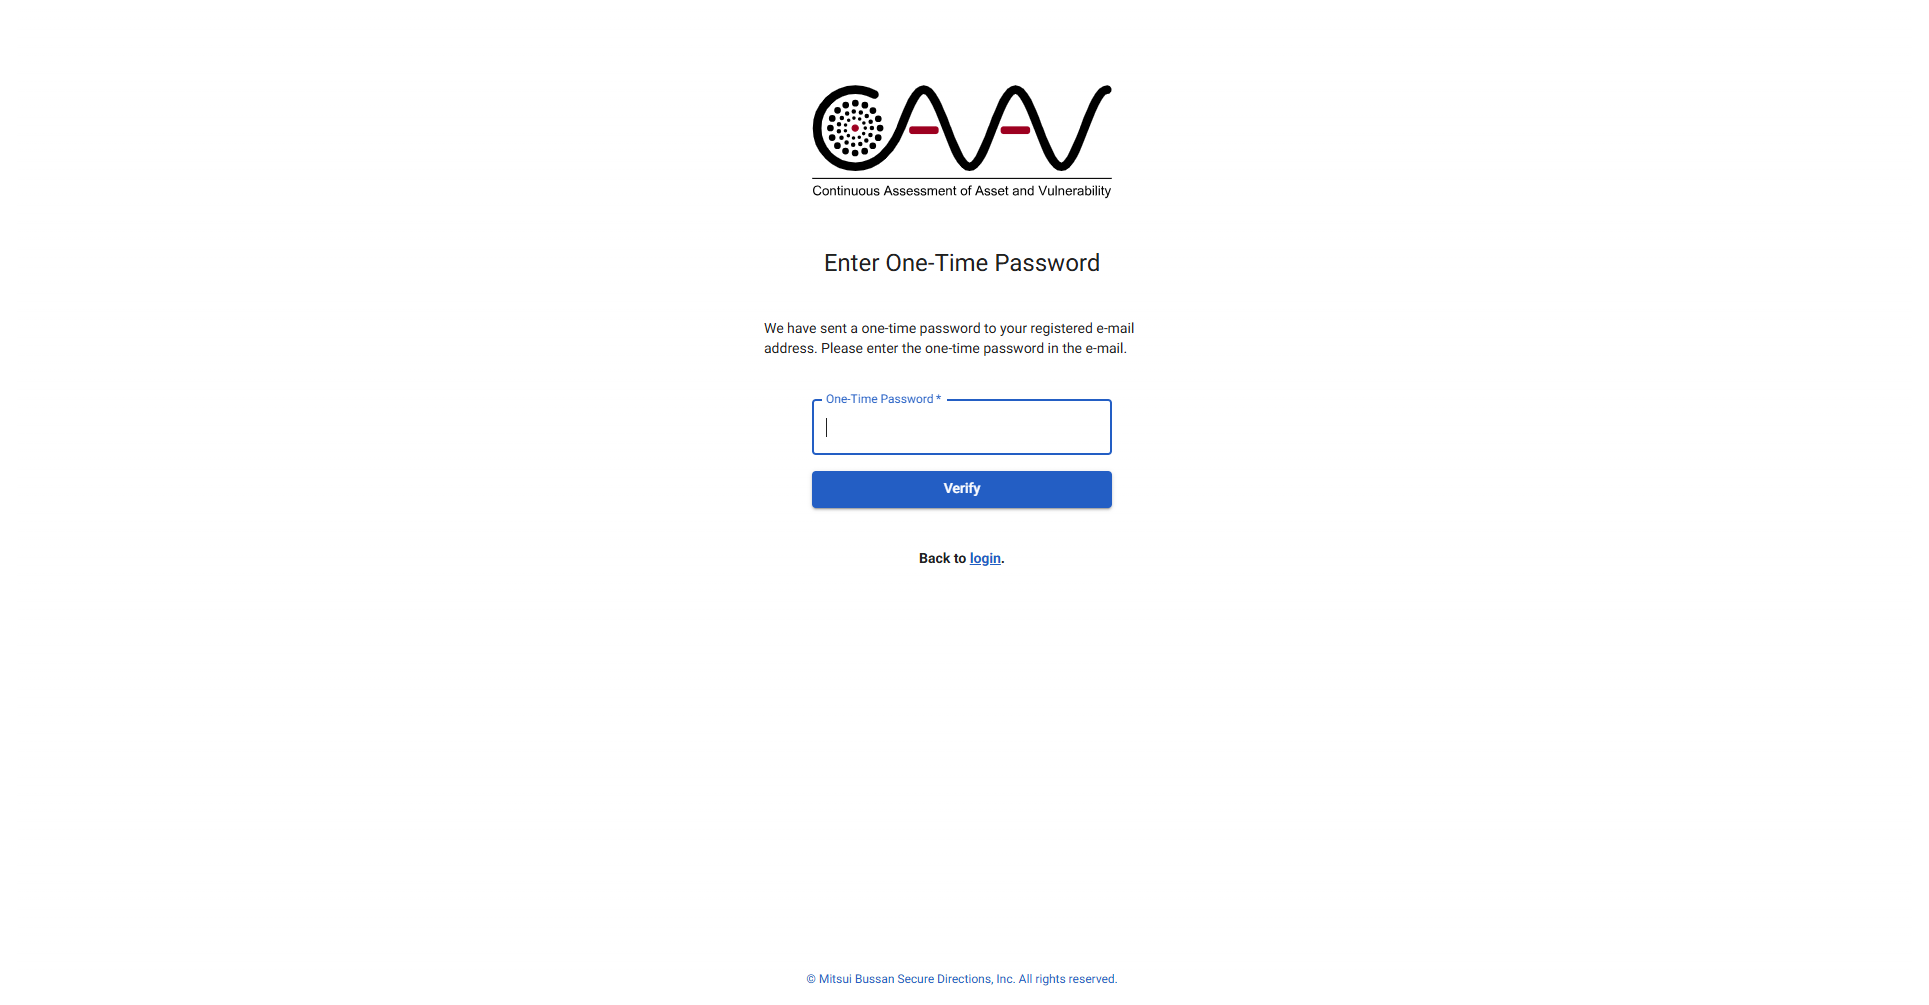
- Login requires two-factor authentication (password + a one-time password sent to your email).
- After entering your password, you will receive an email containing a one-time password. Please enter the one-time password provided in the email to log in.
- The one-time password is valid for 5 minutes. Should it expire, please log in again.
- Your account is locked after repeated login failures. If it is locked, please contact your administrator.
Change account password
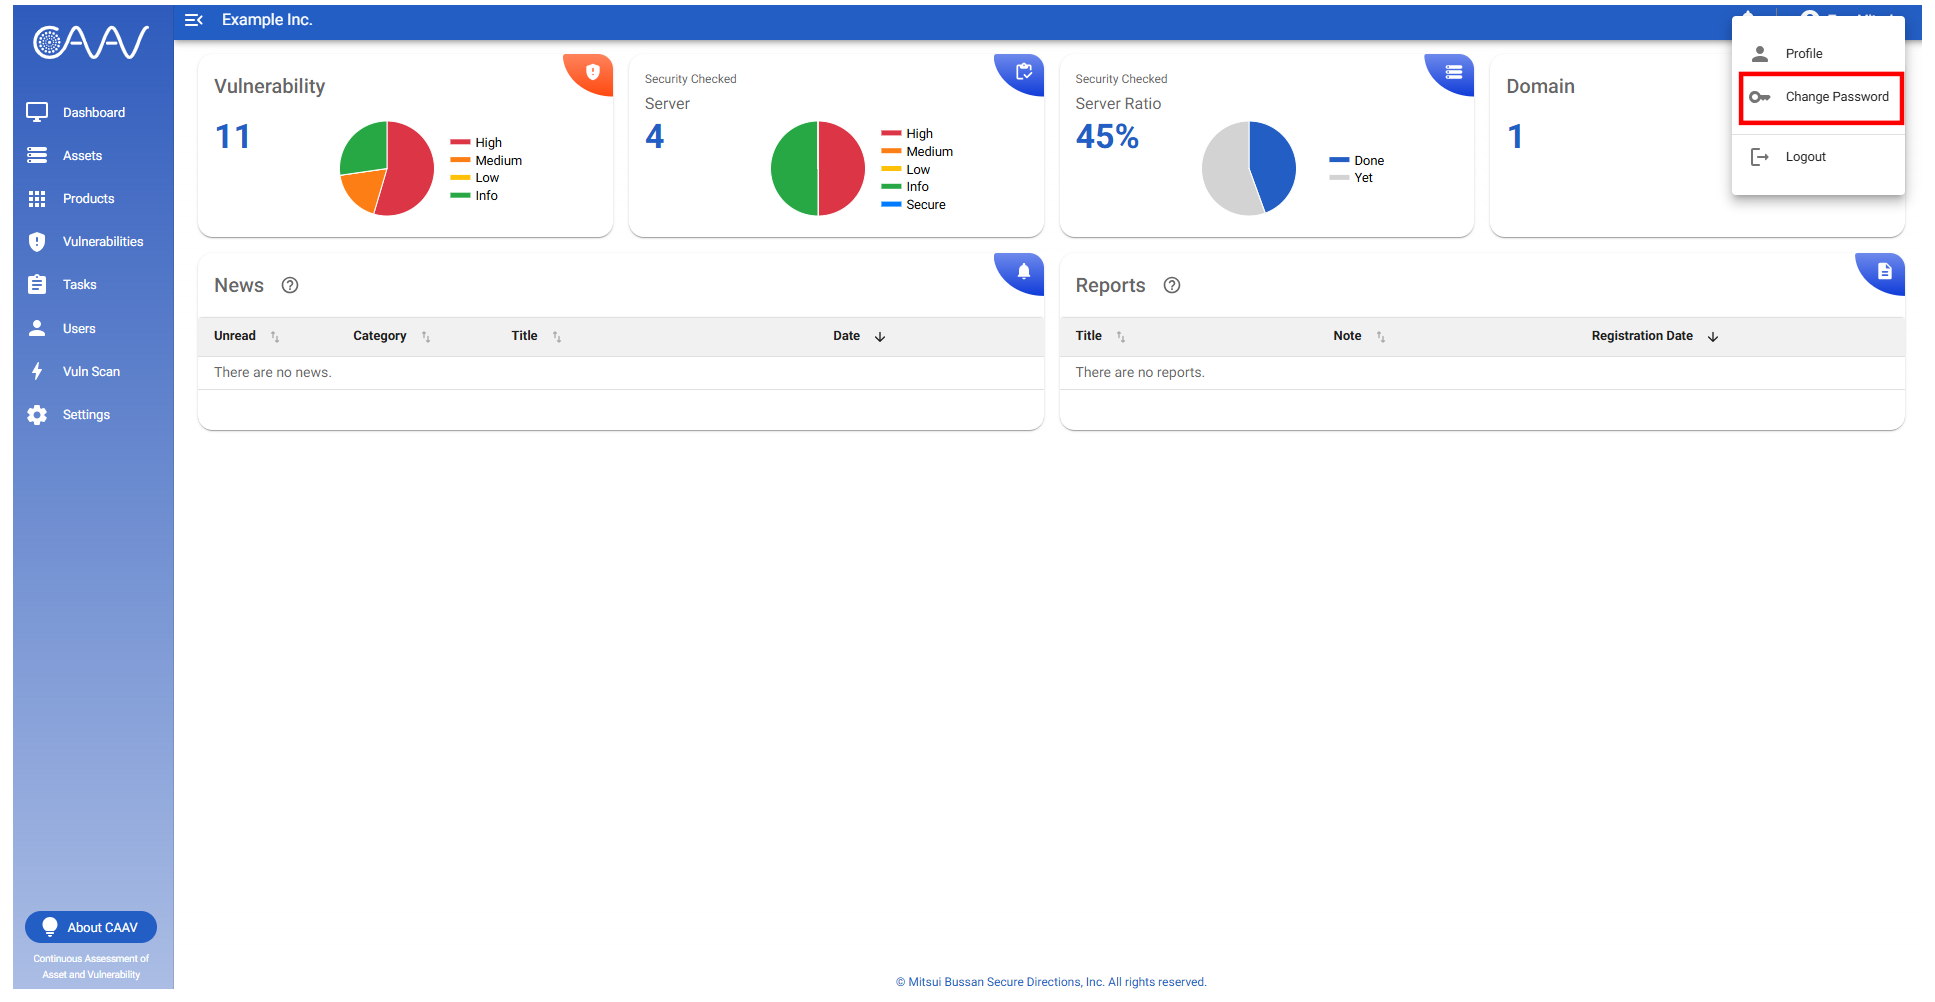
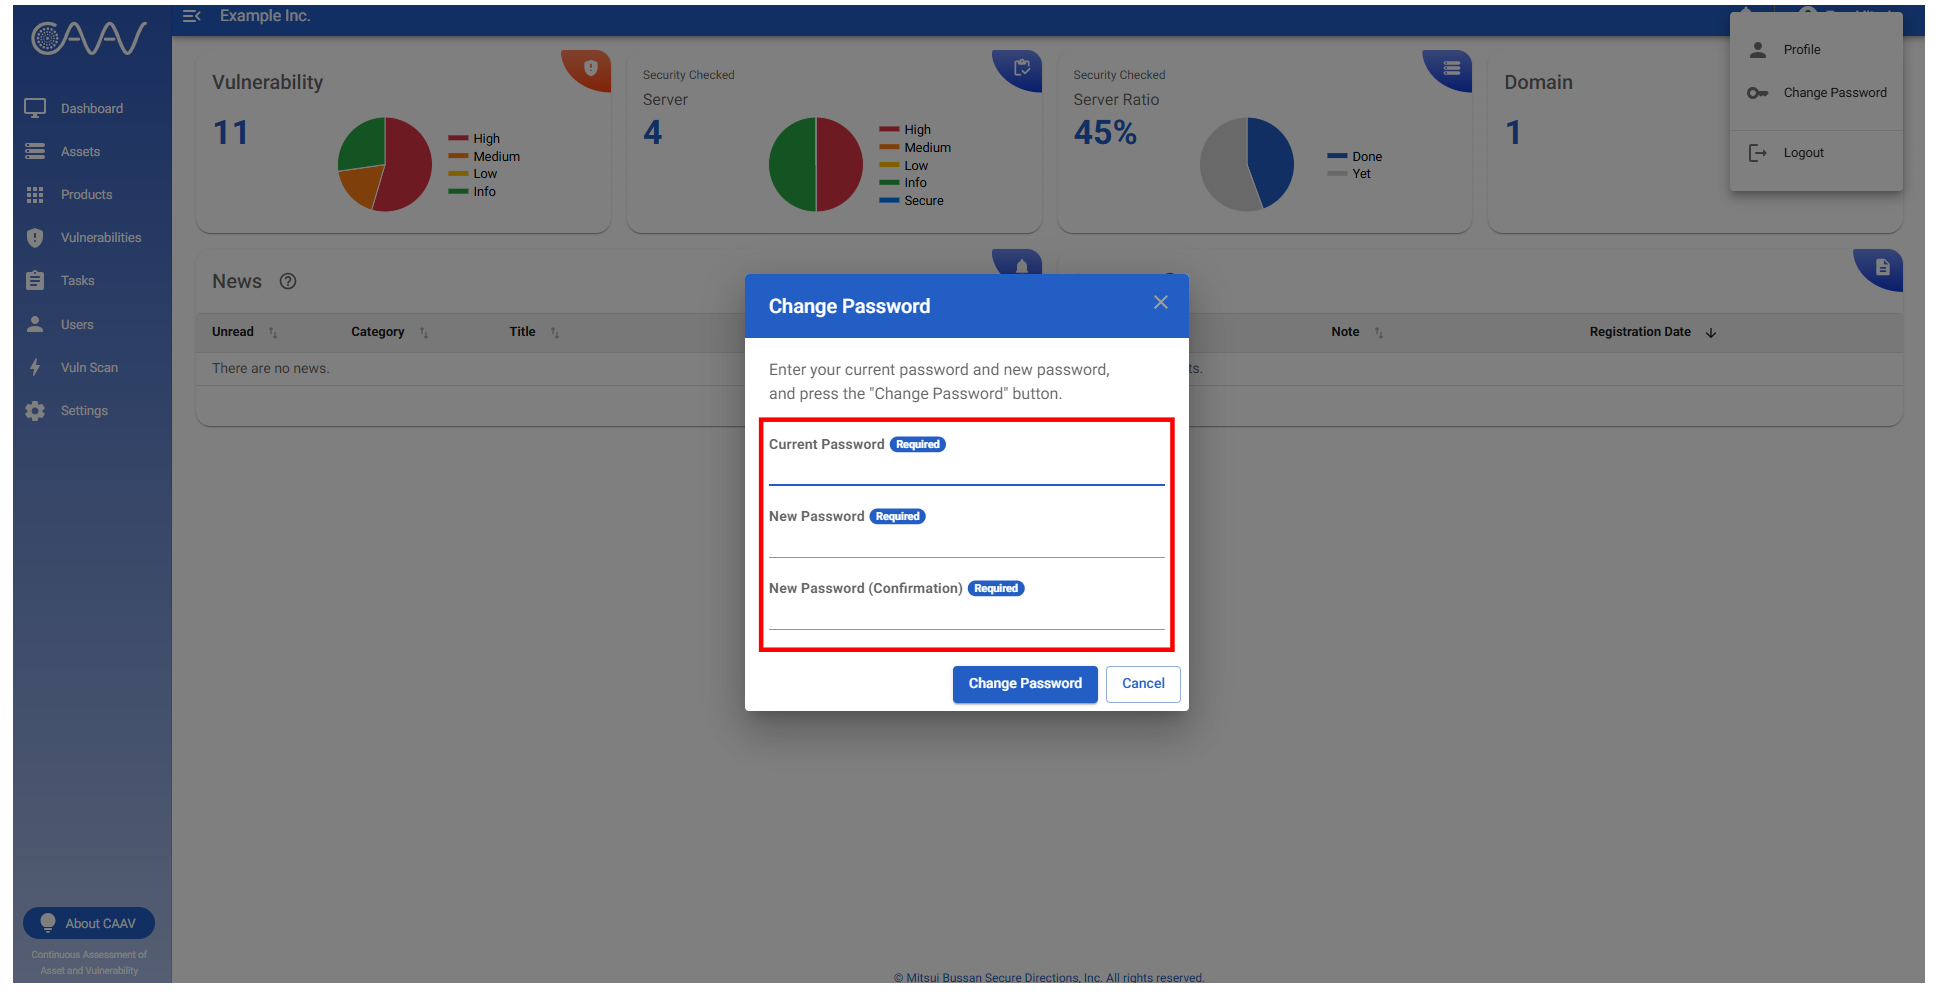
- To change your password, click "Change Password" in the icon menu at the top right.
- Enter the required information in the form to change your password.
Modify account profile
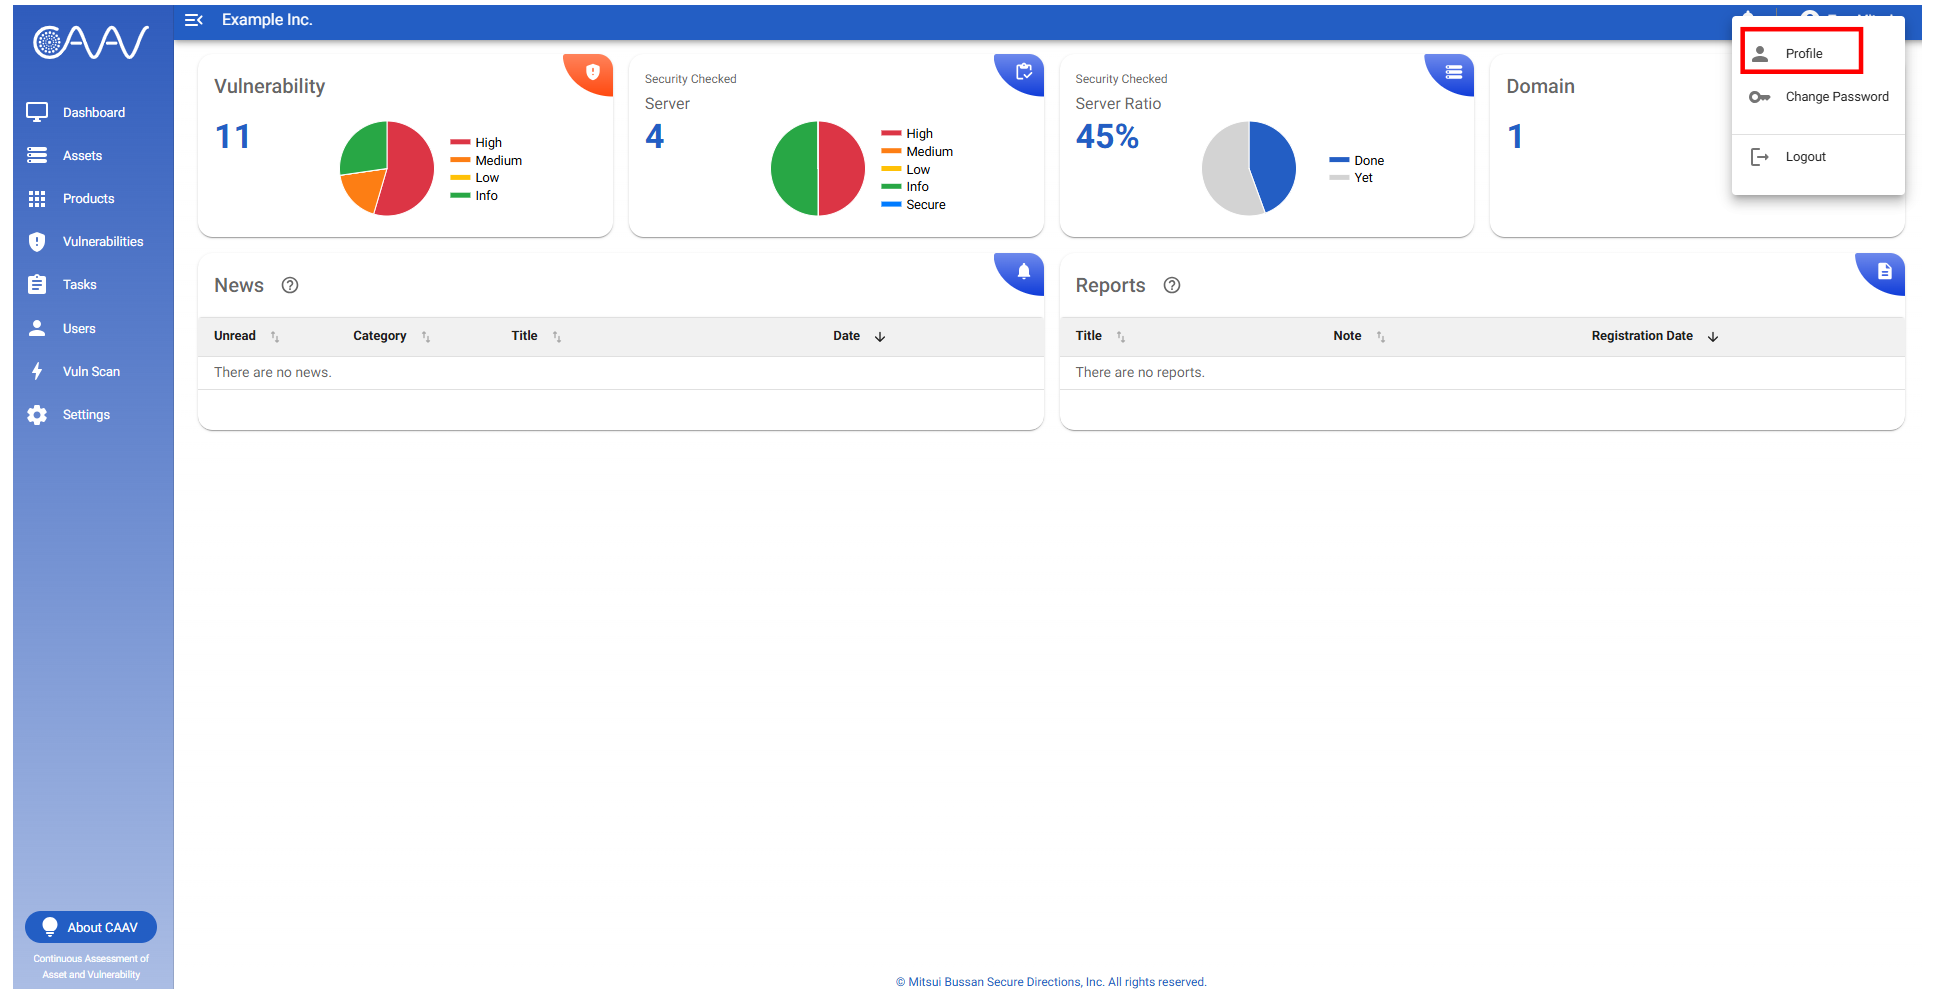
- To change your account name or preferred language, click "Profile" in the icon menu at the top right.
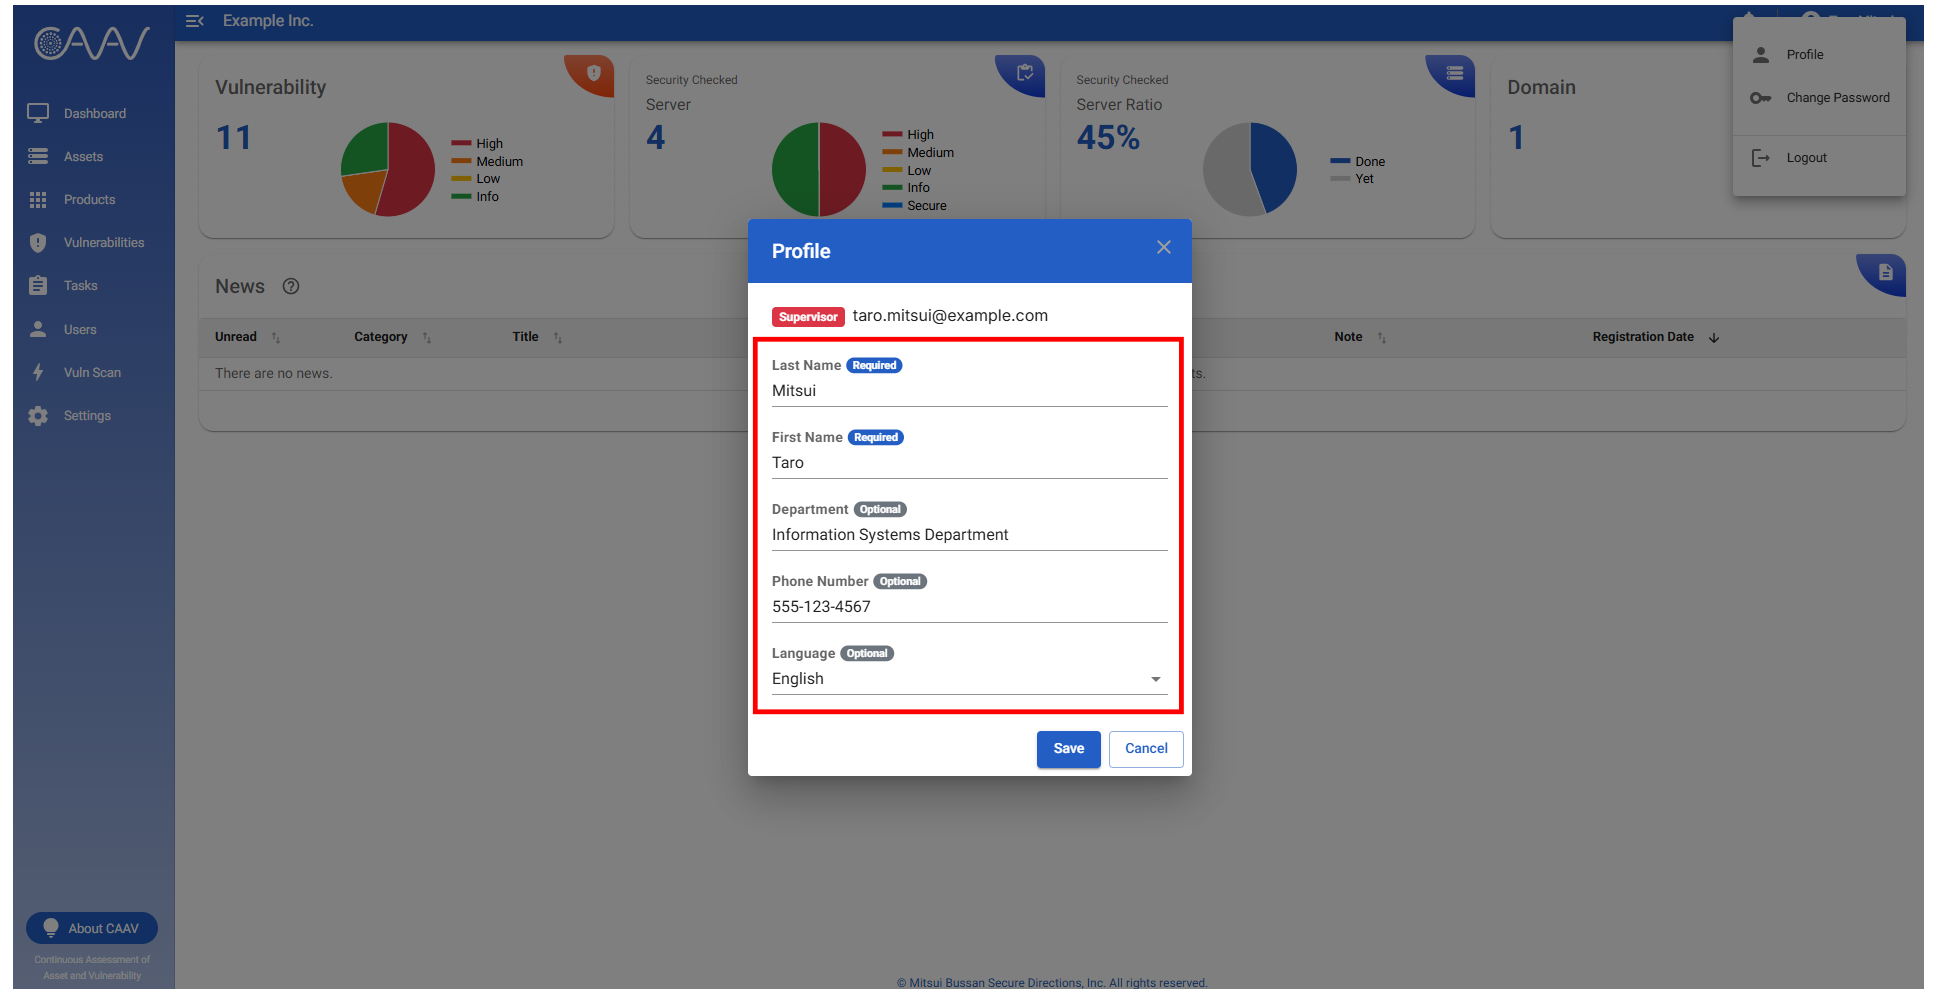
- Edit the sections requiring changes and click the "Save" button.
- Please note that the language is registered based on automatic detection during your first access. Should you require it, please change it on this screen.
Manage asset information (For administrators)
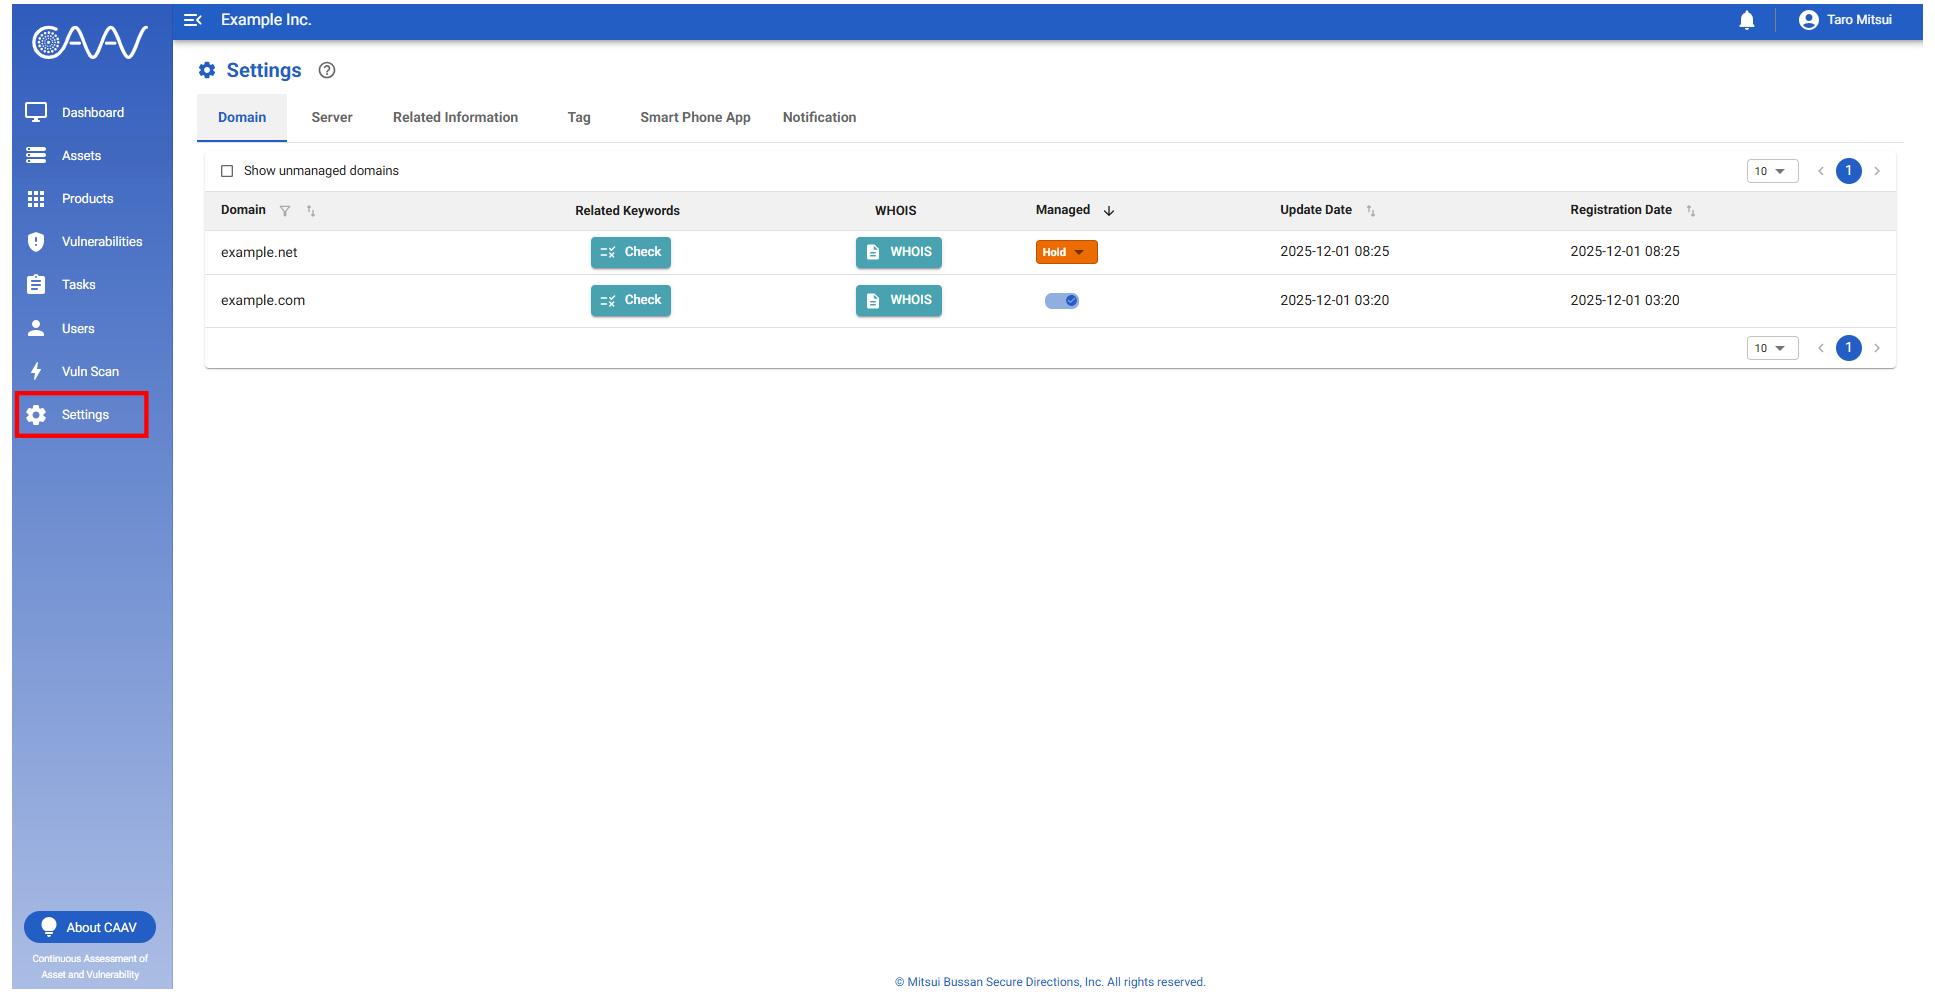
- Within the "Settings" menu, you can manage domains and servers detected by CAAV.
- If an icon "
 " is displayed in a column of the list, you can search for information by clicking the icon.
- If an icon "
 " is displayed in a column of the list, clicking the icon allows you to sort the data in ascending or descending order.
- This operation is the same for lists on other screens.
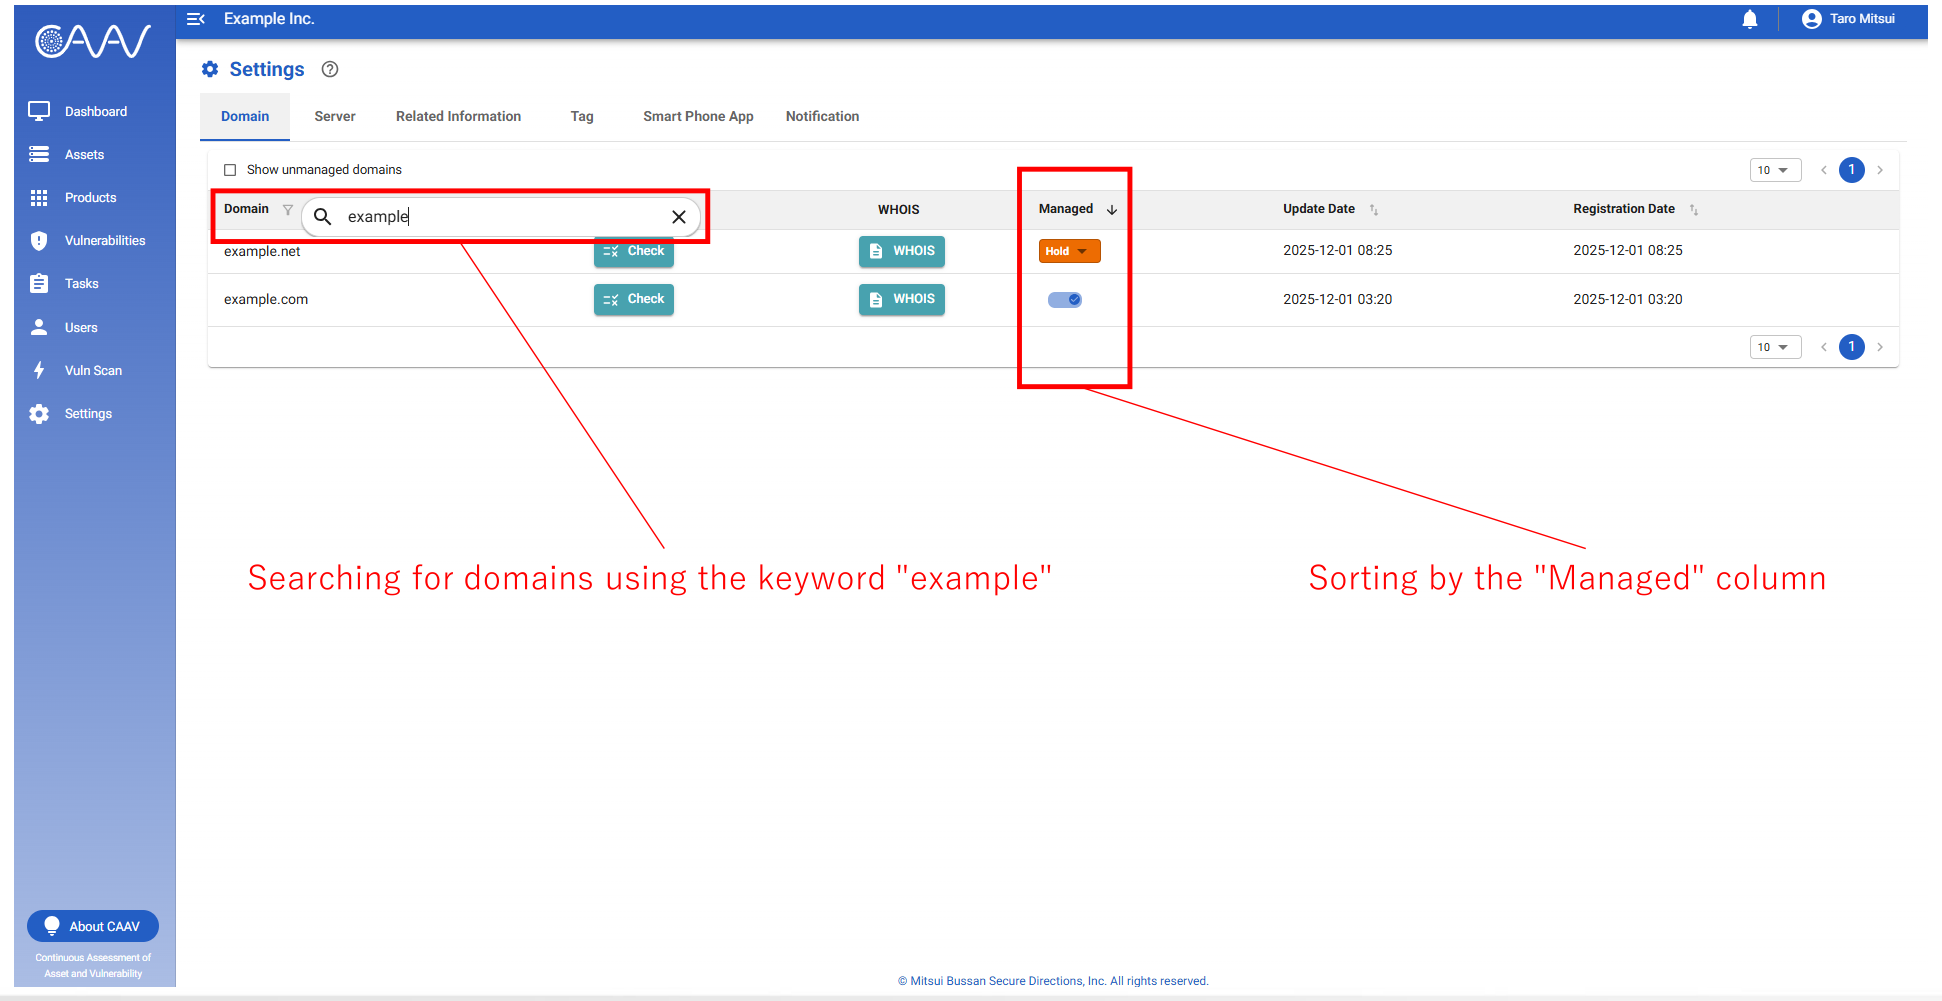
Domain management
-
In the "Domain" tab, you can view a list of domains detected by CAAV.
-
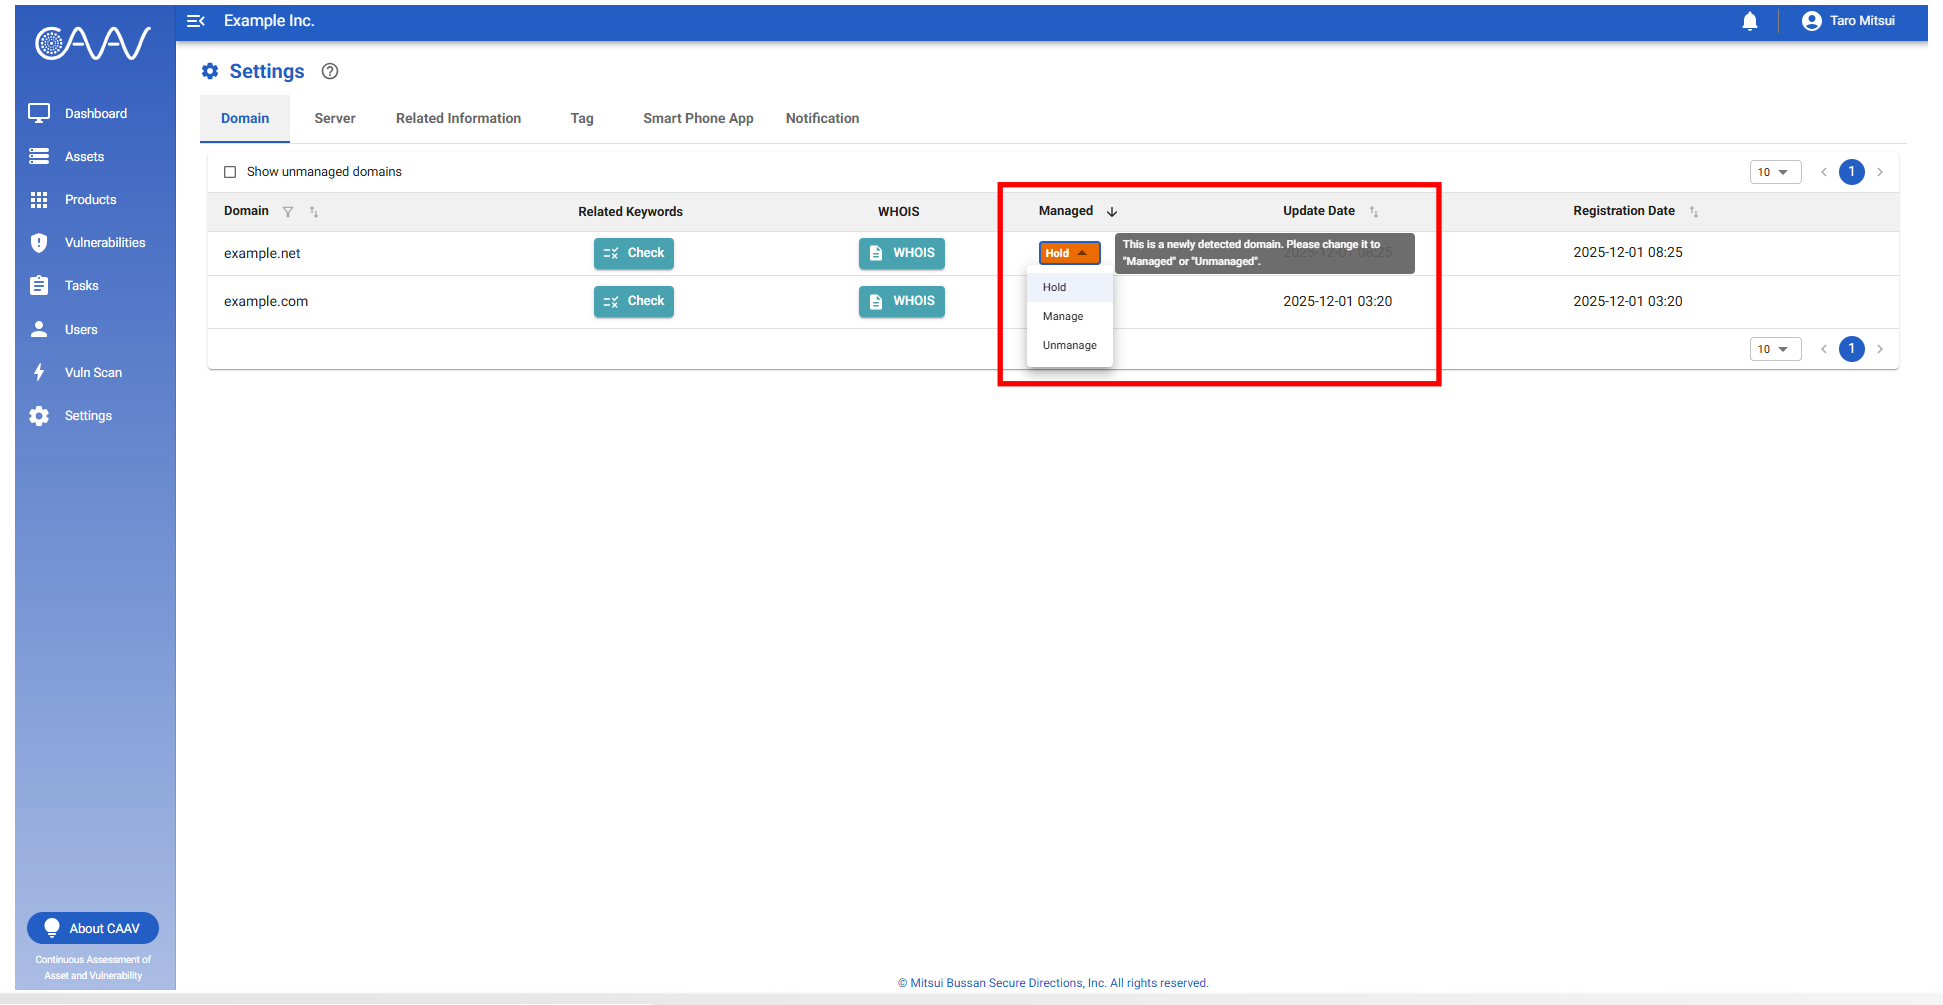
Newly discovered domains are displayed as "Hold". You can manage them as either Manage or Unmanage via the Hold button.
-
Once added to management, CAAV will be able to perform server discovery and security checks originating from the domain.
Note that domains removed from management can be re-added via the same button.
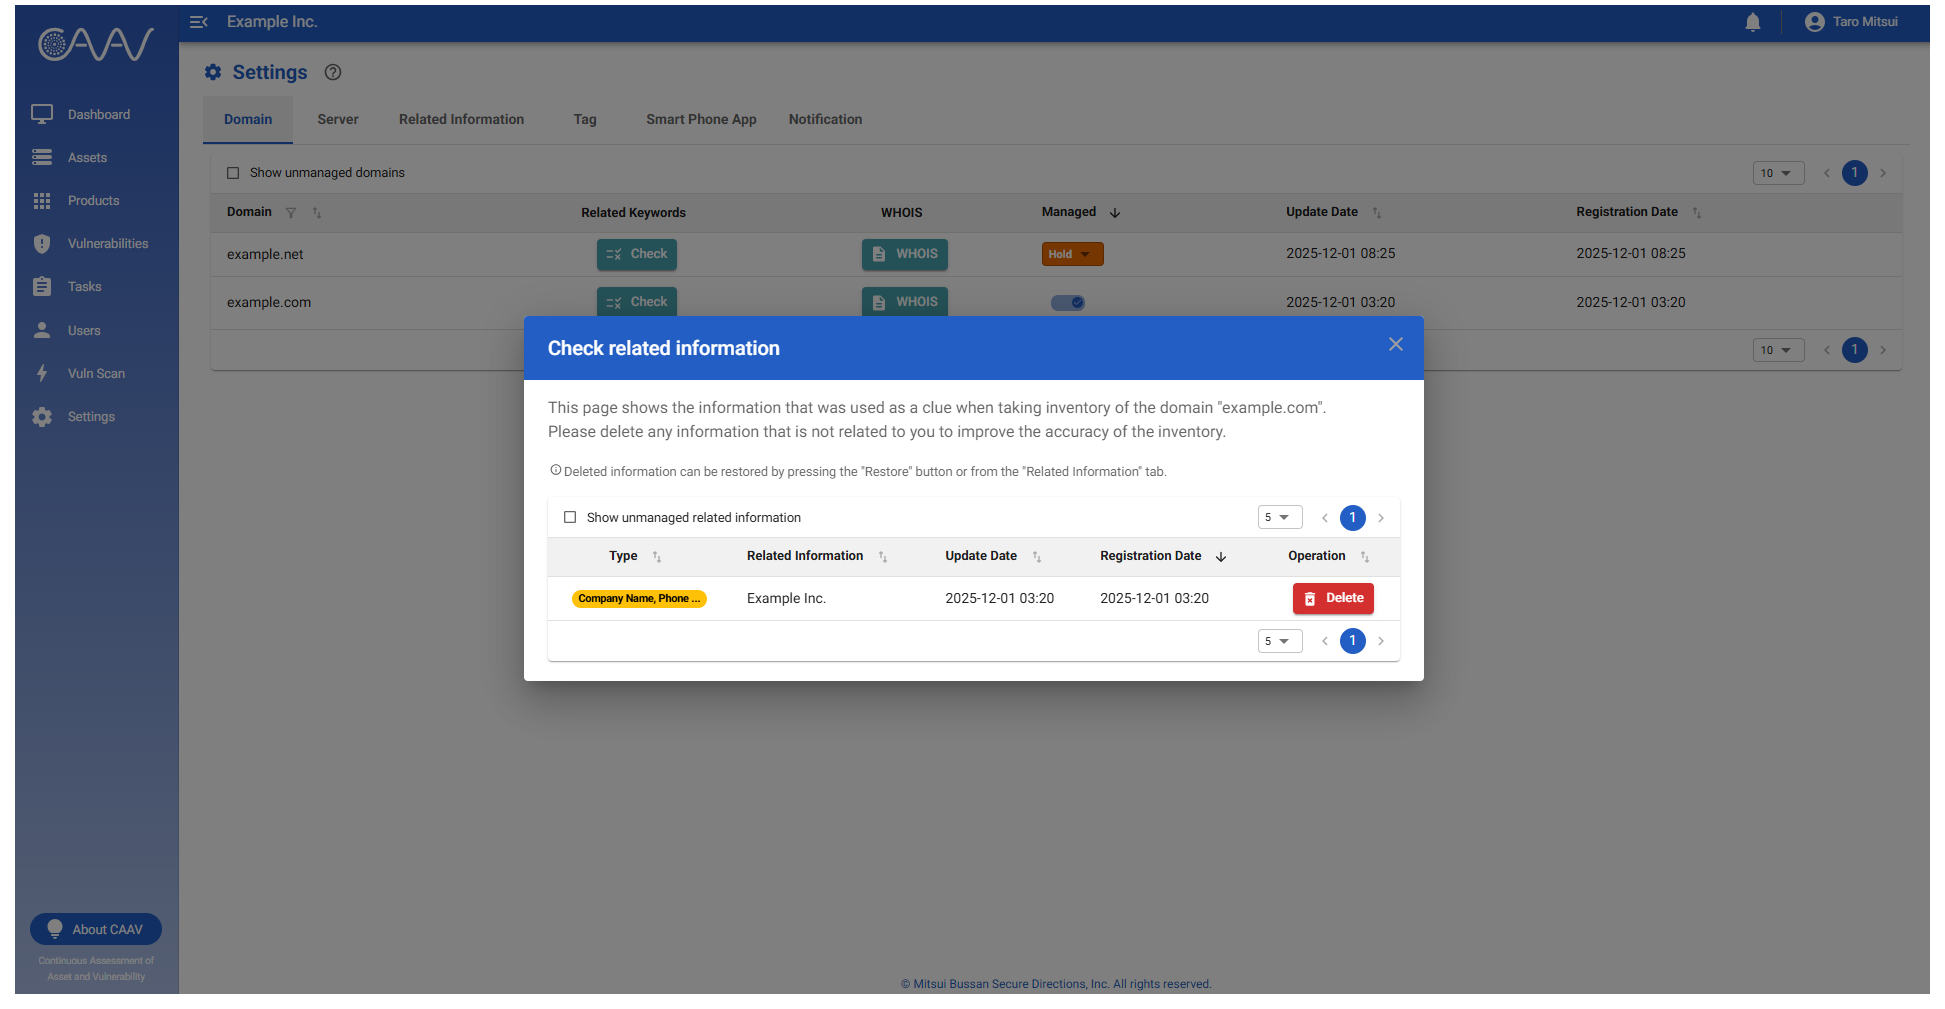
Domain-related information management
-
Clicking the "Check" button will display a list of the relevant information used when the domain was discovered.
-
If information unrelated to your company is displayed, removing it will improve inventory accuracy.
Note that reviewing related information can also be performed via the "Related Information" tab.
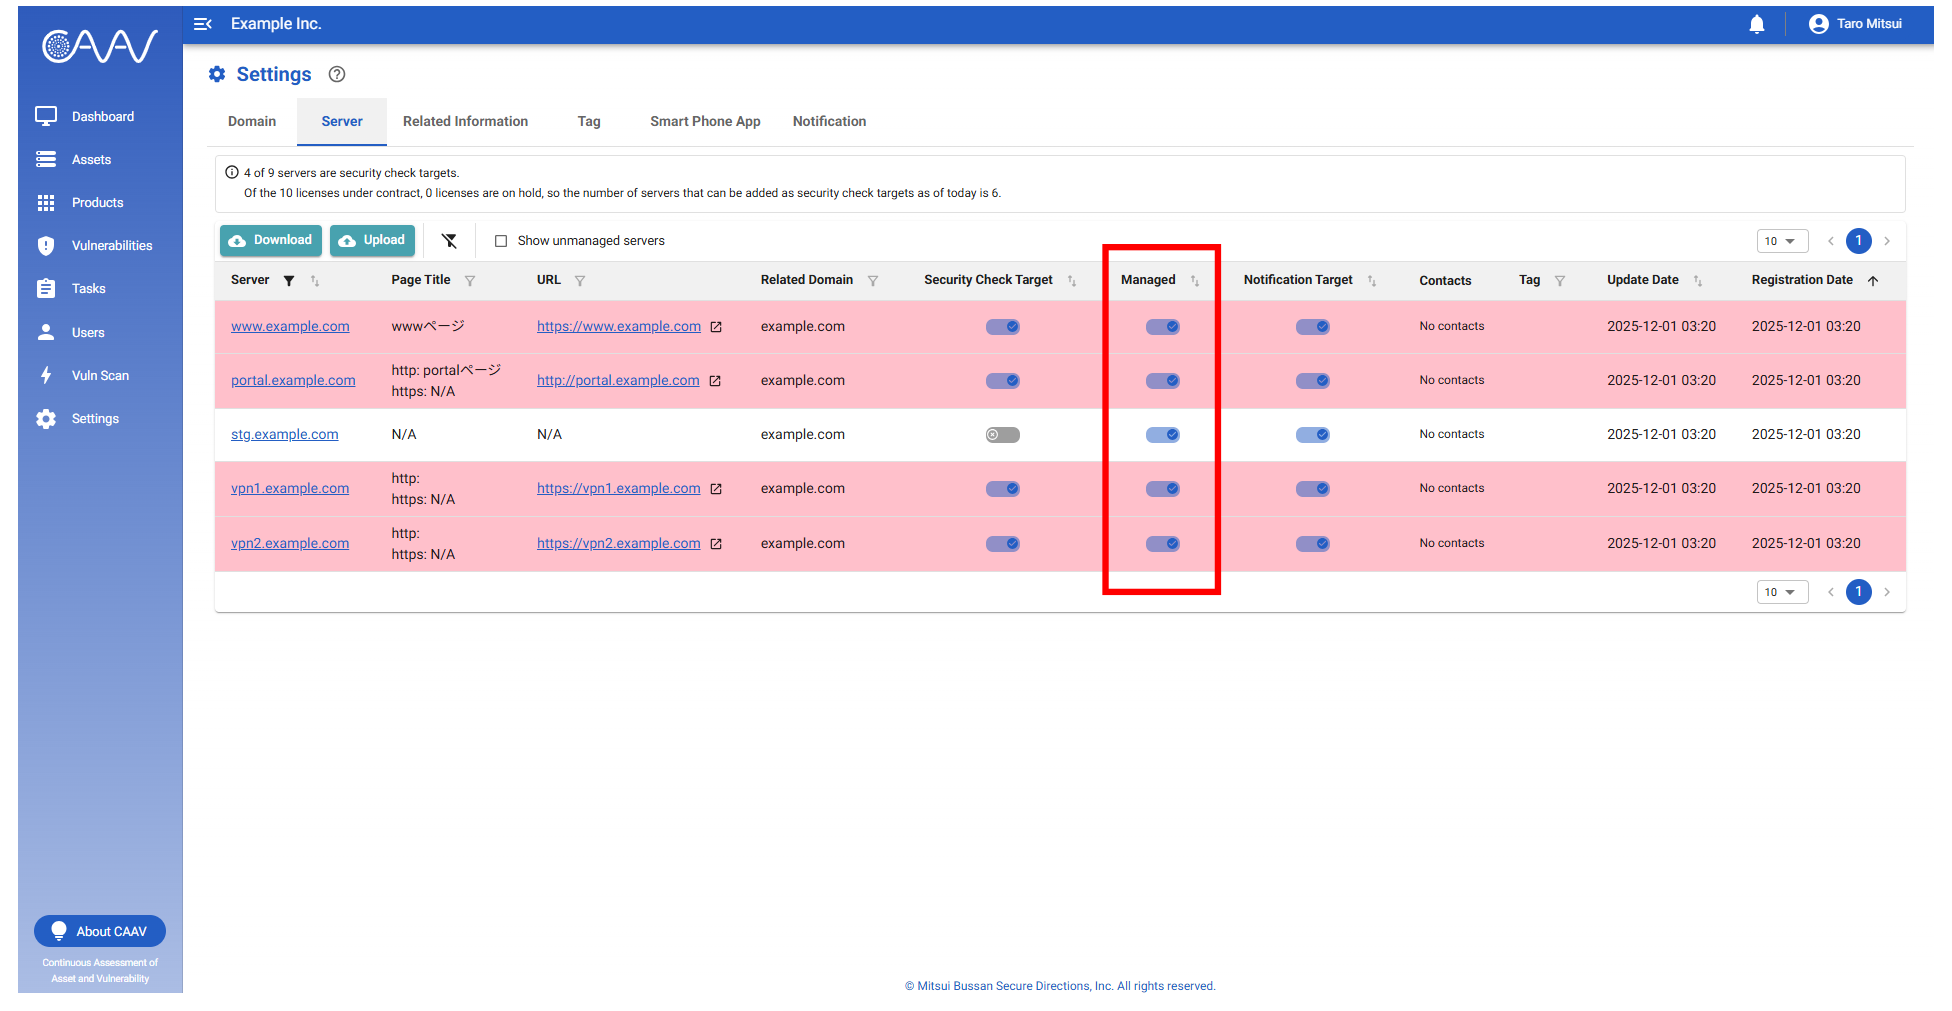
Server management
-
In the "Server" tab, you can view a list of servers (FQDN/network) detected by CAAV.
-
Servers you wish to exclude from management can be removed from the managed list by toggling the "Managed" switch.
Once excluded, these servers can be reinstated into the managed list via the same switch.
-
Should any servers not appear in the list, please register them by following the instructions in "Register servers (For administrators)".
Select security check targets (For administrators)
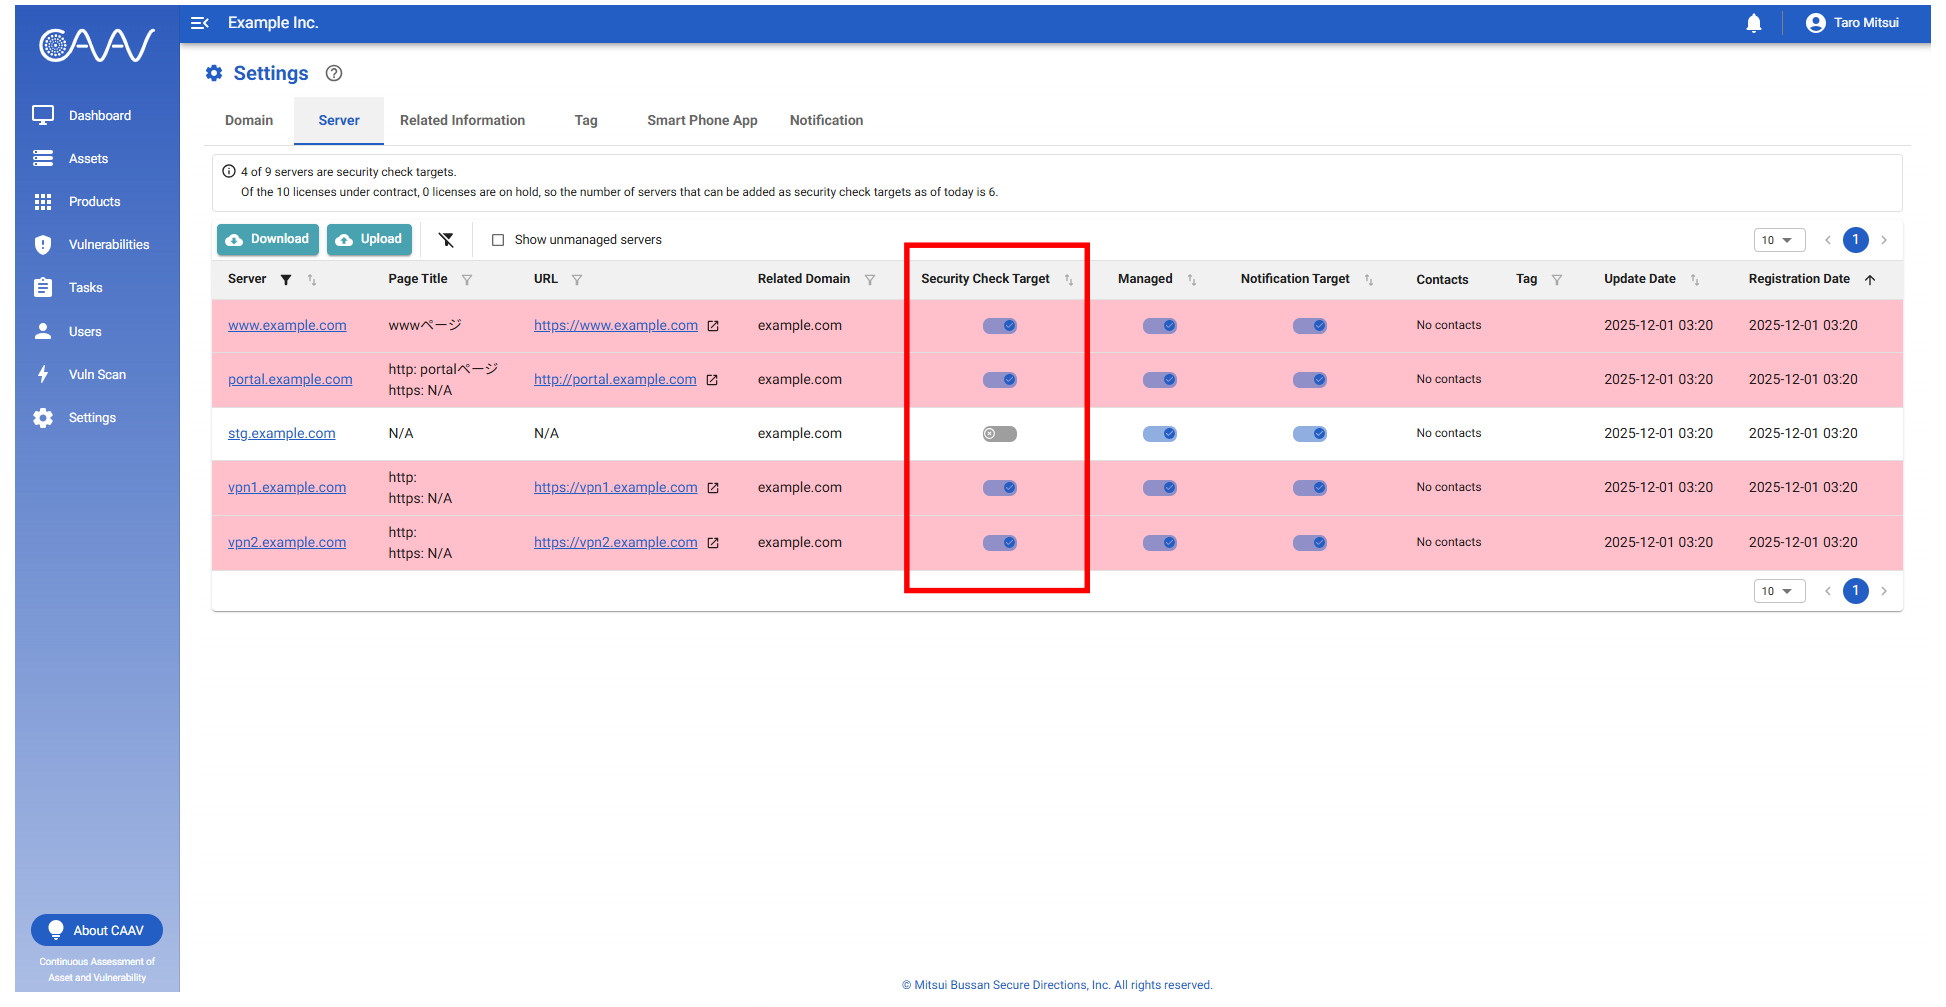
-
Select the server to be subjected to security checks from the list.
-
The number of servers that can be subjected to security checks varies depending on the number of licenses in your contract.
Should the number of servers requiring security checks exceed the license count, please contact us (see "Contact").
-
Changes to the security check targets are permissible within the license count.
Please note, however, that once a license has been released, it cannot be reassigned for a period of three days.
Bulk update security check targets (For administrators)
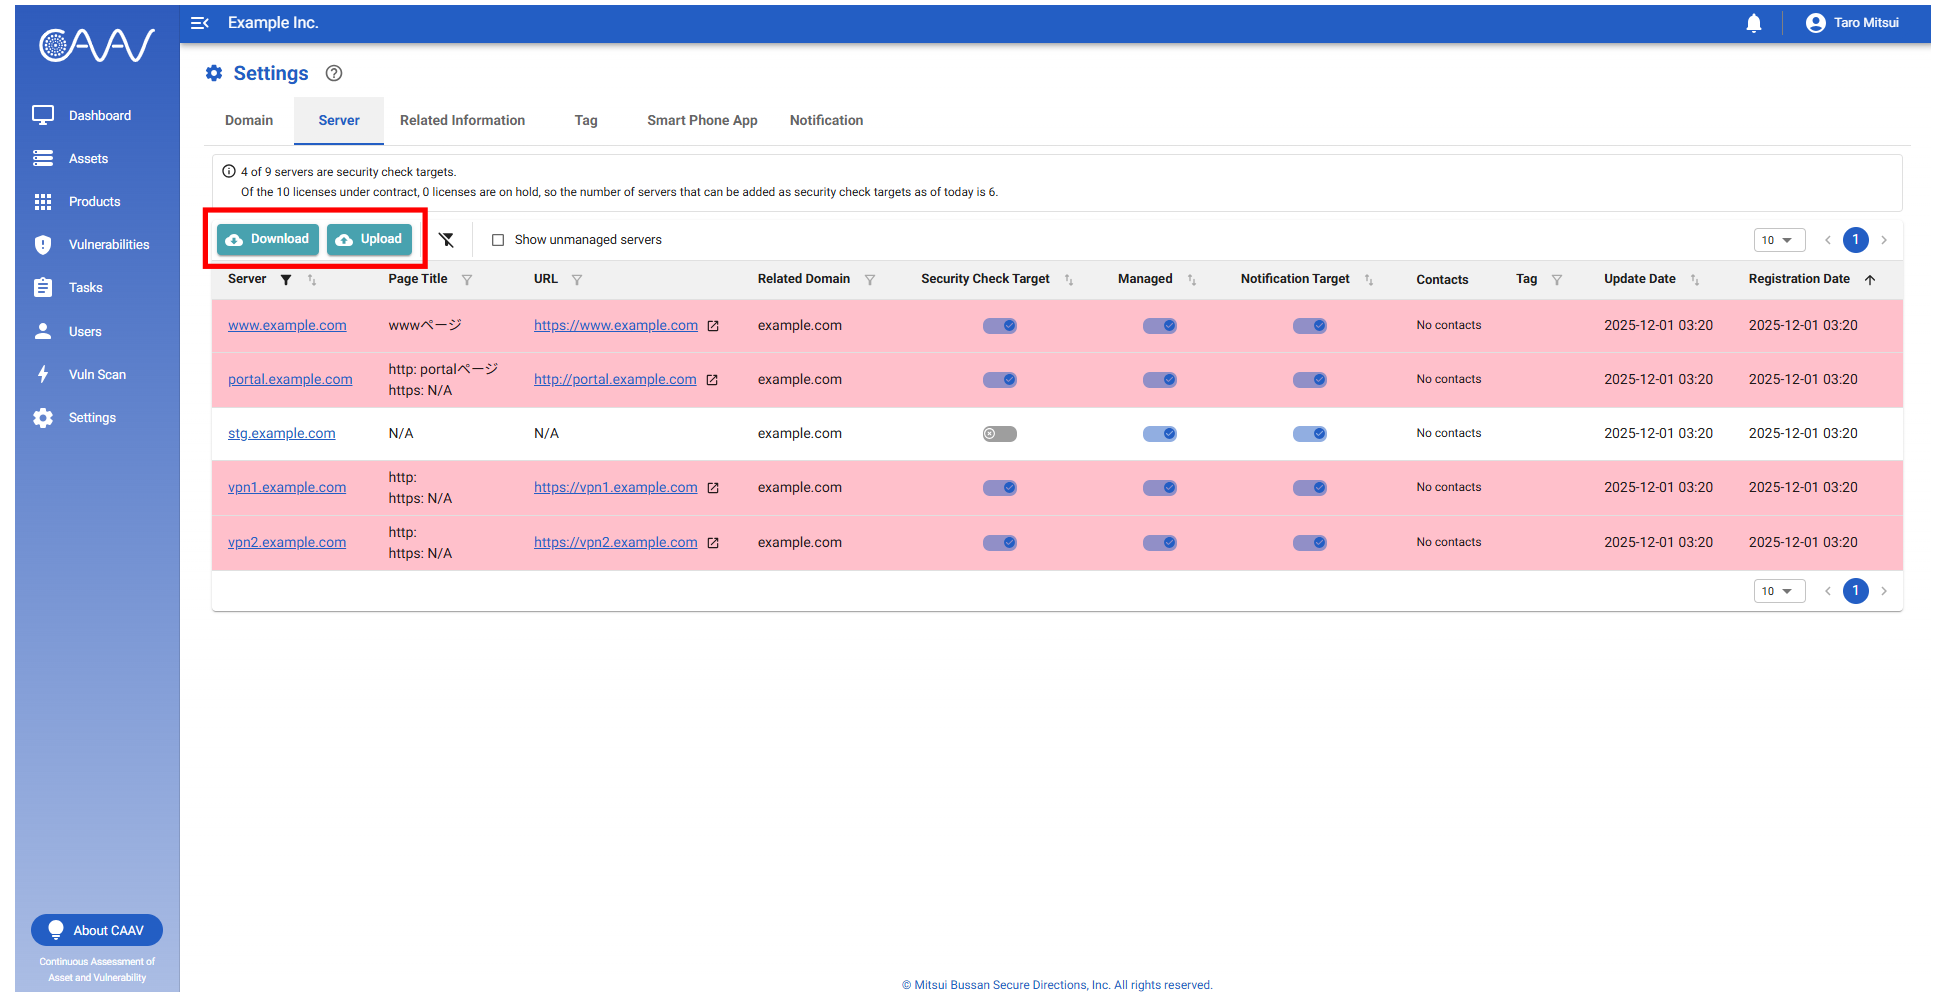
- You can update the list of servers subject to management and security checks in bulk.
- Clicking the "Download" button will allow you to download the bulk update CSV file.
- Click the "Upload" button and upload the edited bulk update CSV file to update managed items, security check targets, and other items in bulk.
- The downloaded CSV file contains both "Security Check Target" and "Managed" columns.
- The value in the "Security Check Target" column indicates either "0"(not target) or "1"(target).
- The value in the "Managed" column indicates either "0"(unmanaged) or "1"(managed).
- To change the settings, update the values in each column to either "0" or "1".
- Please note that servers not under management cannot be included in security checks. Furthermore, servers included in security checks cannot be excluded from management.
- When setting the "Security Check Target" to "1", the "Managed" must also be set to "1".
- When setting the "Managed" to "0", ensure the "Security Check Target" is also set to "0".

- By entering the email address (login ID) of a CAAV-registered user in the "Contact E-mail Address" column of the same CSV file, you can assign that user to the server corresponding to the relevant row.
- To assign multiple users, enter multiple email addresses separated by line breaks.

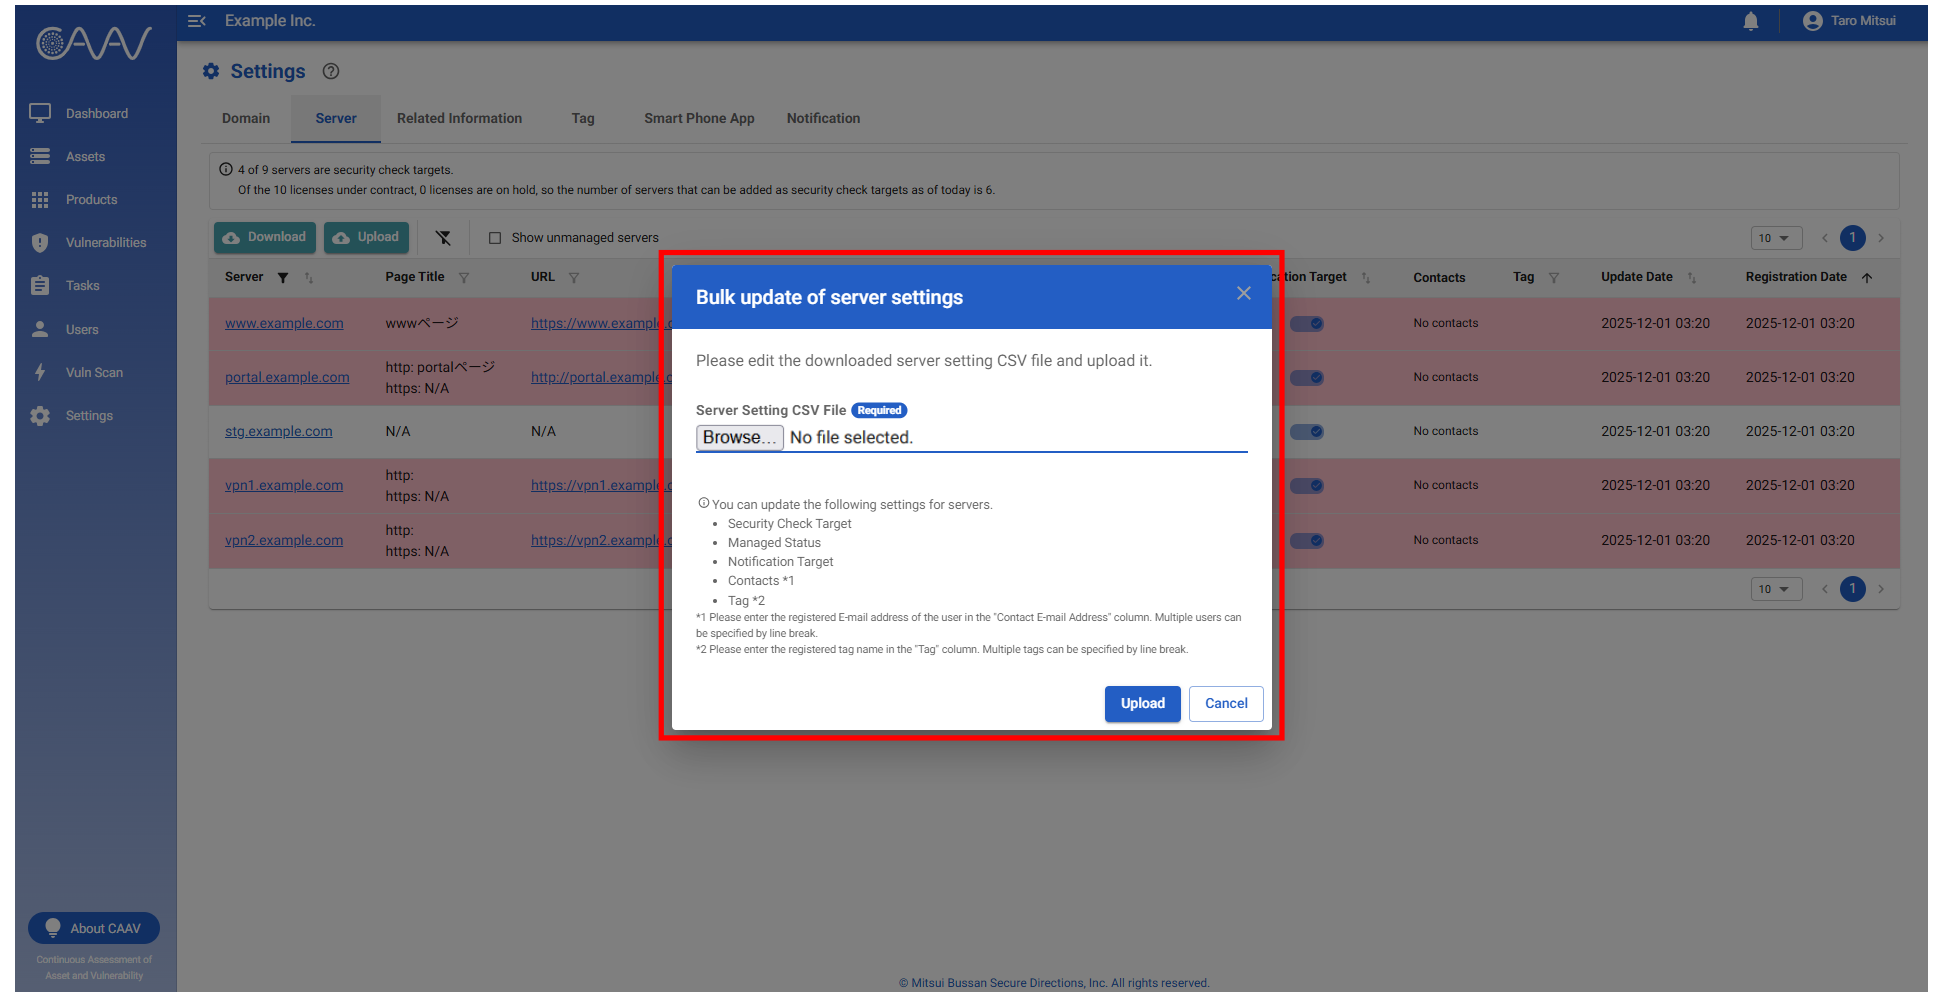
- Clicking the "Upload" button will display a menu.
- You can bulk update server settings by uploading a CSV file edited from this menu.
- Please note that once a license has been released, it cannot be reassigned for a period of three days.
Register servers (For administrators)
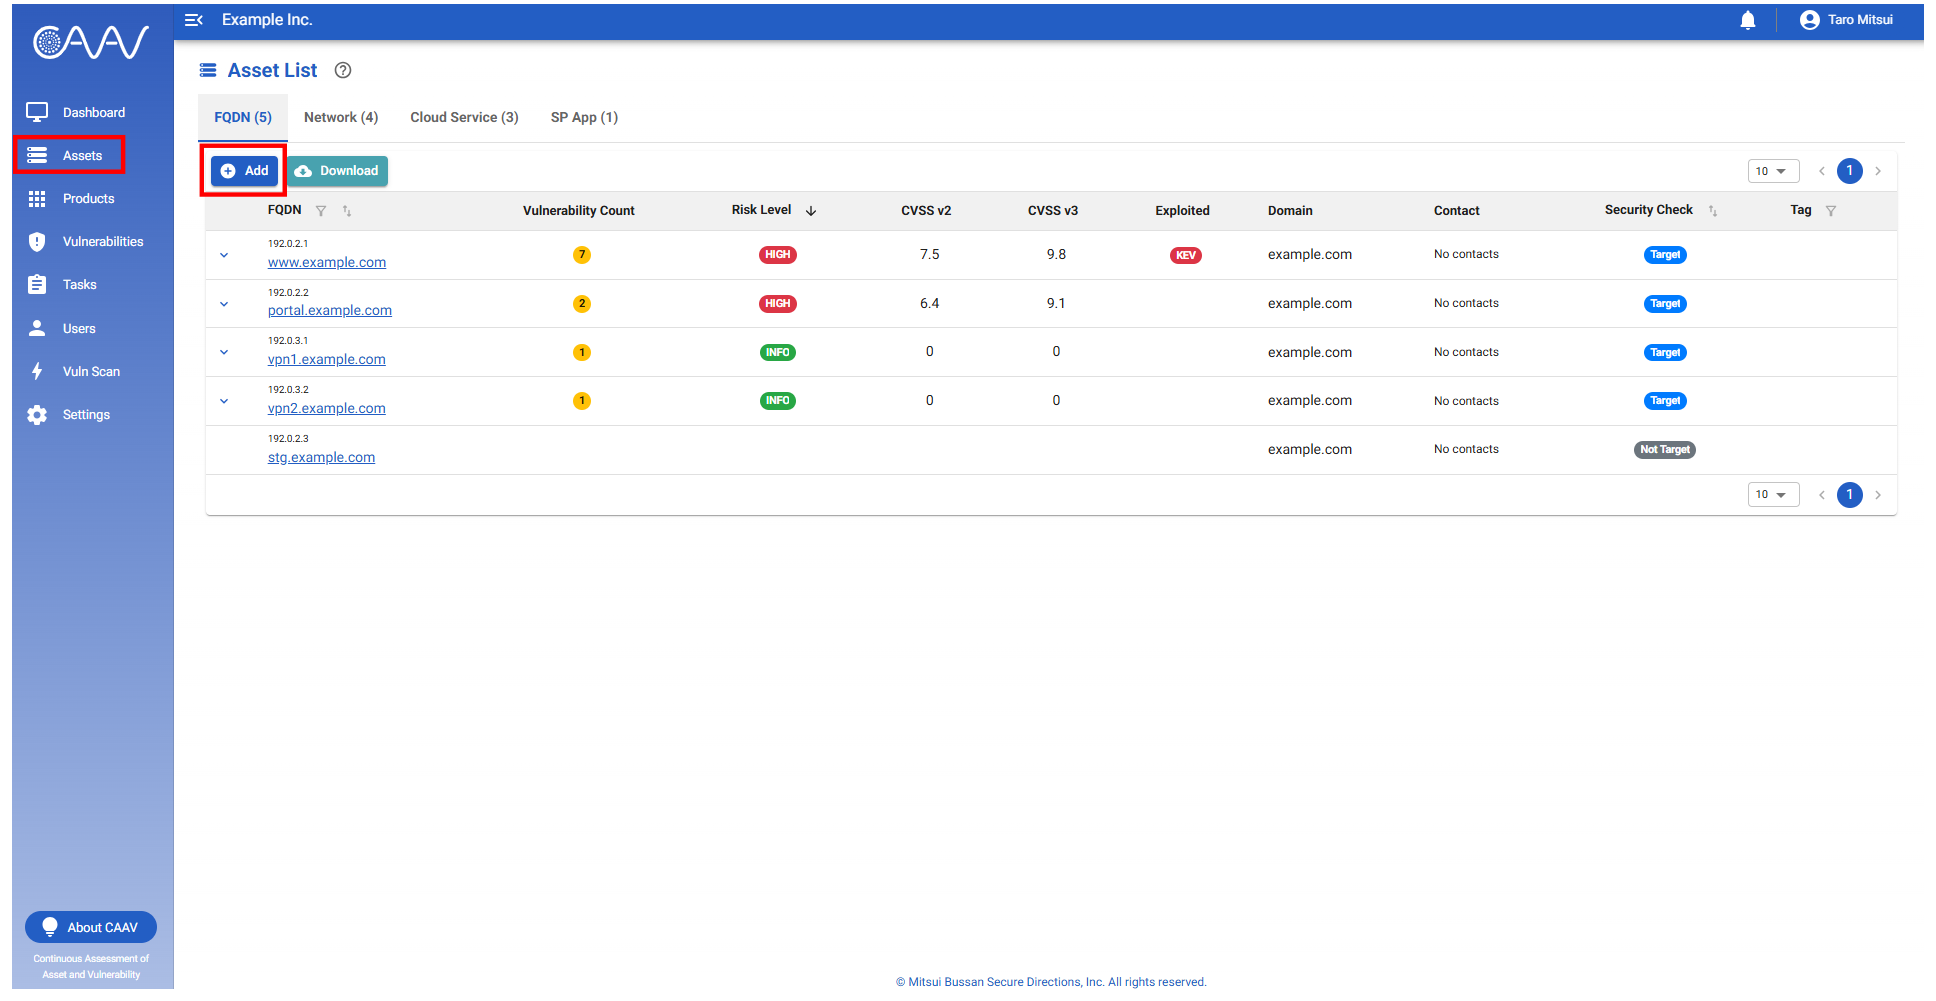
- Should you wish to add a server yourself, you may do so via the "Add" button under the "Assets" menu.
Invite users (For administrators)
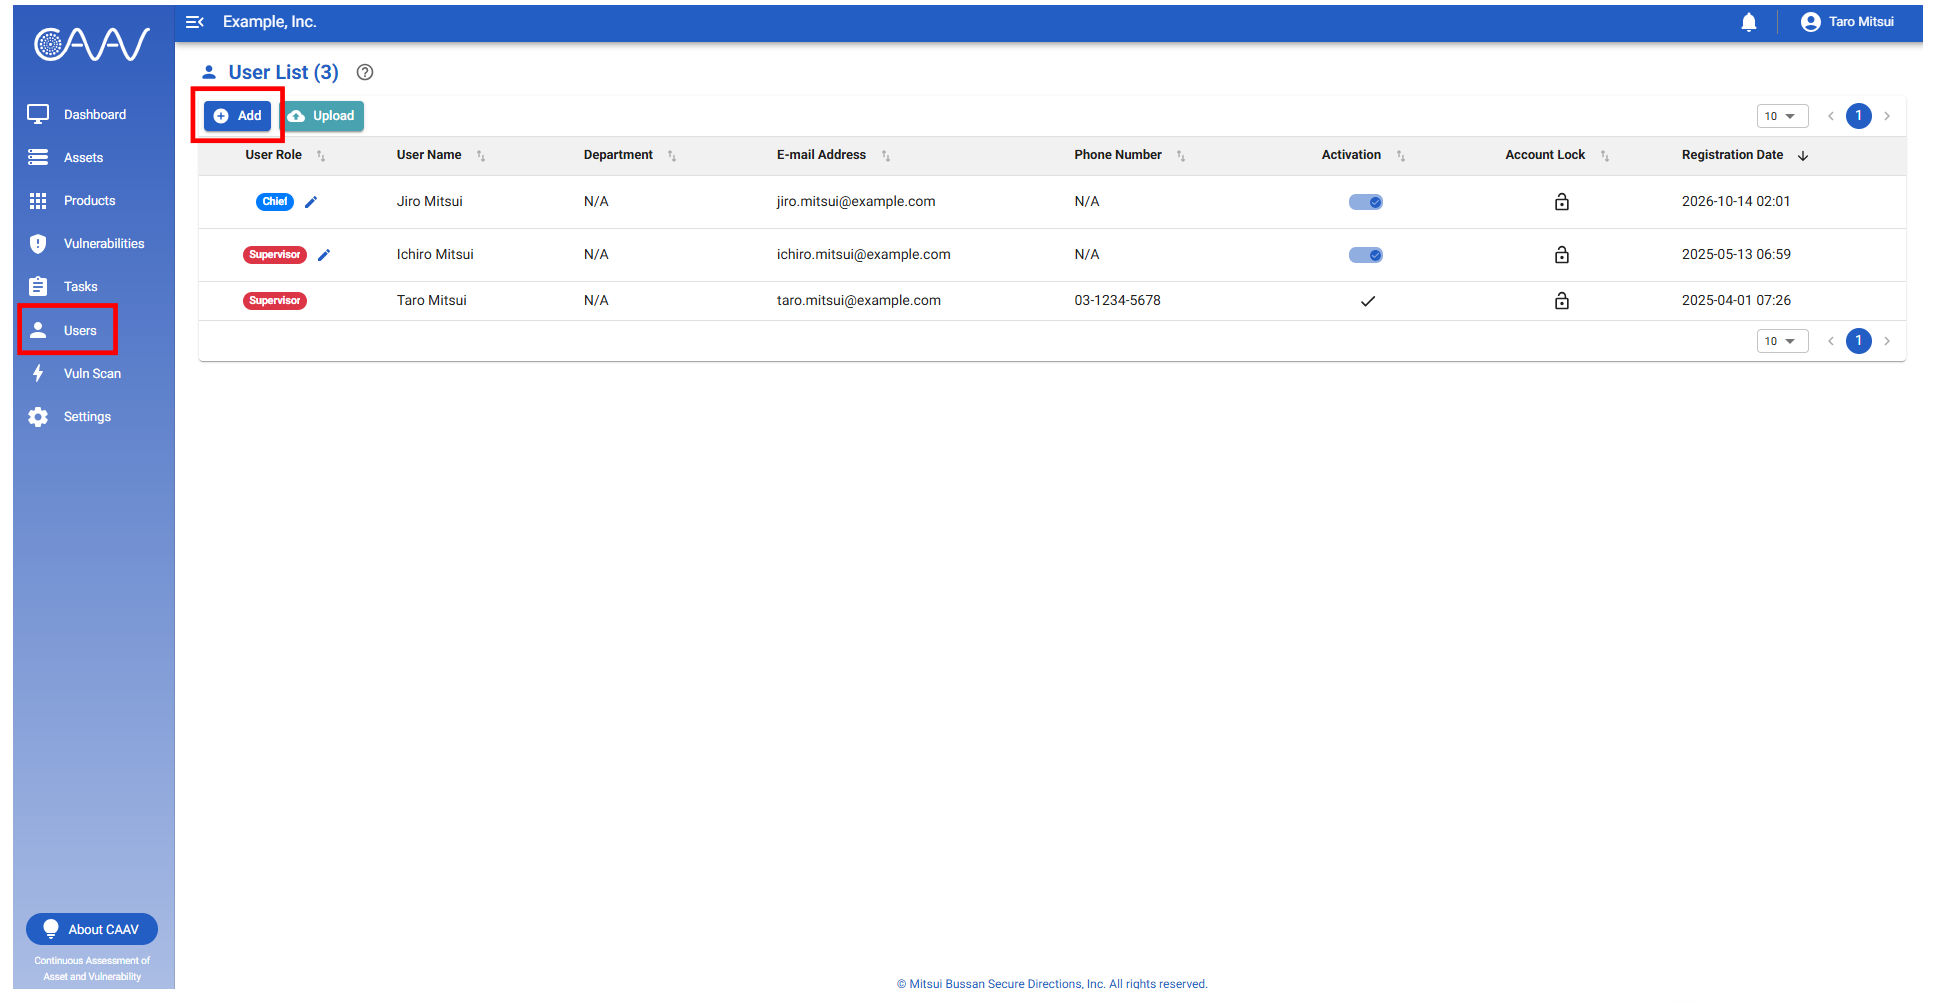
- In the "Users" menu, you can view users registered with CAAV.
- Users with "Supervisor" privileges may add other users' accounts via the "Add" button.
Bulk Invite users (For administrators)
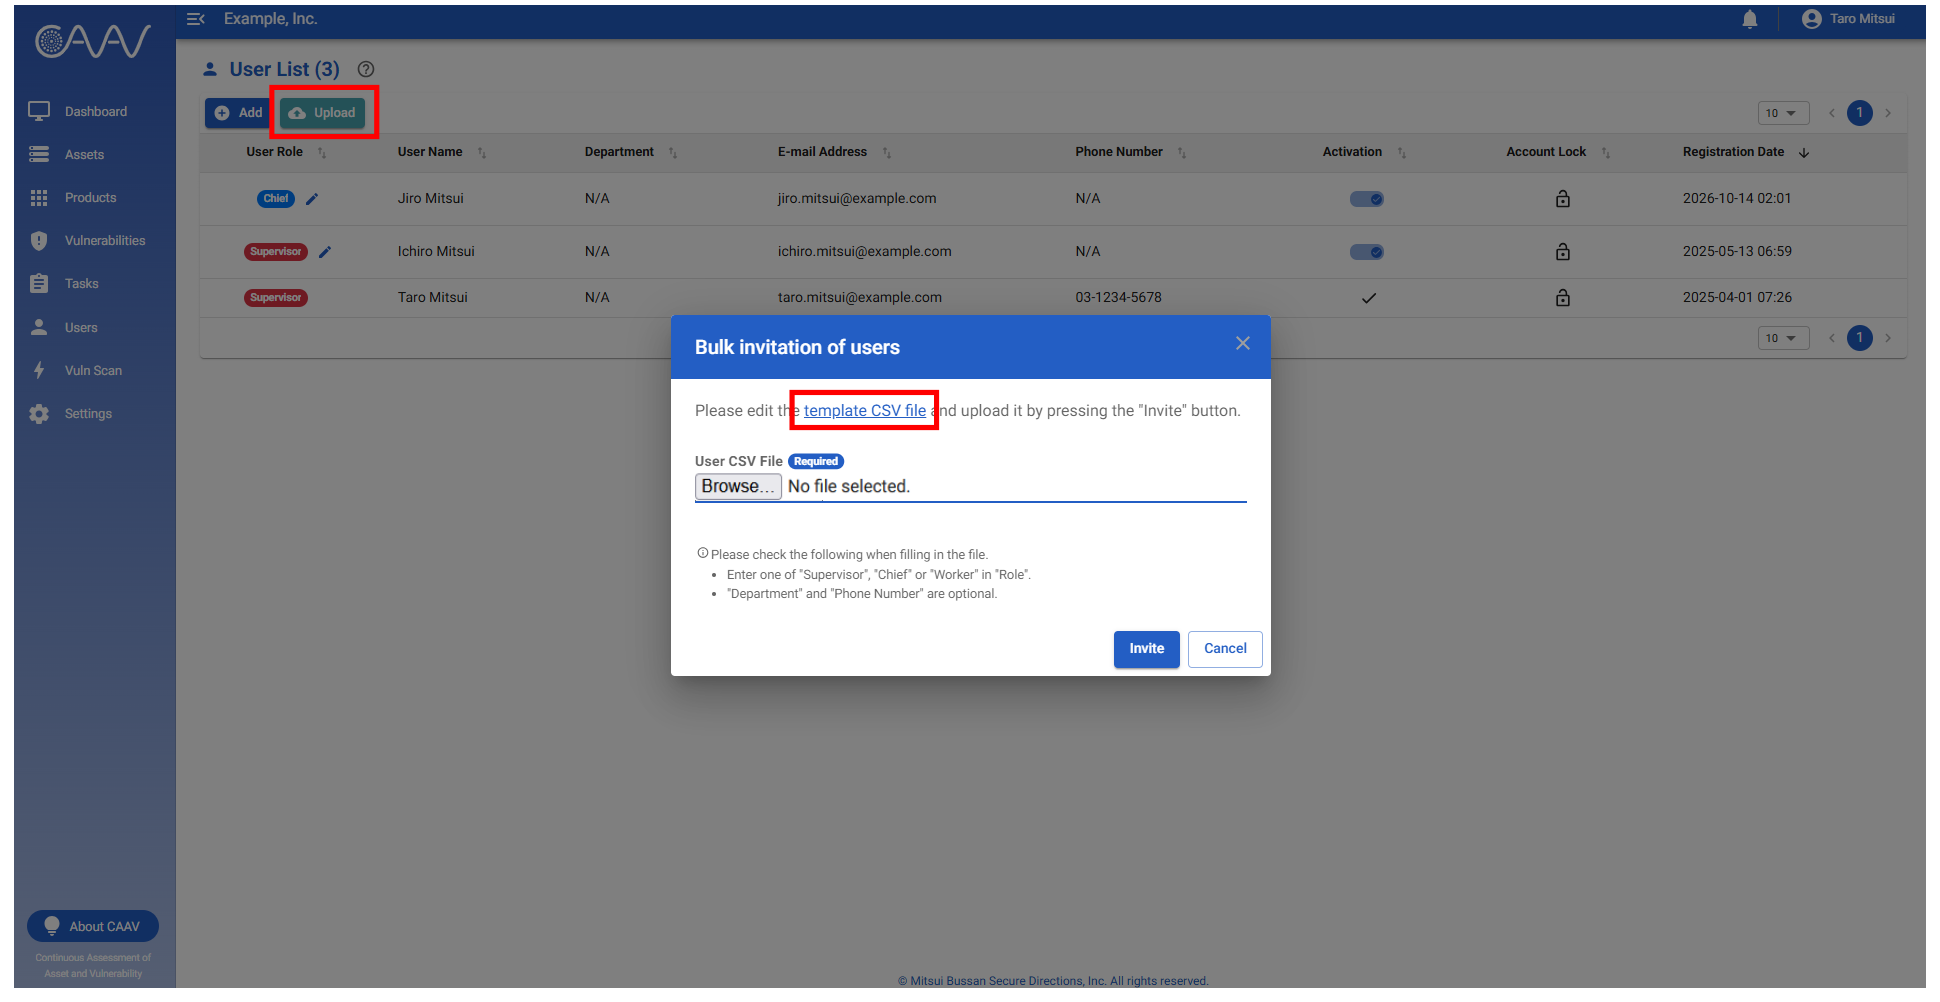
- Users with "Supervisor" privileges can add multiple user accounts in bulk via the "Upload" button.
- Bulk invitations are made by uploading a CSV file in the dedicated format to CAAV.
- Clicking the "Upload" button will display a menu; click the link for "template CSV file" to download the CSV file.
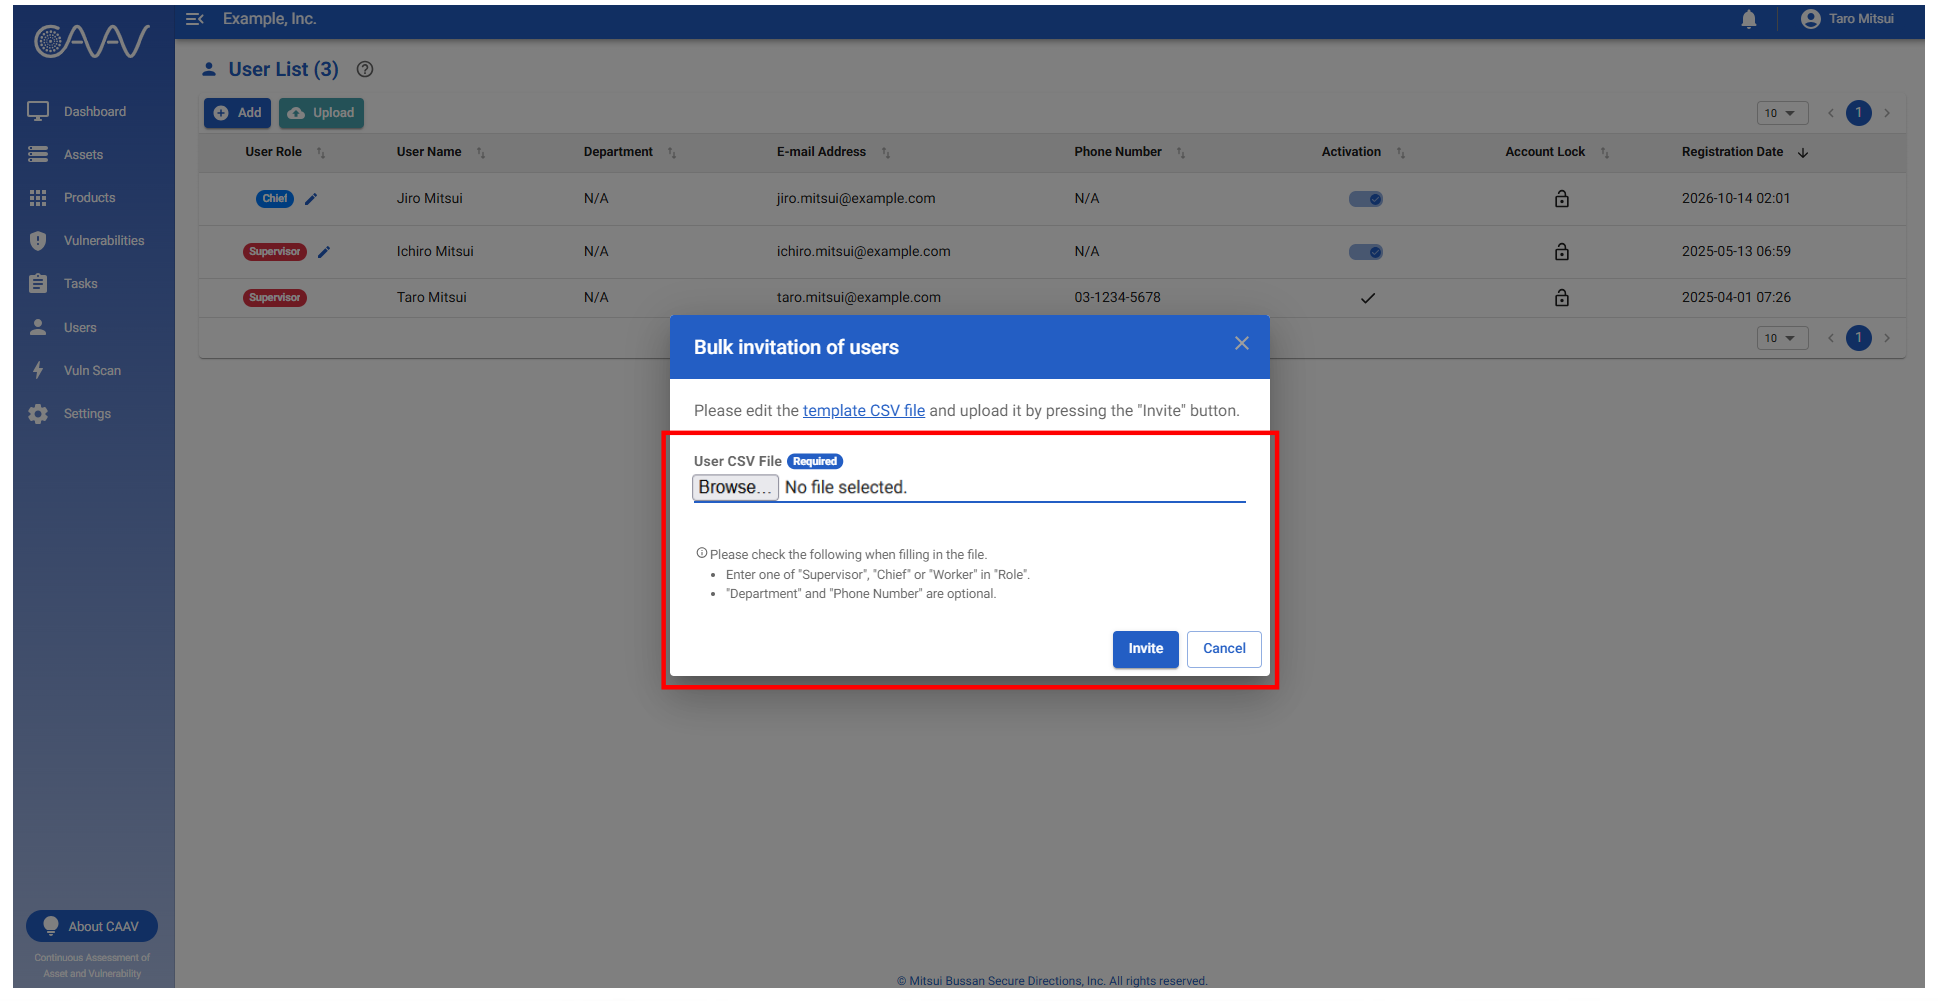
- The downloaded CSV file is a template file for inviting multiple users at once.
- In the "Role" column, please enter one of "Supervisor", "Chief" or "Worker".
- In the "Email Address" column, please enter the email address (login ID) of the user.
- In the "Password" column, please enter the initial password for the user.
- In the "First Name" and "Last Name" columns, please enter the first name and last name of the user.
- "Department" and "Phone Number" are optional fields. Please enter them as required.

- Select the edited CSV file from "Browse" and click the "Invite" button to invite users in bulk.
Configure email notification conditions (For administrators)
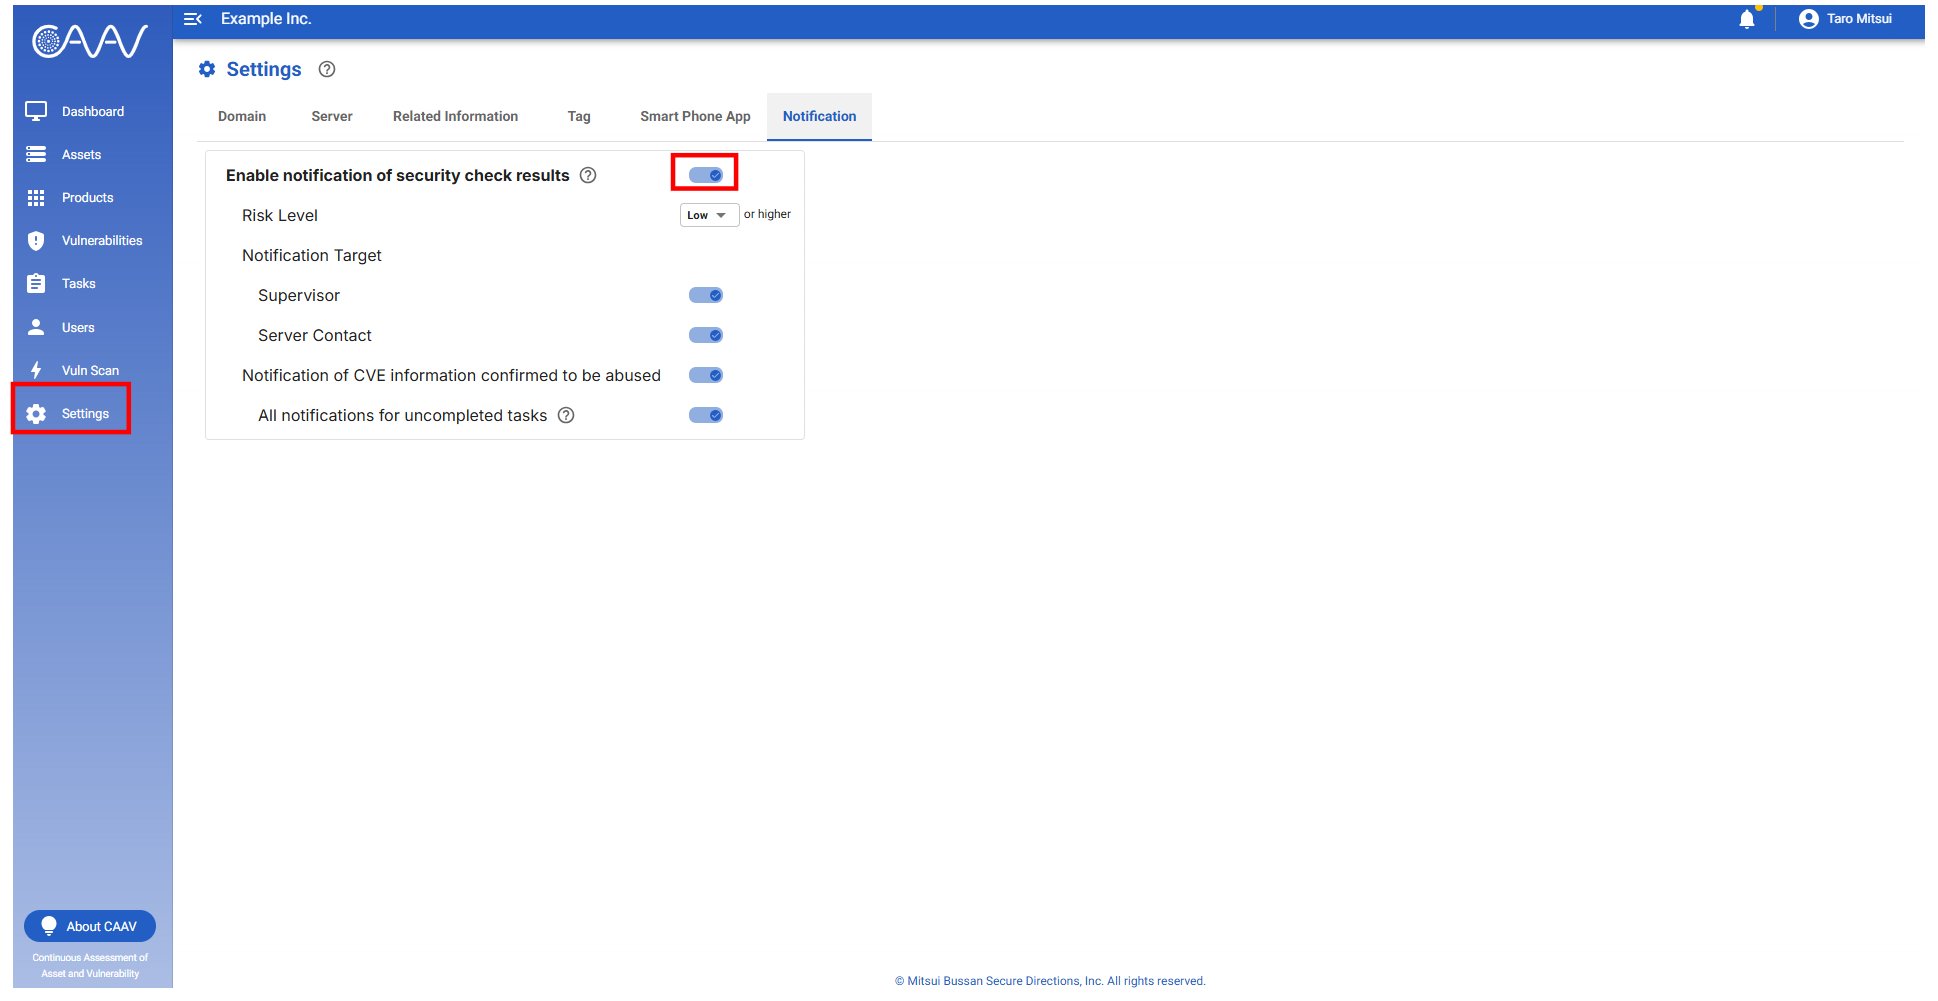
- Users with "Supervisor" privileges may configure email notification conditions for security check results via the "Notification" tab within "Settings" menu. Using this feature enables you to configure email notification conditions in detail, including whether notifications are sent, whether notifications are sent per user or per server, and notification settings based on the severity of vulnerabilities.
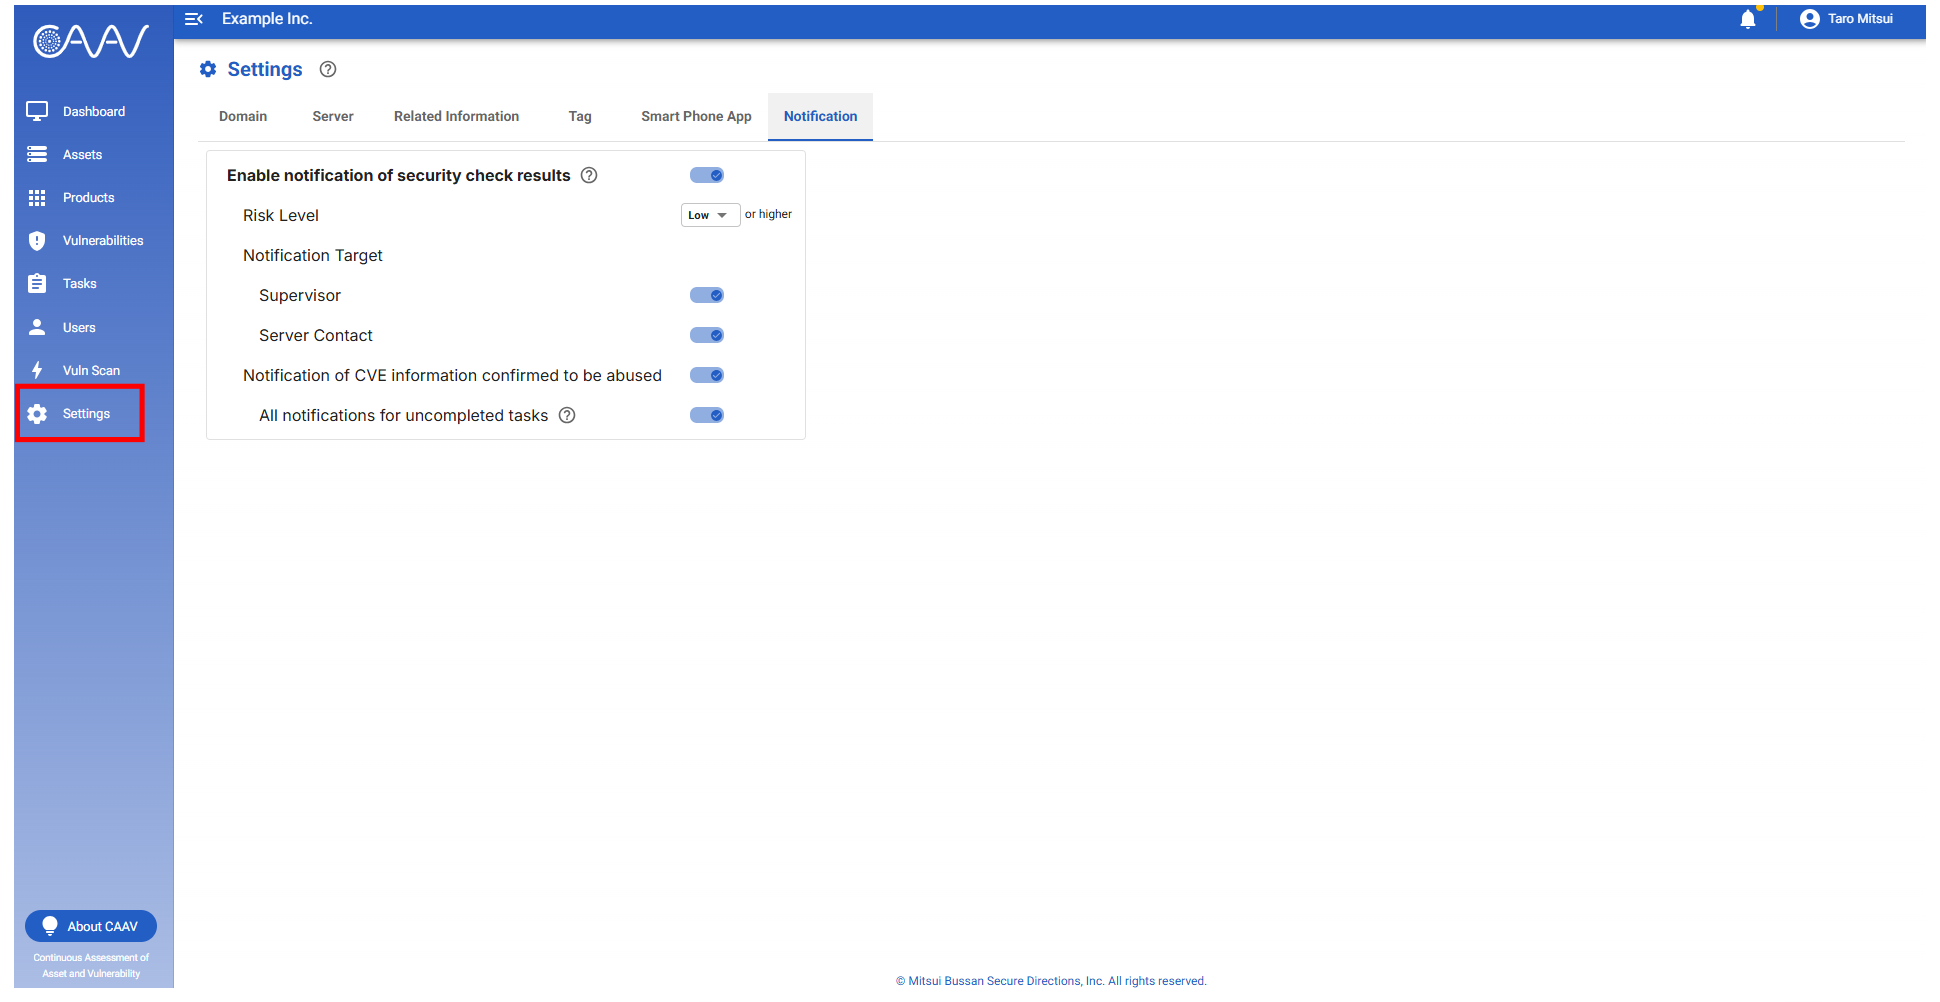
- When "Enable notification of security check results" is enabled, security check results will be notified via email.
- Please note that if disabled, the switch will appear greyed out and no security check results will be notified via email.
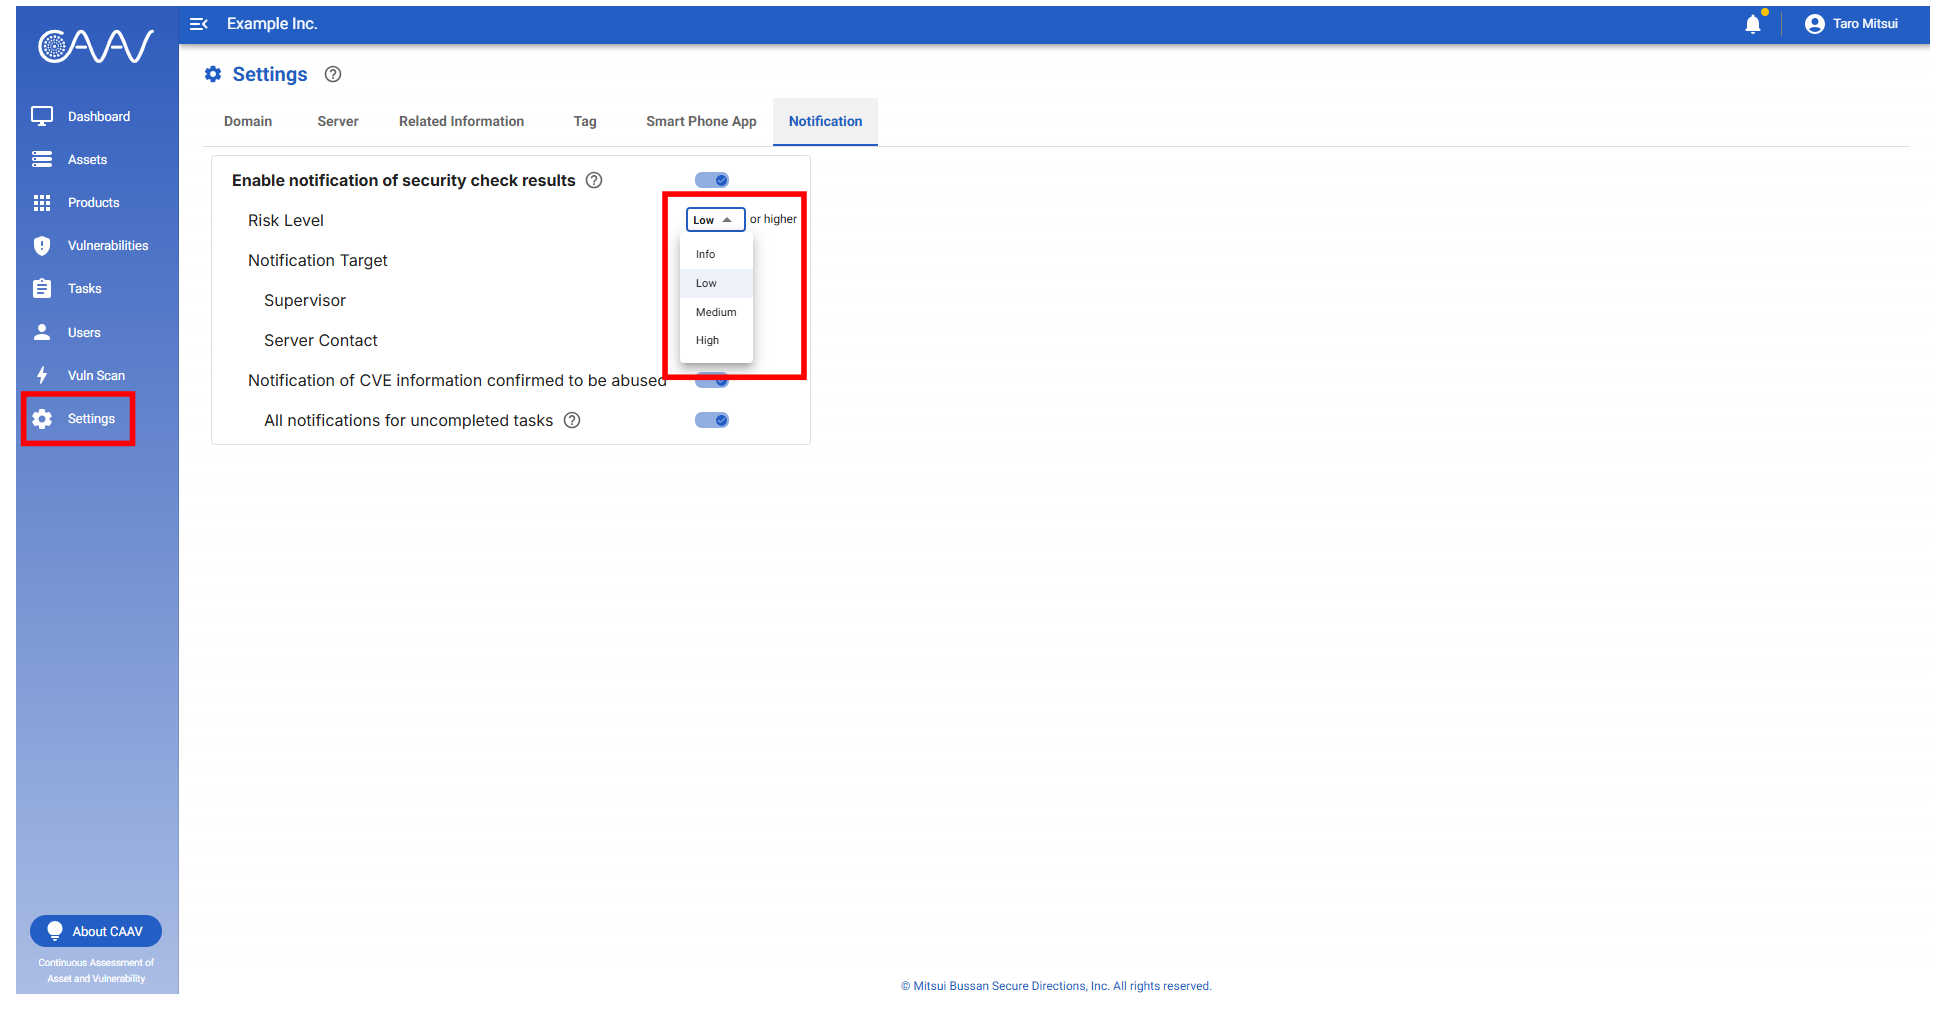
- From the "Risk Level" dropdown menu, you can configure email notification conditions according to the risk level of detected vulnerabilities.
- Info or higher: Vulnerabilities with risk levels "Info", "Low", "Medium" and "High" will be notified via email.
- Low or higher: Vulnerabilities with risk levels of "Low", "Medium" and "High" will be notified via email.
- Medium or higher: Vulnerabilities with risk levels of "Medium" and "High" will be notified via email.
- High: Only vulnerabilities with a risk level of "High" will be notified via email.
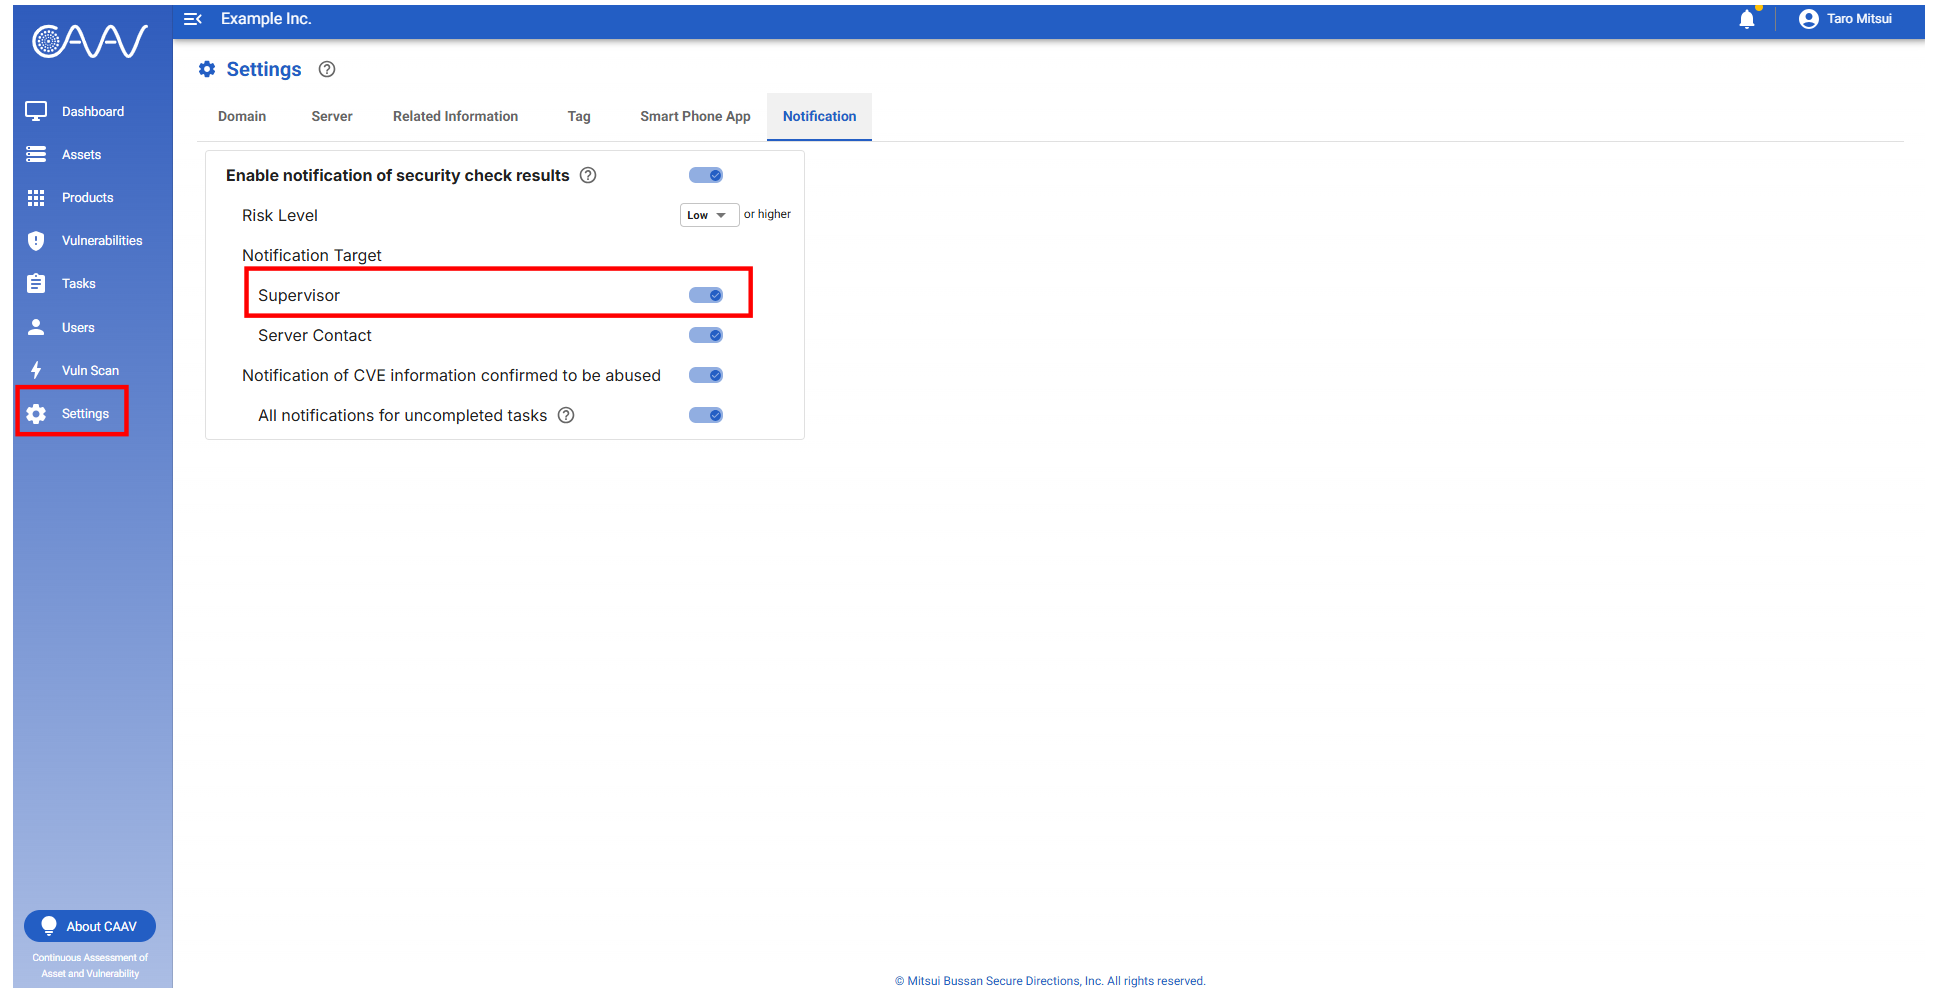
- If the "Supervisor" under "Notification Target" is enabled, the supervisor user will receive email notifications of security check results.
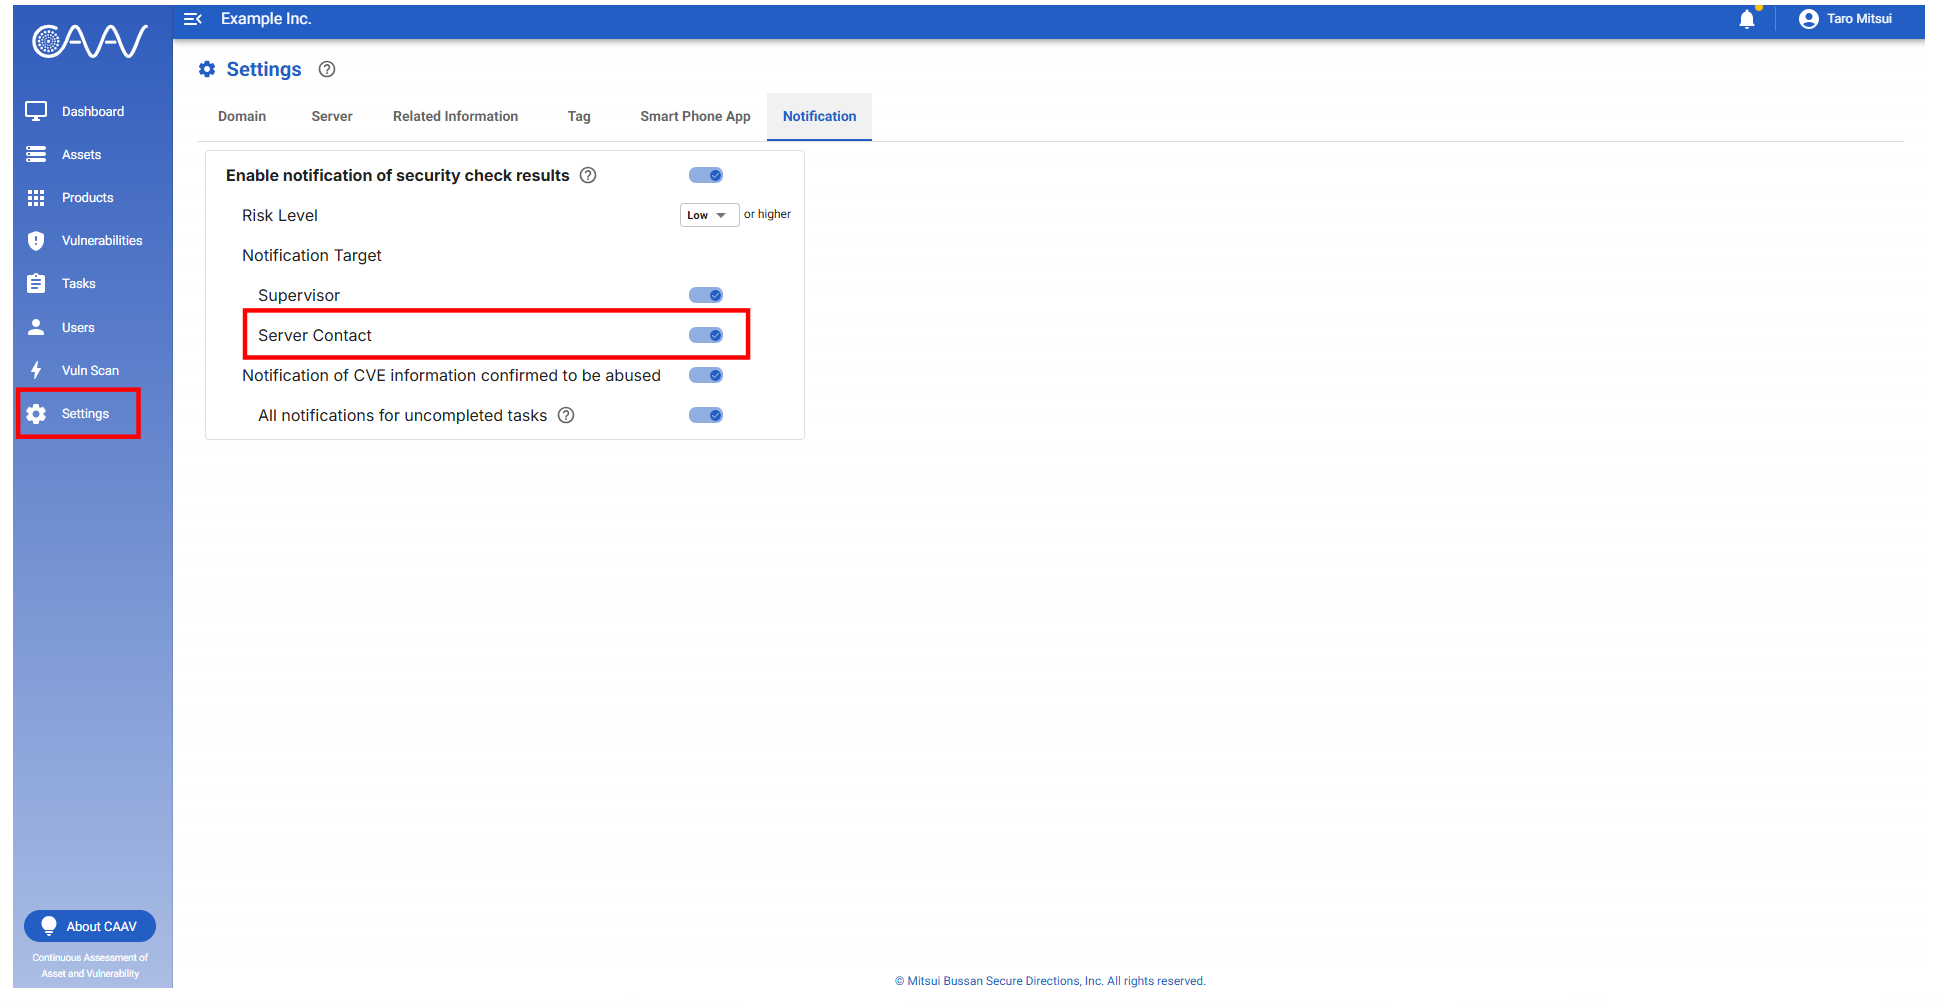
- If the "Server Contact" under "Notification Target" is enabled, users assigned to servers where vulnerabilities have been detected will receive email notifications of the security check results.
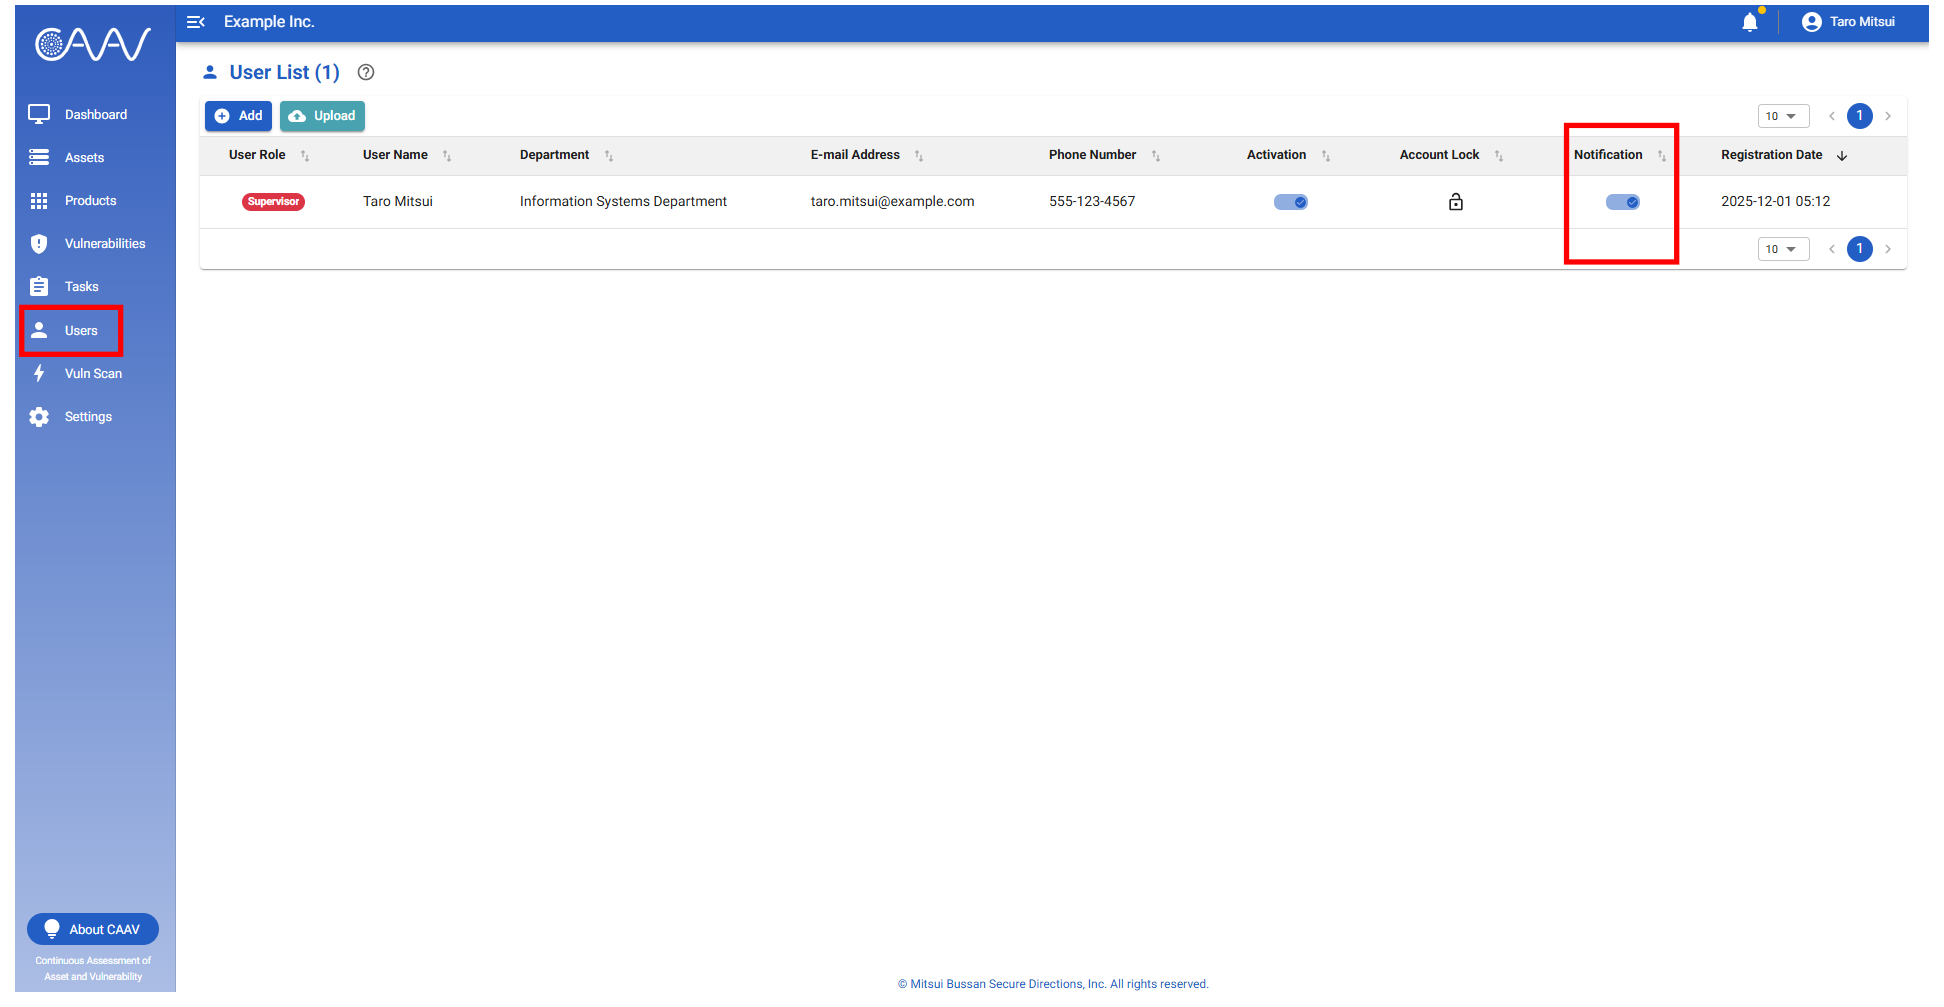
- You can configure email notification conditions on a per-user basis from the "Users" menu.
- Switch the toggle in the "Notification" column to set whether notifications are enabled or disabled.
- Please note that if the "Server Contact" option under "Settings" – "Notification" is disabled, the "Notification" column will not be displayed.
- You can configure server-level email notification conditions from "Server" tab within "Settings" menu.
- When the "Notification Target" column is enabled, the security check results for the relevant server will be notified by email.
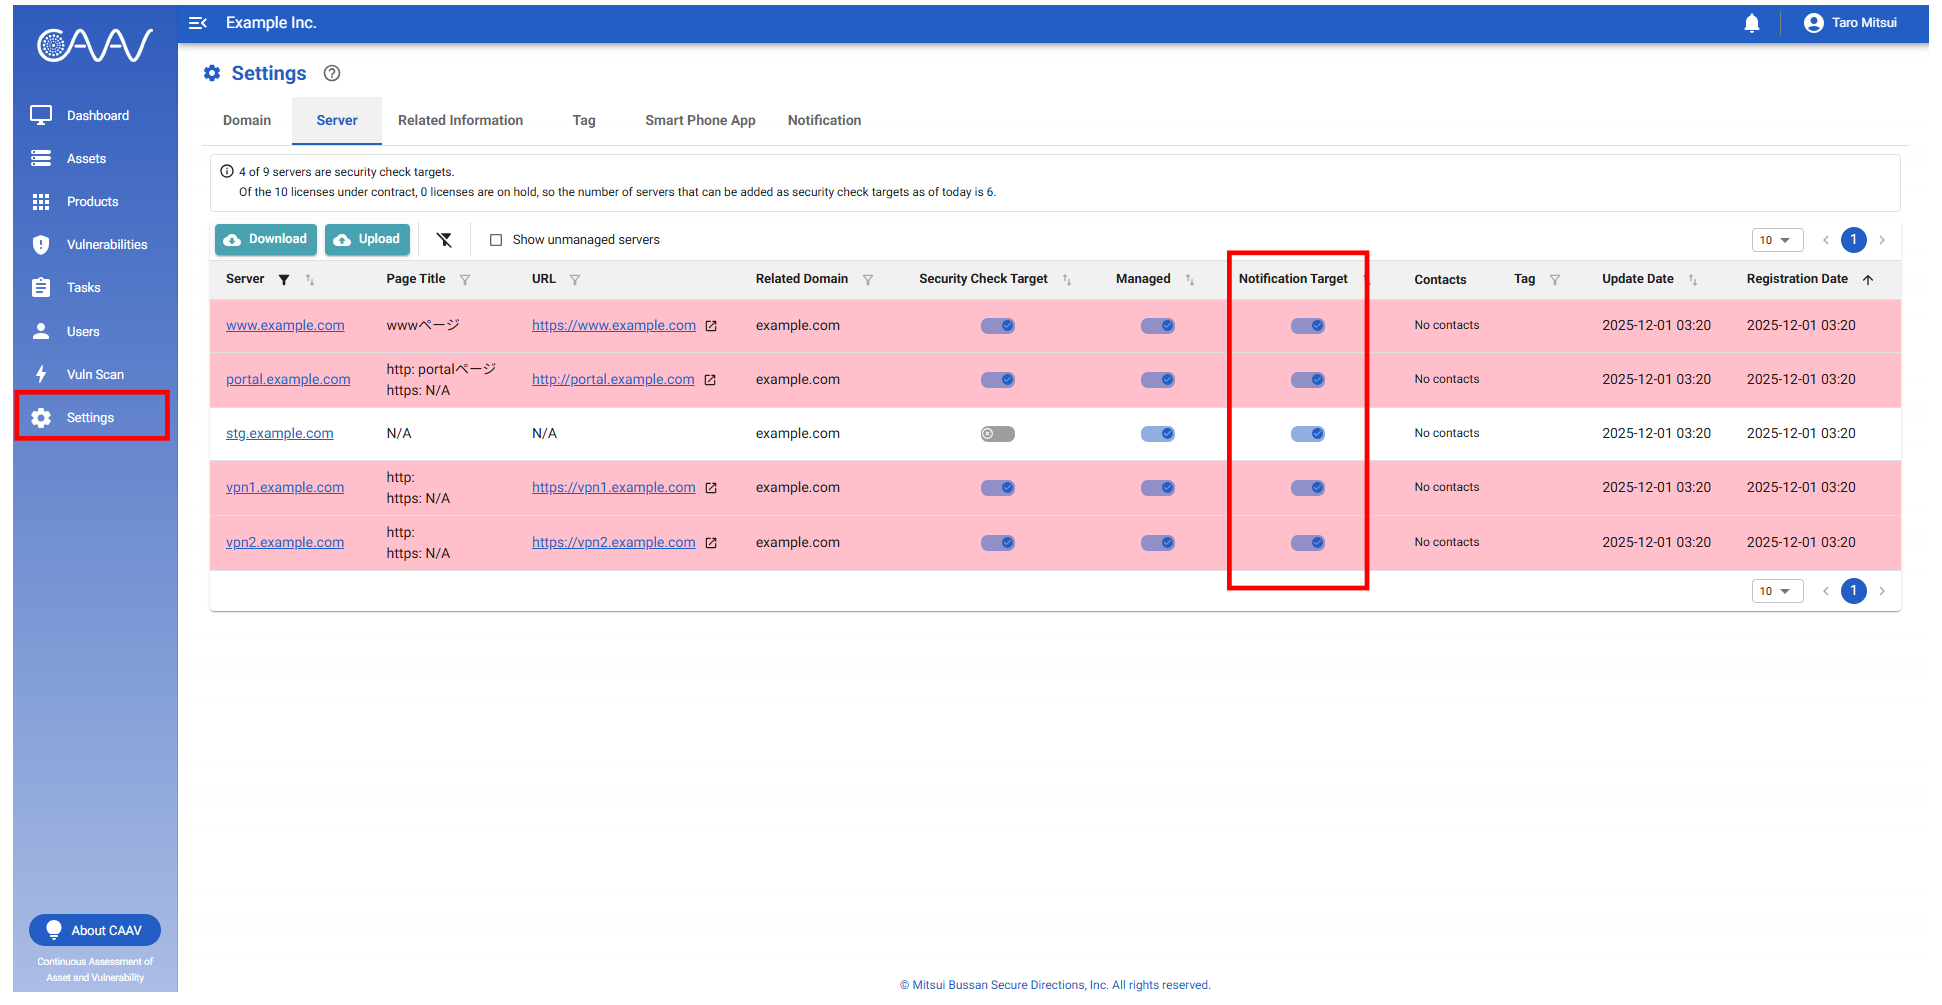
- Using the CSV file employed in the section "Bulk update security check targets (For administrators)", you can configure email notification conditions for each server in bulk.
- The value in the "Notification Target" column of the CSV file signifies "0"(not notify) or "1"(notify).
- To change your notification settings, please update the value in each column to either 0 or 1.
- You can configure notification settings in bulk by uploading an edited CSV file.

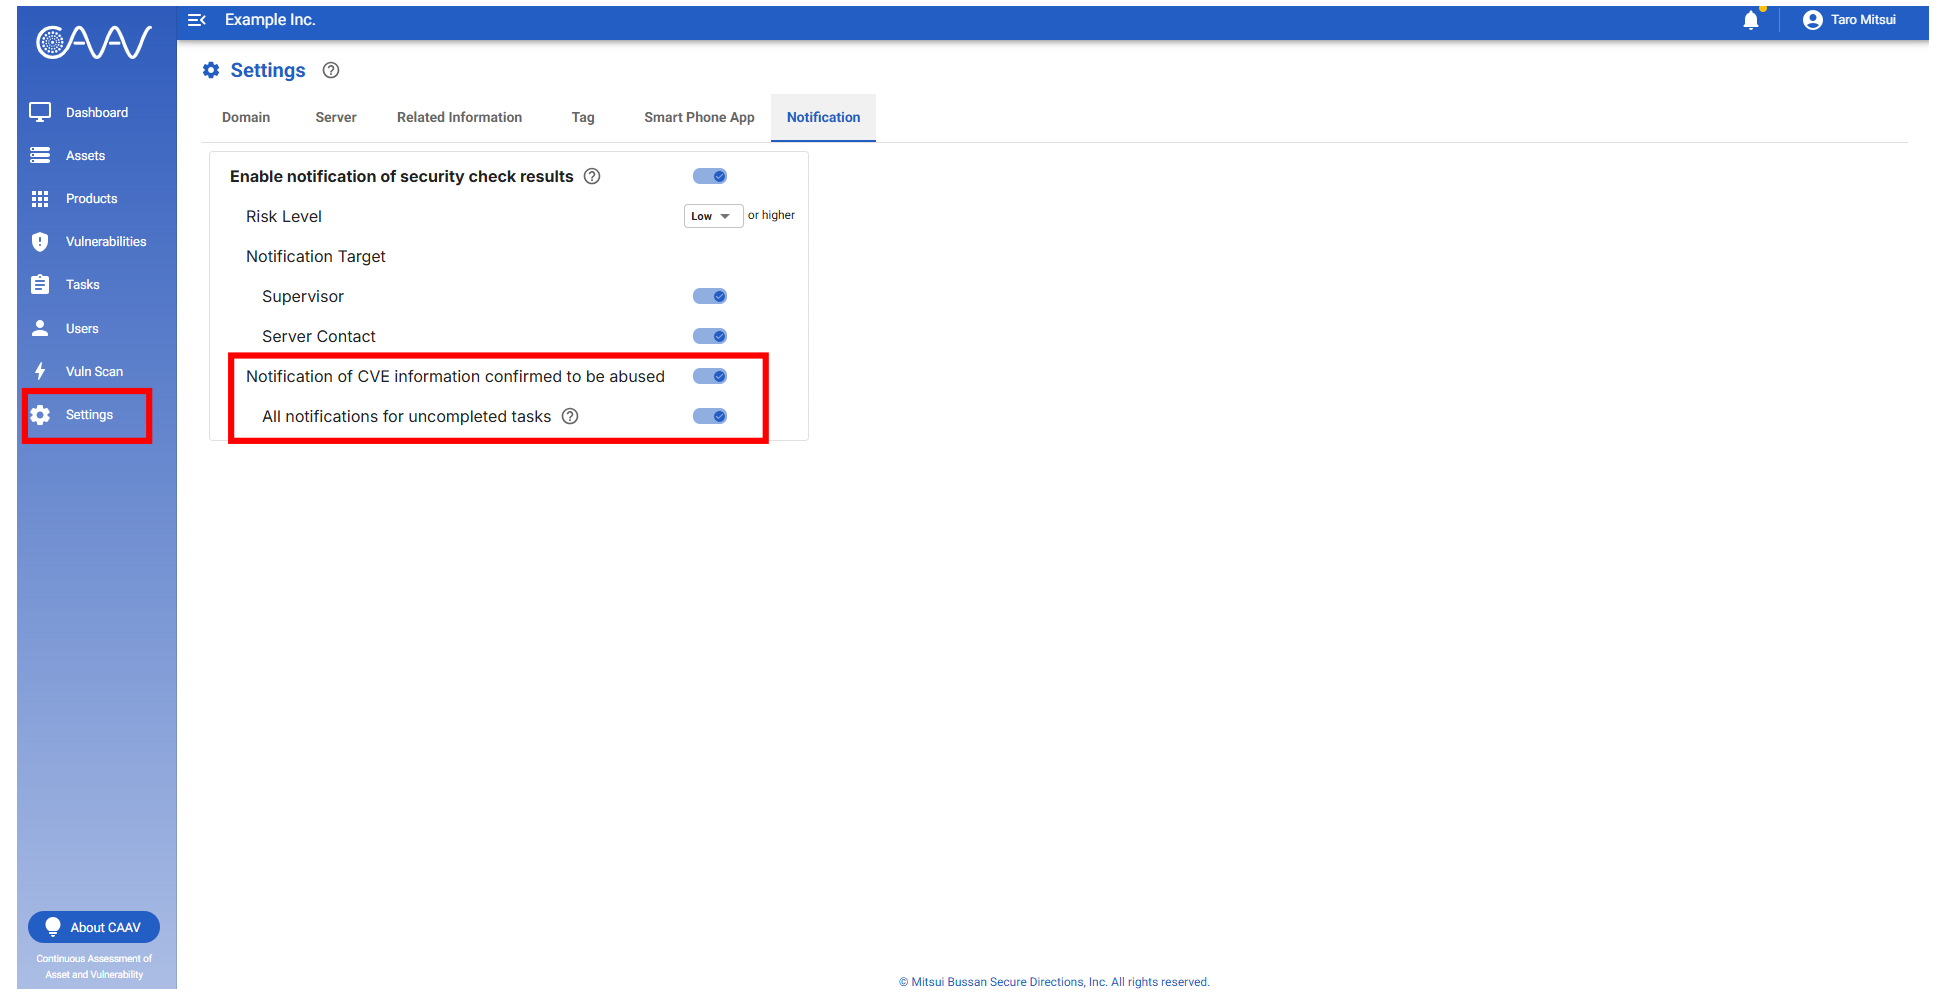
- When "Notification of CVE information confirmed to be abused" is enabled, you will receive email notifications if vulnerabilities detected by security checks are listed in the US CISA's Known Exploited Vulnerabilities Catalog (*1).
- When "All notifications for uncompleted tasks" is disabled, only newly detected vulnerabilities of this type will be notified via email.
- When "All notifications for uncompleted tasks" is enabled, if the status of the relevant vulnerability is not "Done" or "Ignore", email notifications will be sent regardless of whether the vulnerability is previously reported or newly identified.
User management
Disable user accounts (For administrators)
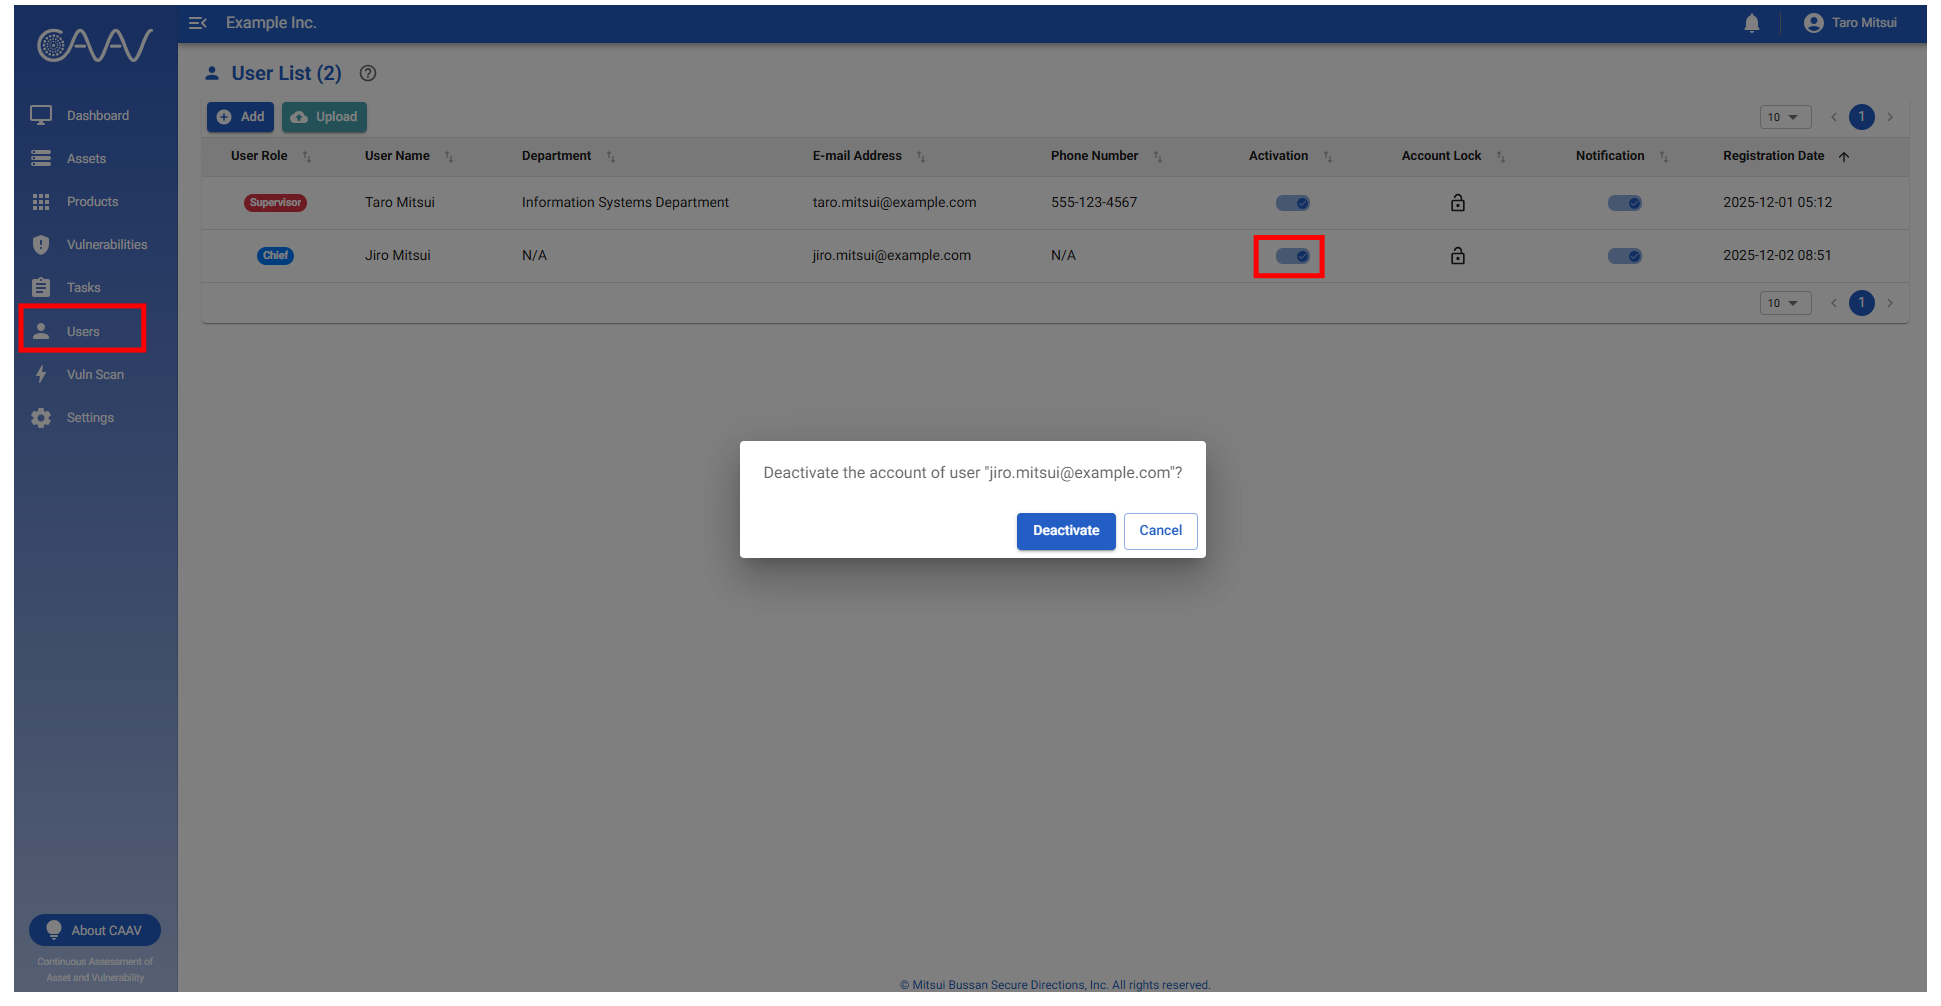
- In the "Users" menu, you can disable users (prevent them from logging in).
- Users with "Supervisor" permissions may disable the relevant user by toggling the switch in the "Activation" column.
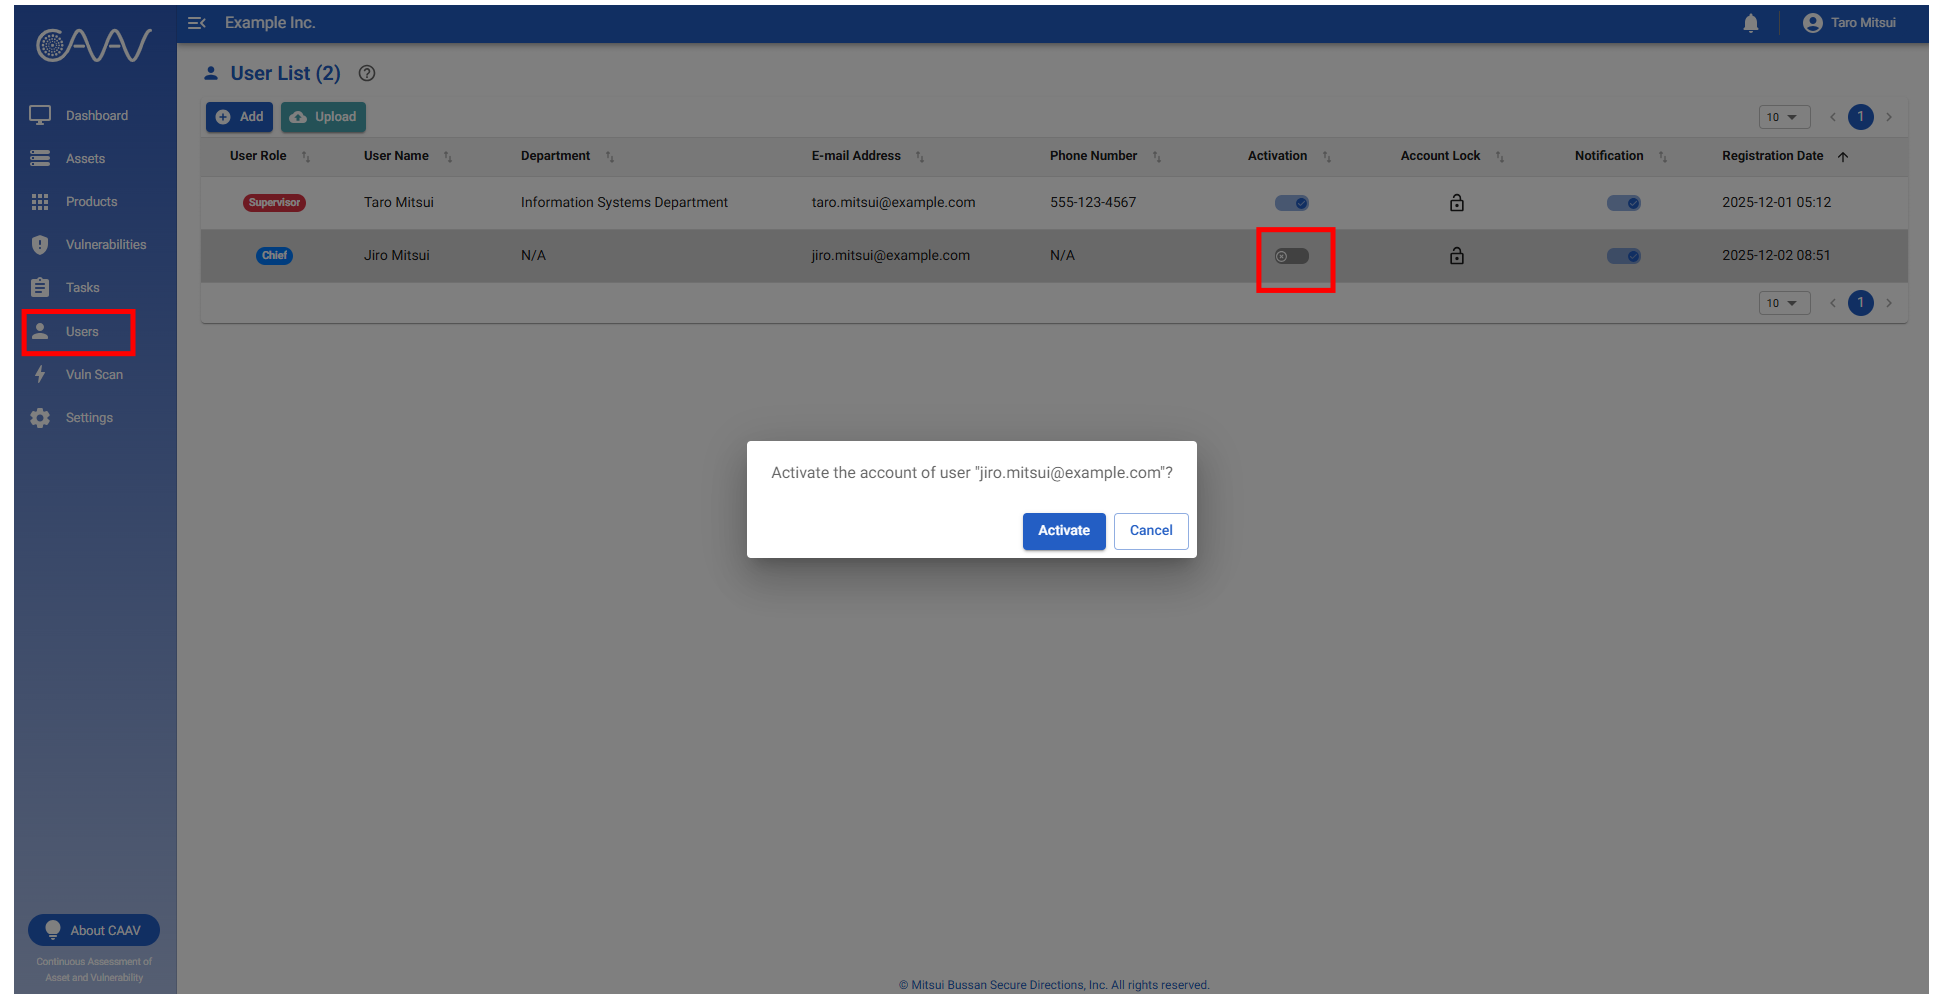
Enable user accounts (For administrators)
- In the "Users" menu, you can activate users (grant login permission).
- Users whose accounts have been deactivated are displayed in grey.
- Users with "Supervisor" privileges may activate the relevant user by toggling the greyed-out switch.
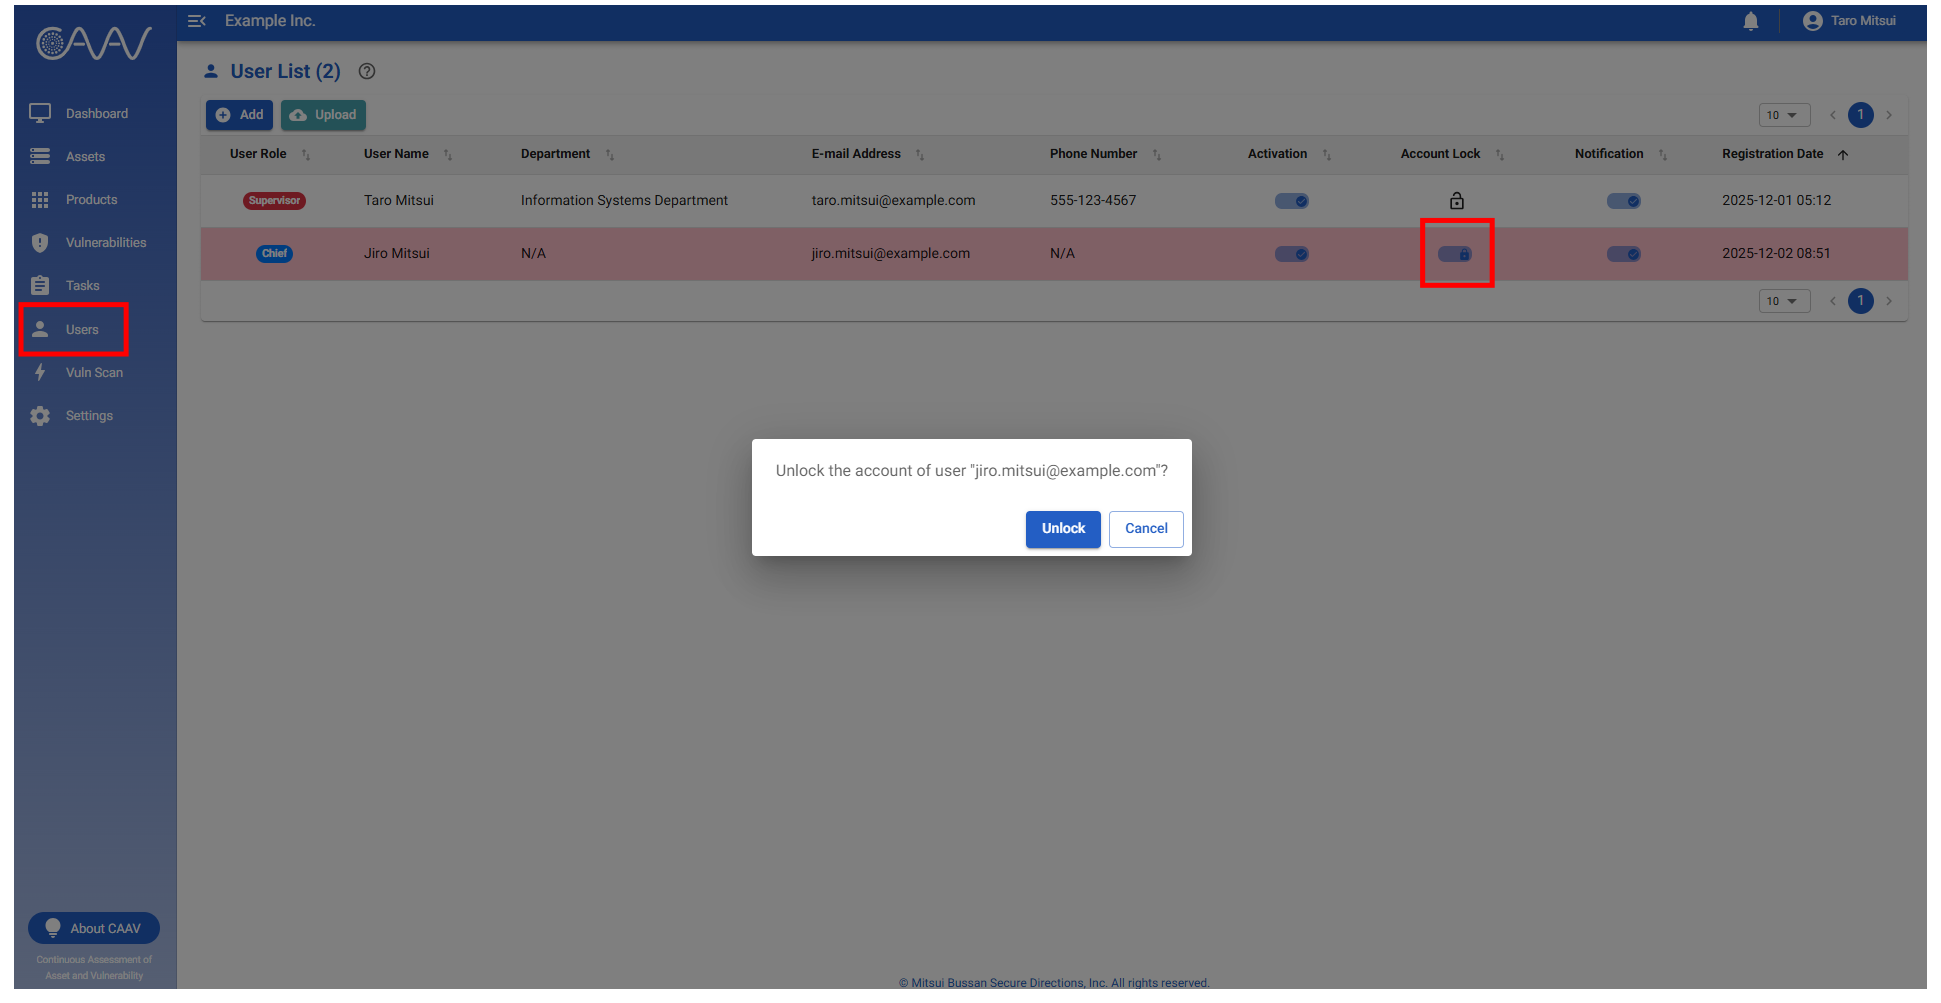
Unlock user accounts (For administrators)
- In the "Users" menu, you can unlock the accounts of users.
- Users whose accounts have been locked are displayed in red, and the switch in the "Account Lock" column turns blue.
- Users with "Supervisor" privileges can unlock the account by toggling the switch.
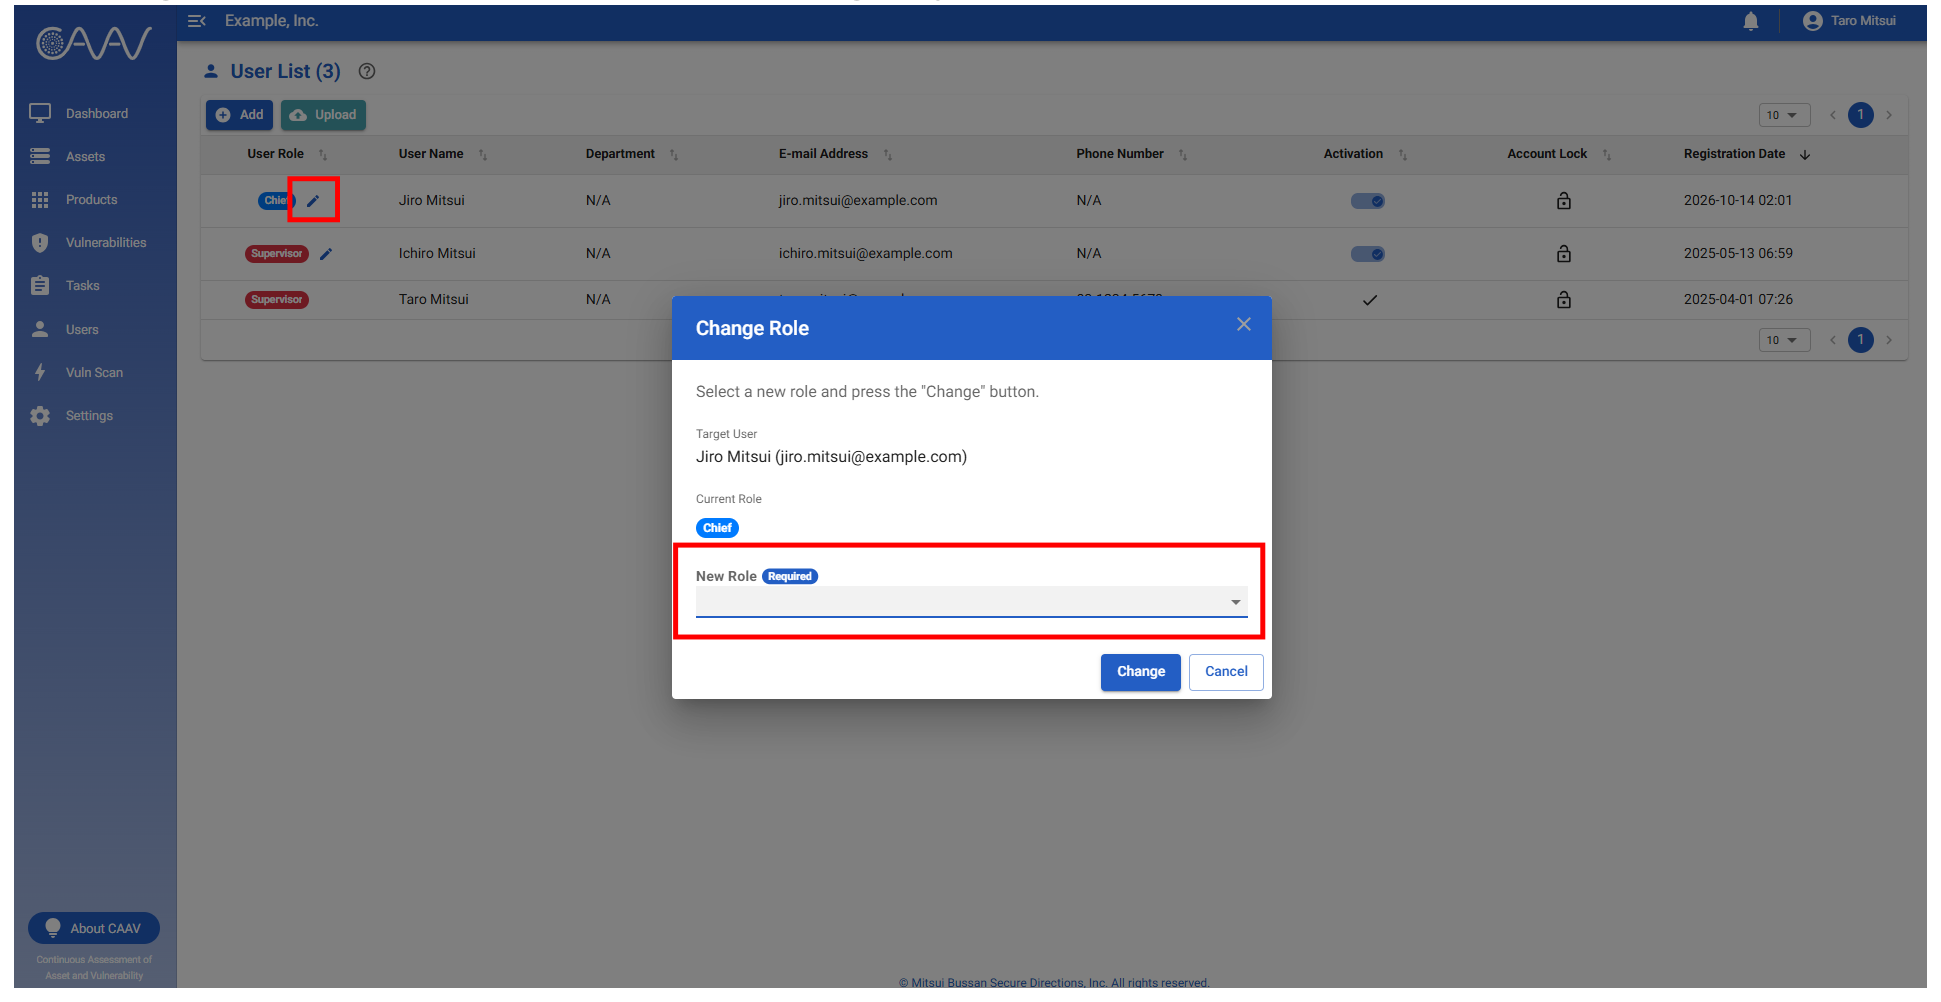
Change user roles (For administrators)
- In the "Users" menu, you can change the roles of users.
- Users with "Supervisor" privileges may change the role of the relevant user by clicking the edit button in the "User Role" column.
- The target user is notified of a role change by email.
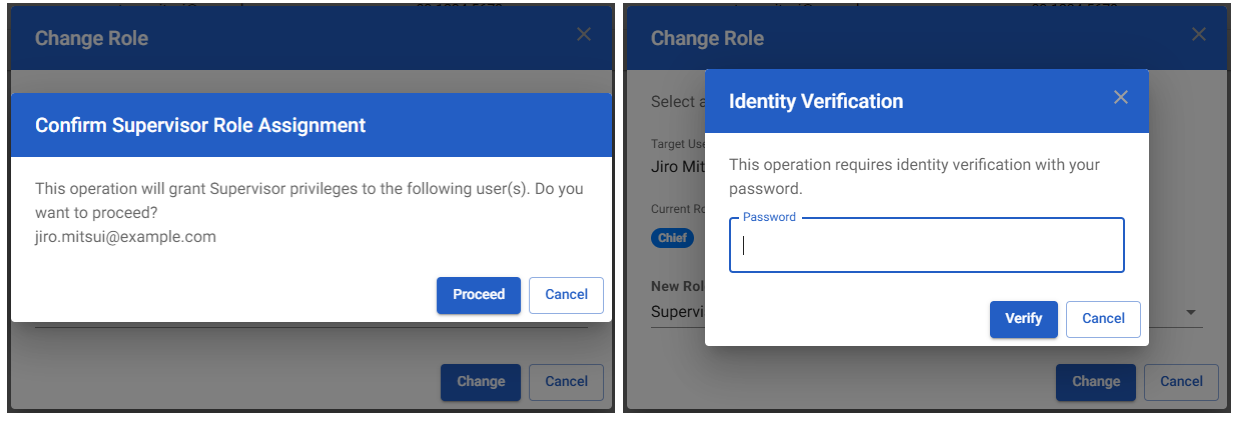
Identity verification for Supervisor operations (For administrators)
- The following operations involving "Supervisor" require a confirmation dialog and identity verification (password + a one-time password sent to your email).
- Changing a role to or from "Supervisor"
- Inviting a "Supervisor" (individually or in bulk)
- Activating, deactivating or unlocking a "Supervisor"
- Once verified, identity verification is skipped for 15 minutes.
- All Supervisors in the organization are also notified by email when a Supervisor is added, granted or revoked, activated, deactivated or unlocked.
Dashboard usage
Dashboard
- Upon logging in, the dashboard will appear, allowing you to monitor servers, vulnerabilities, and other aspects.
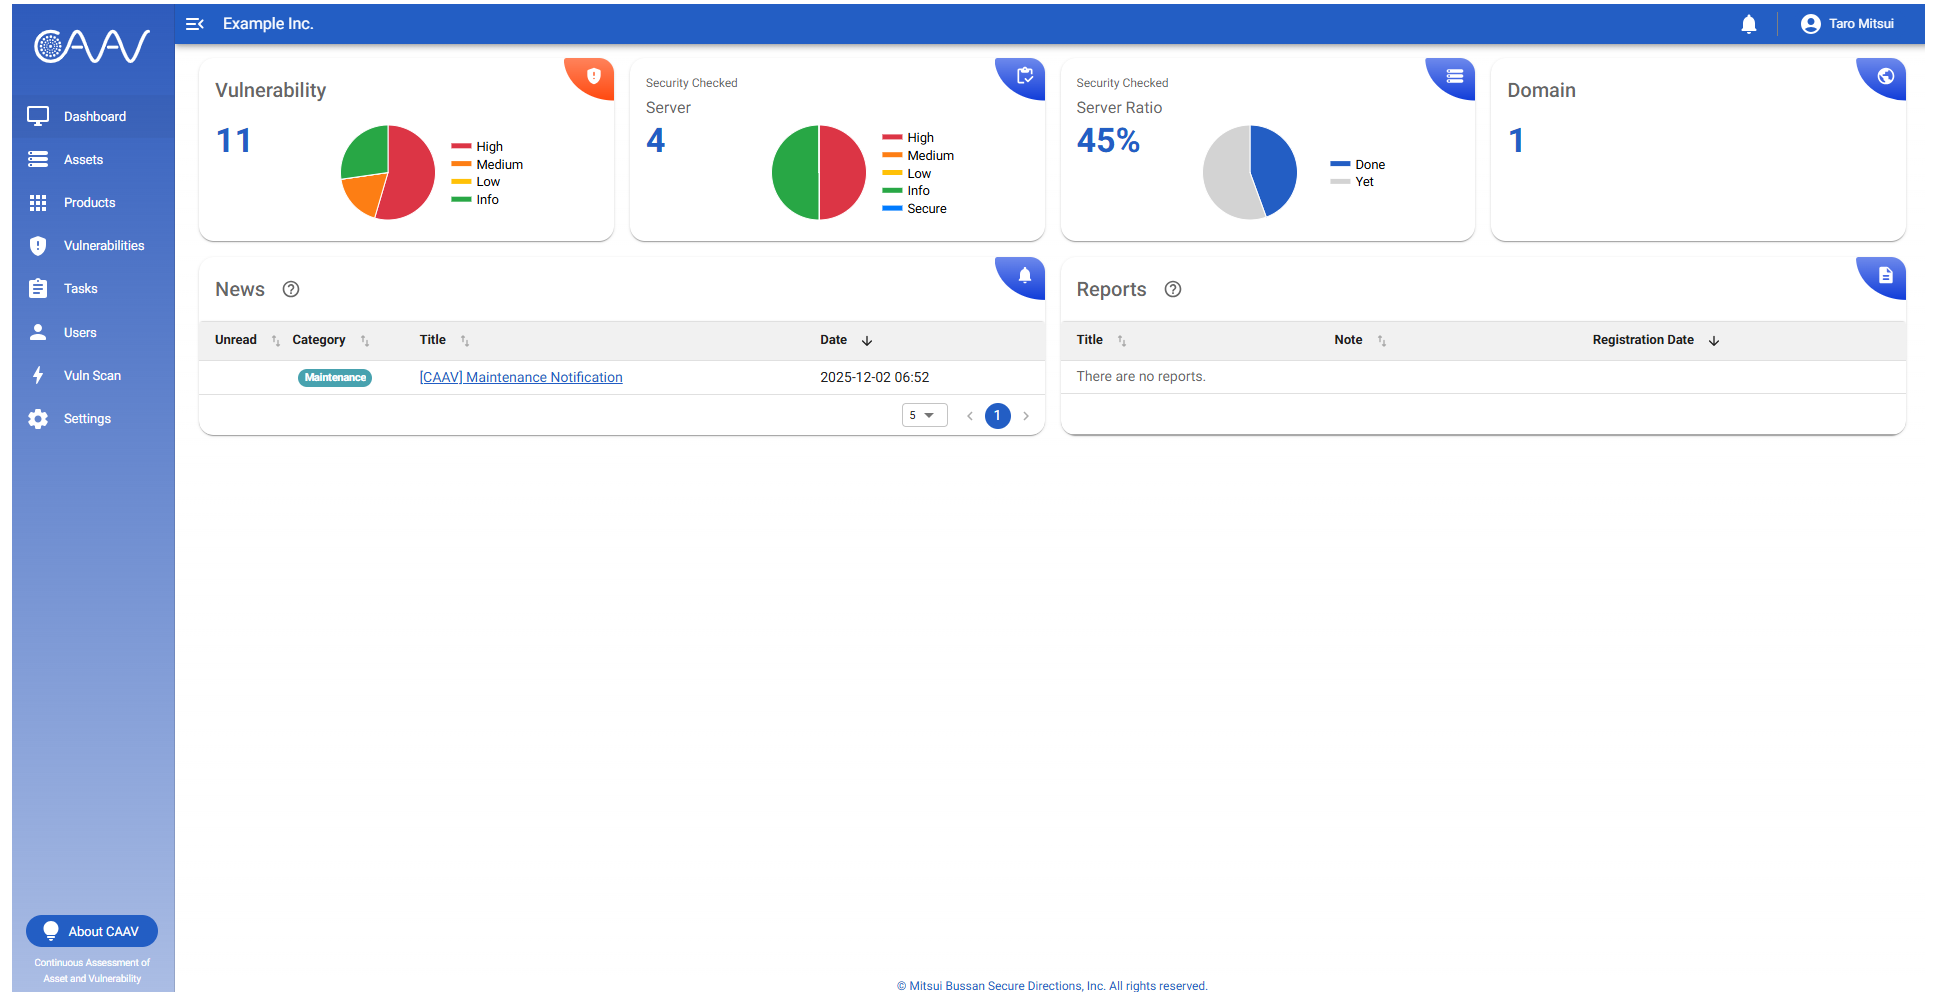
Summary information
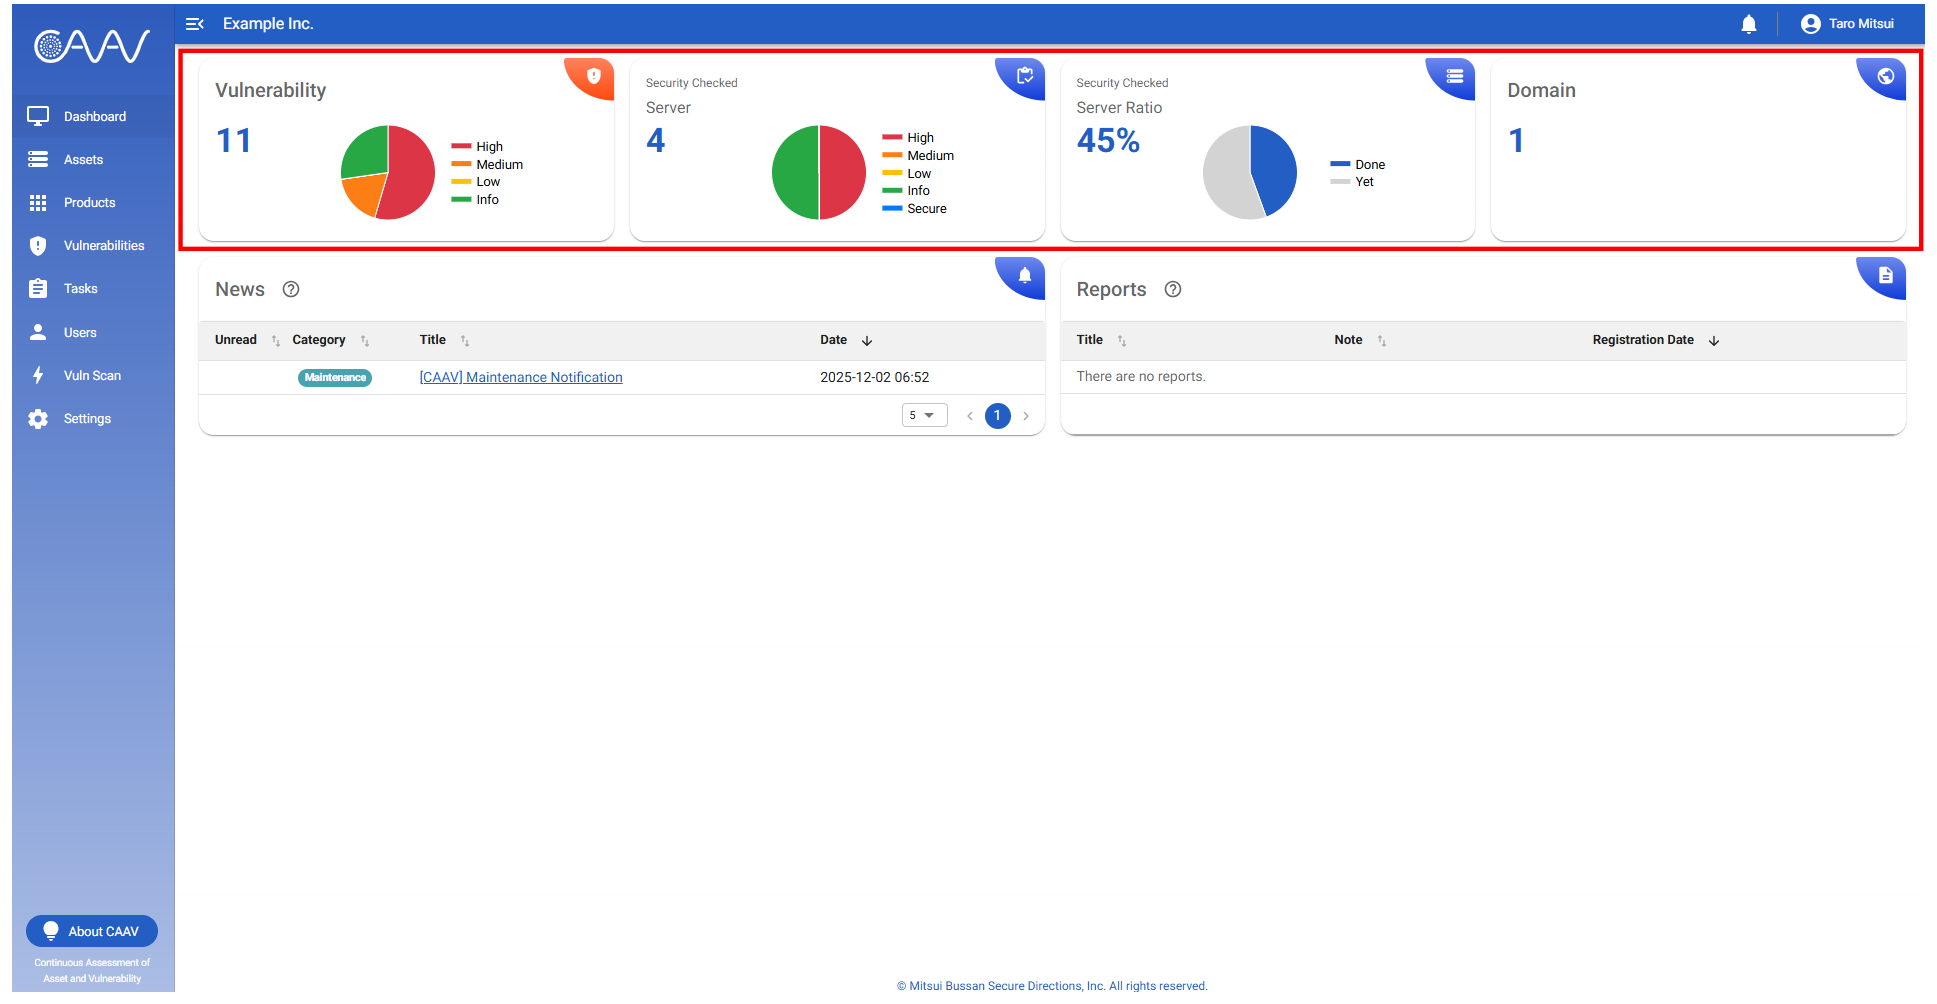
-
The number of managed domains and servers, along with the number of detected vulnerabilities, will be displayed.
Additionally, pie charts showing the number of vulnerabilities, server count, and server ratio will also be presented.
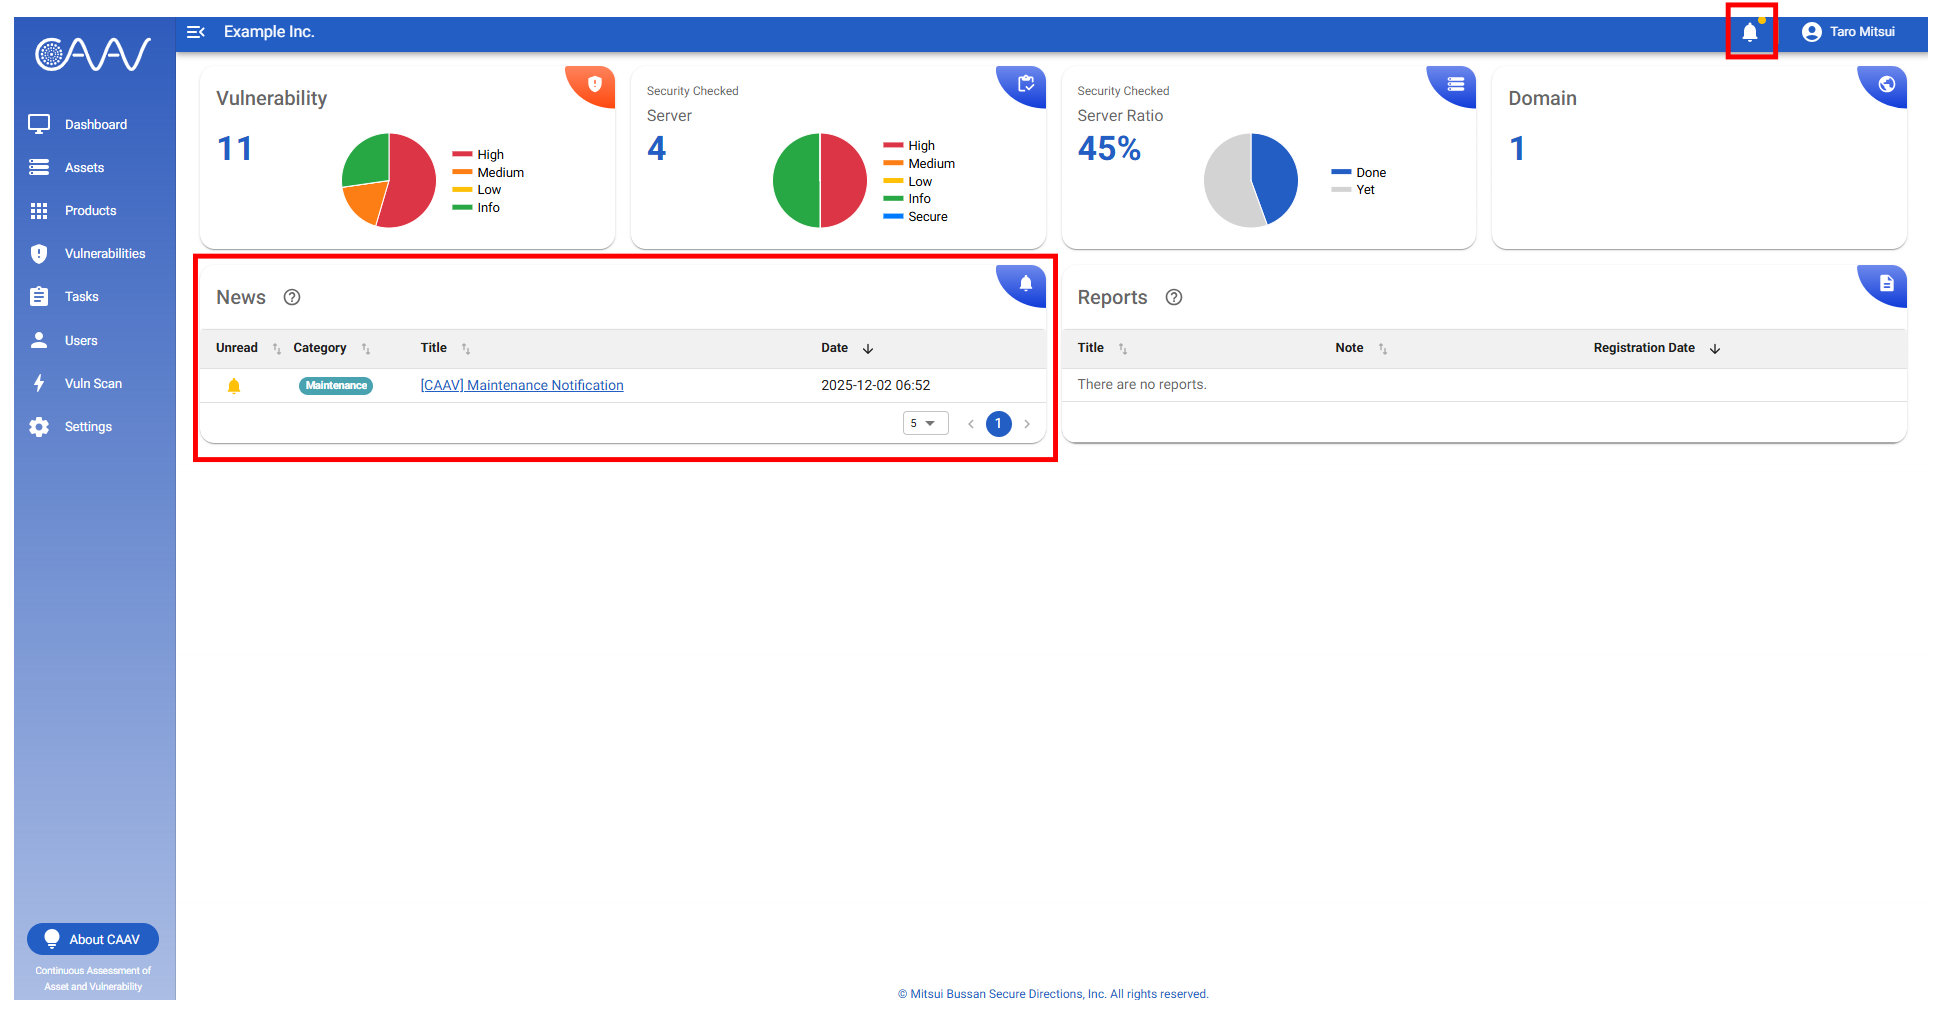
News
- Information on topics such as vulnerability detection and the discovery of new servers will be displayed as news.
- Clicking the title link will allow you to view detailed information.
- News will be displayed on the dashboard and notified to the relevant users via email.
- If there are any unread news, a yellow circle will appear on the bell icon in the header section.
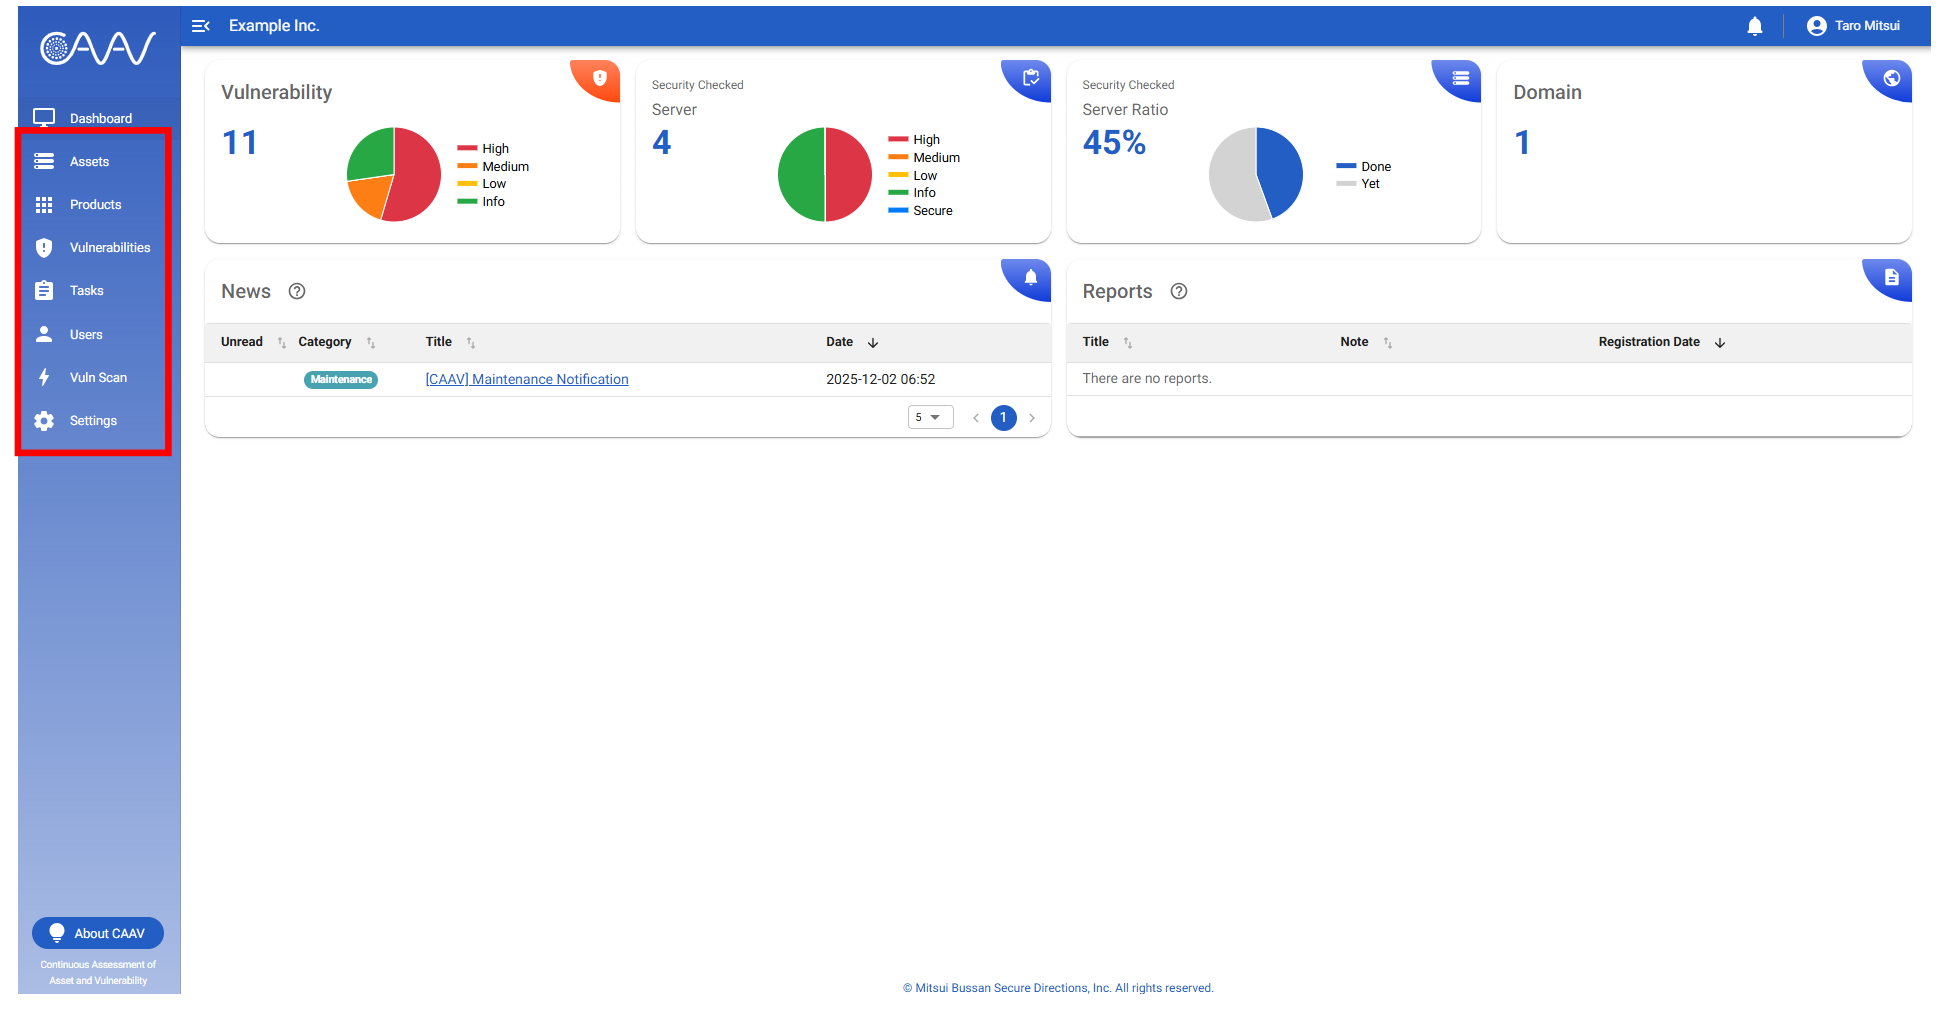
Main menu
- The main menu is as follows:
| Menu | Description |
|---|---|
| Assets | View managed servers and other resources. |
| Products | View a list of products detected in the assets. |
| Vulnerabilities | View the list of vulnerabilities. |
| Tasks | Manage tasks related to vulnerability response. |
| Users | Manage users. |
| Vuln Scan | Execute vulnerability scans and view the results. |
| Settings | Manage domain, server, related keyword used for inventory, and so on. |
Asset management
Asset management
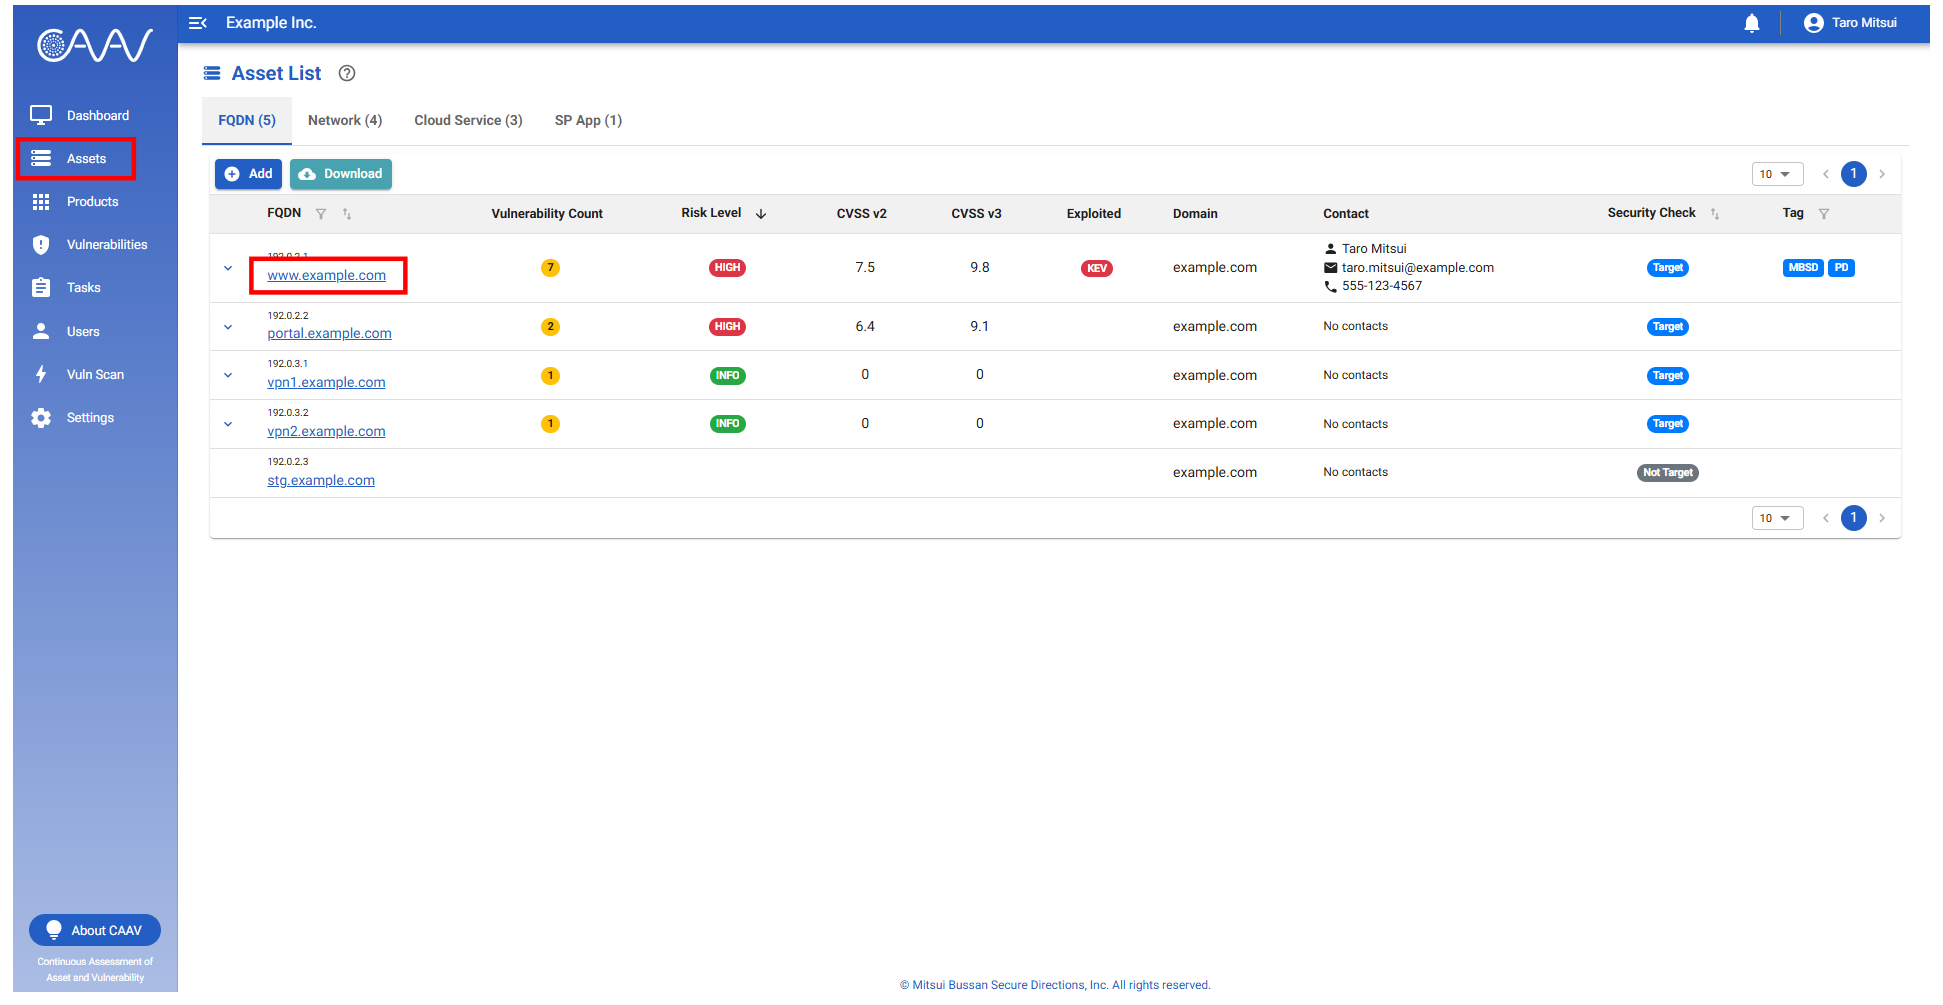
- In the "Assets" menu, you can view a list of servers associated with your account.
- Clicking the FQDN name in the FQDN tab allows you to view the server's detailed information.
Server details
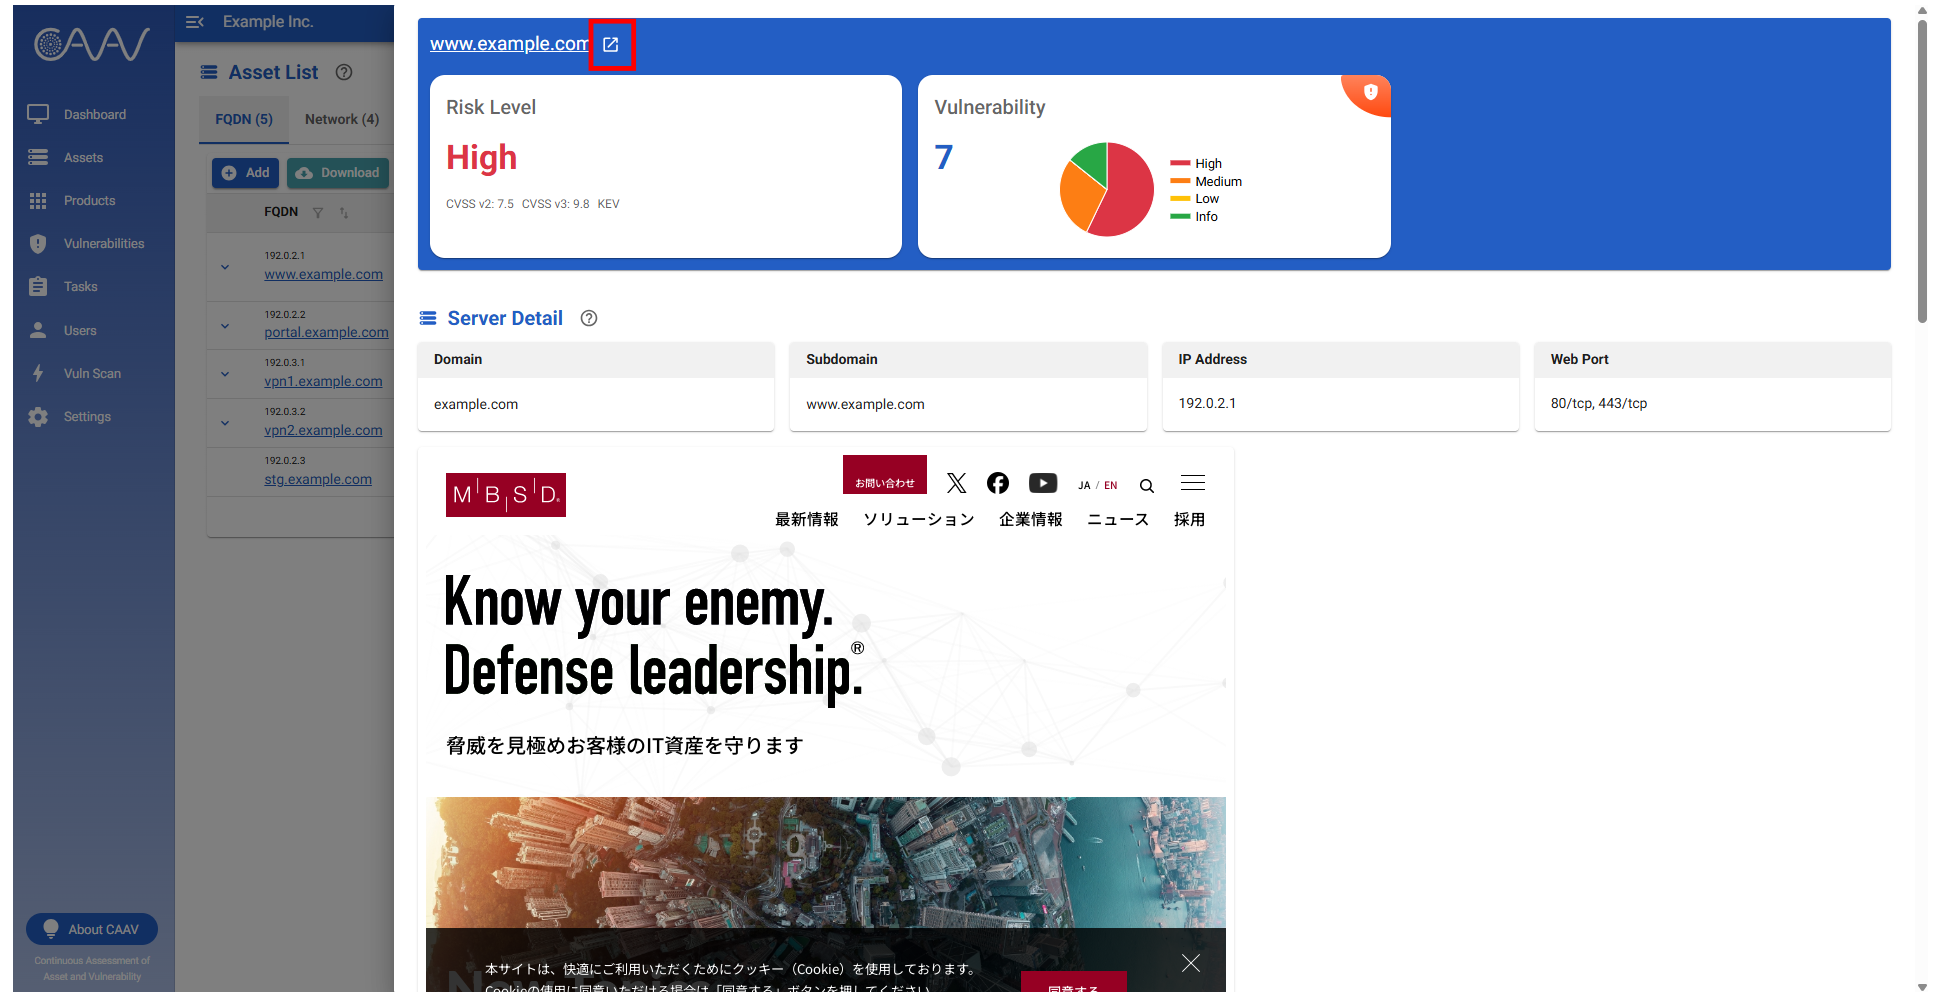
- You can view the server's detailed information.
- On this screen, you can view a list of product running on the server and any vulnerabilities.
- Clicking the pop-up icon to the right of the FQDN name will allow you to view the server details in a new tab.
Tag assignment
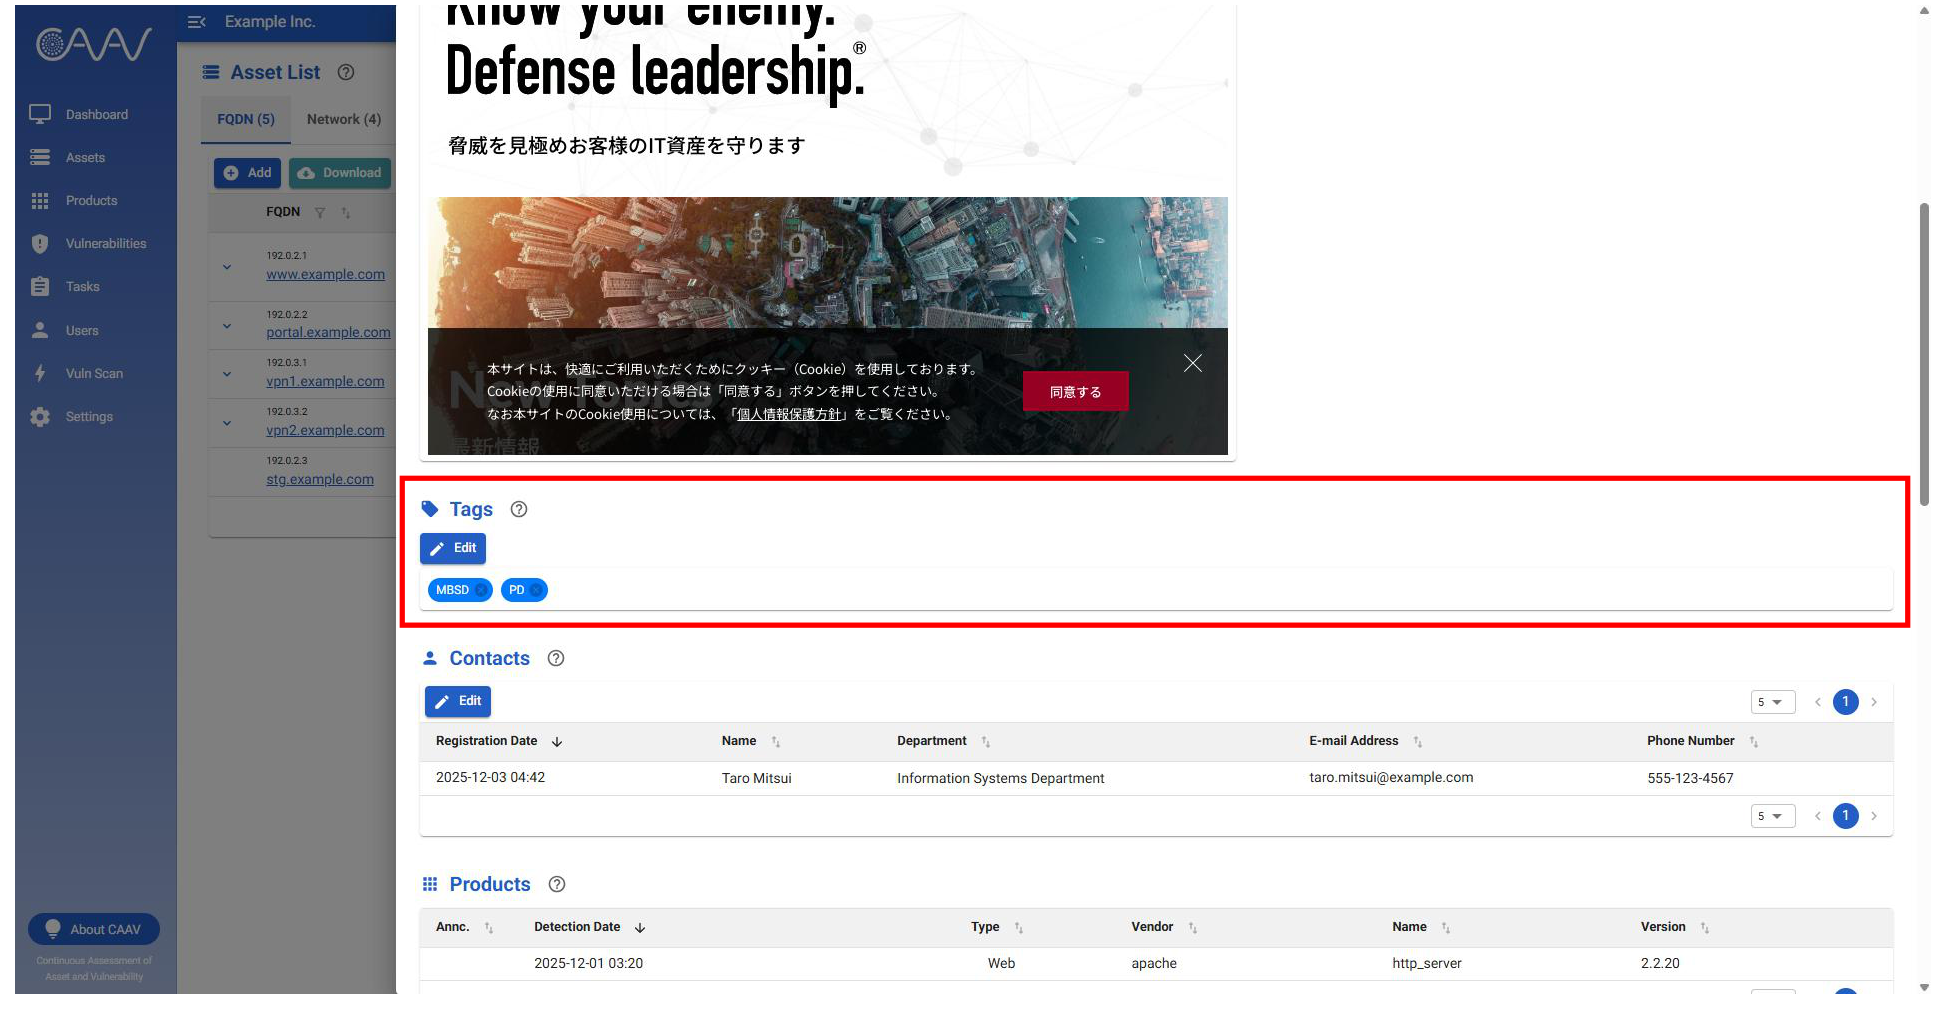
- You can view or assign tags by clicking "Edit" in the "Tags" section within the server details.
- Assigning tags to servers makes it easier to organize them.
- Furthermore, within the "Server" tab of the "Settings" menu, it is also possible to bulk update tag assignments for multiple servers via CSV upload.
Server search based on tags
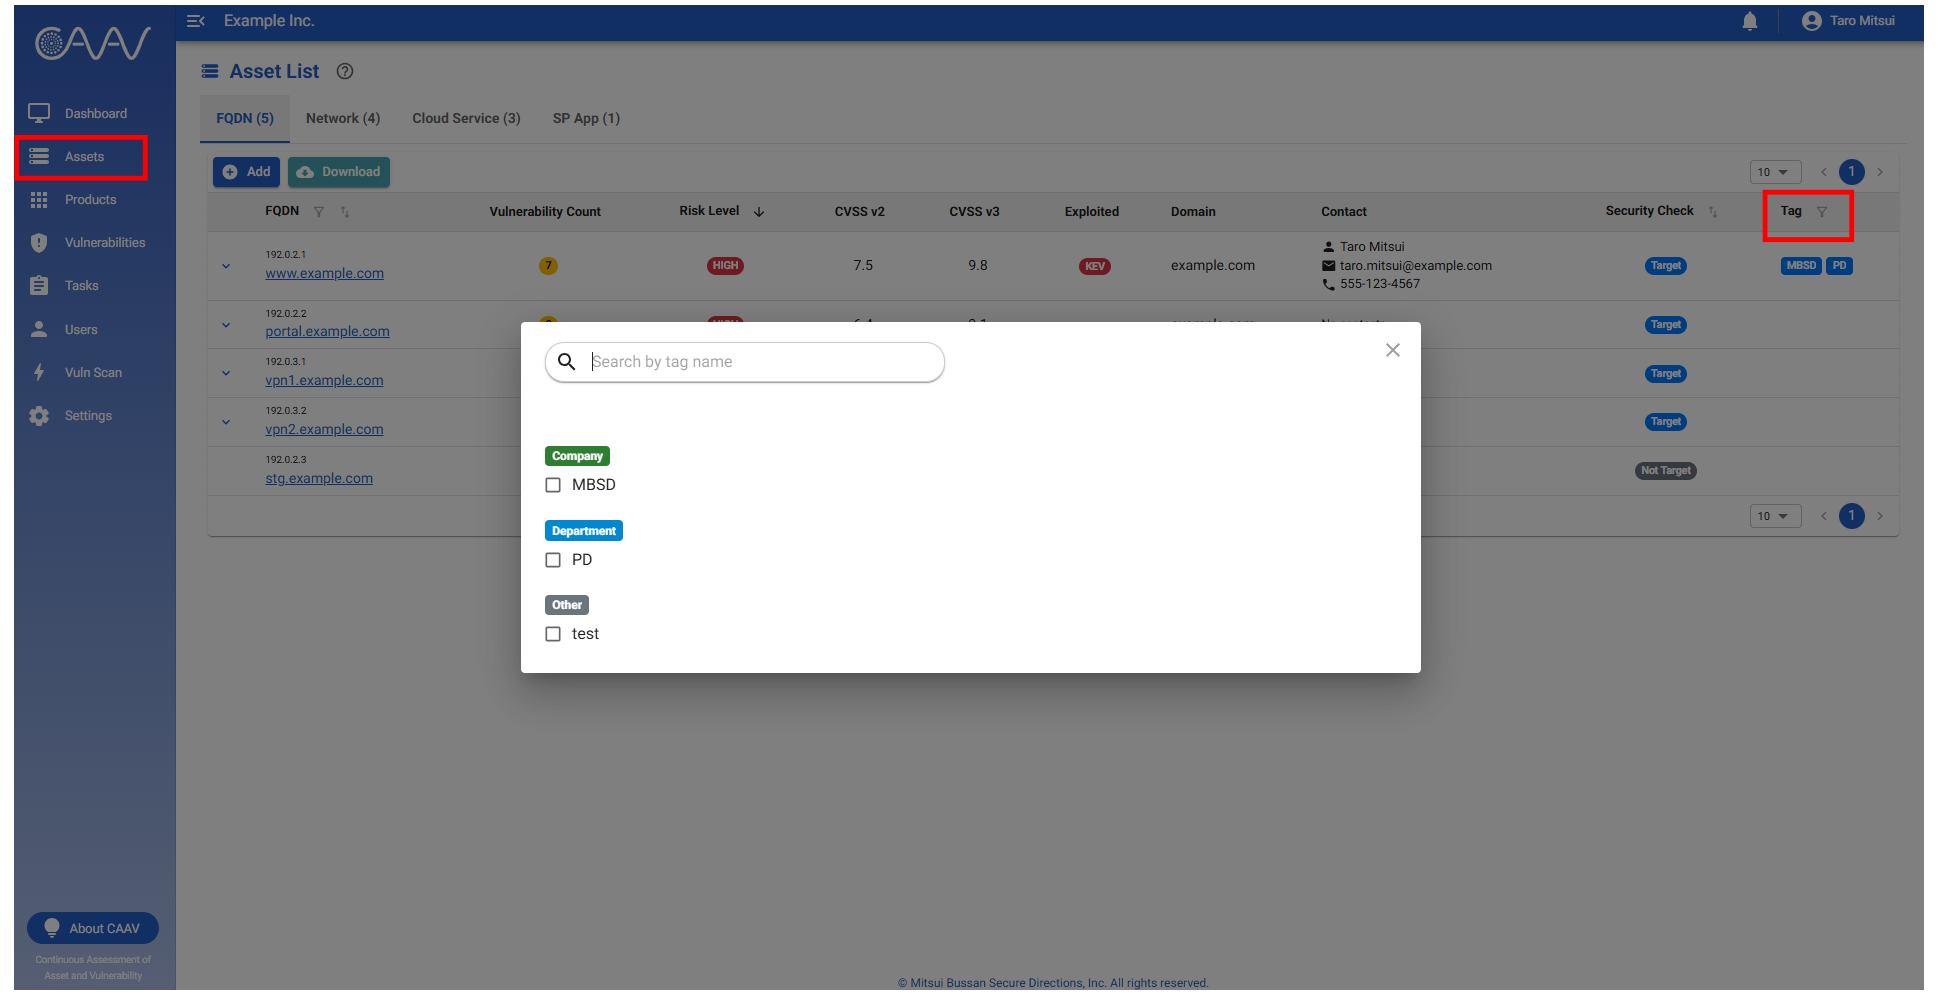
- Within the "Assets" menu, you can search for servers based on tags assigned to them.
- Clicking the icon in the "Tag" column of the list will display a screen for selecting tags. By checking one or more tags, you can filter the servers based on those tags.
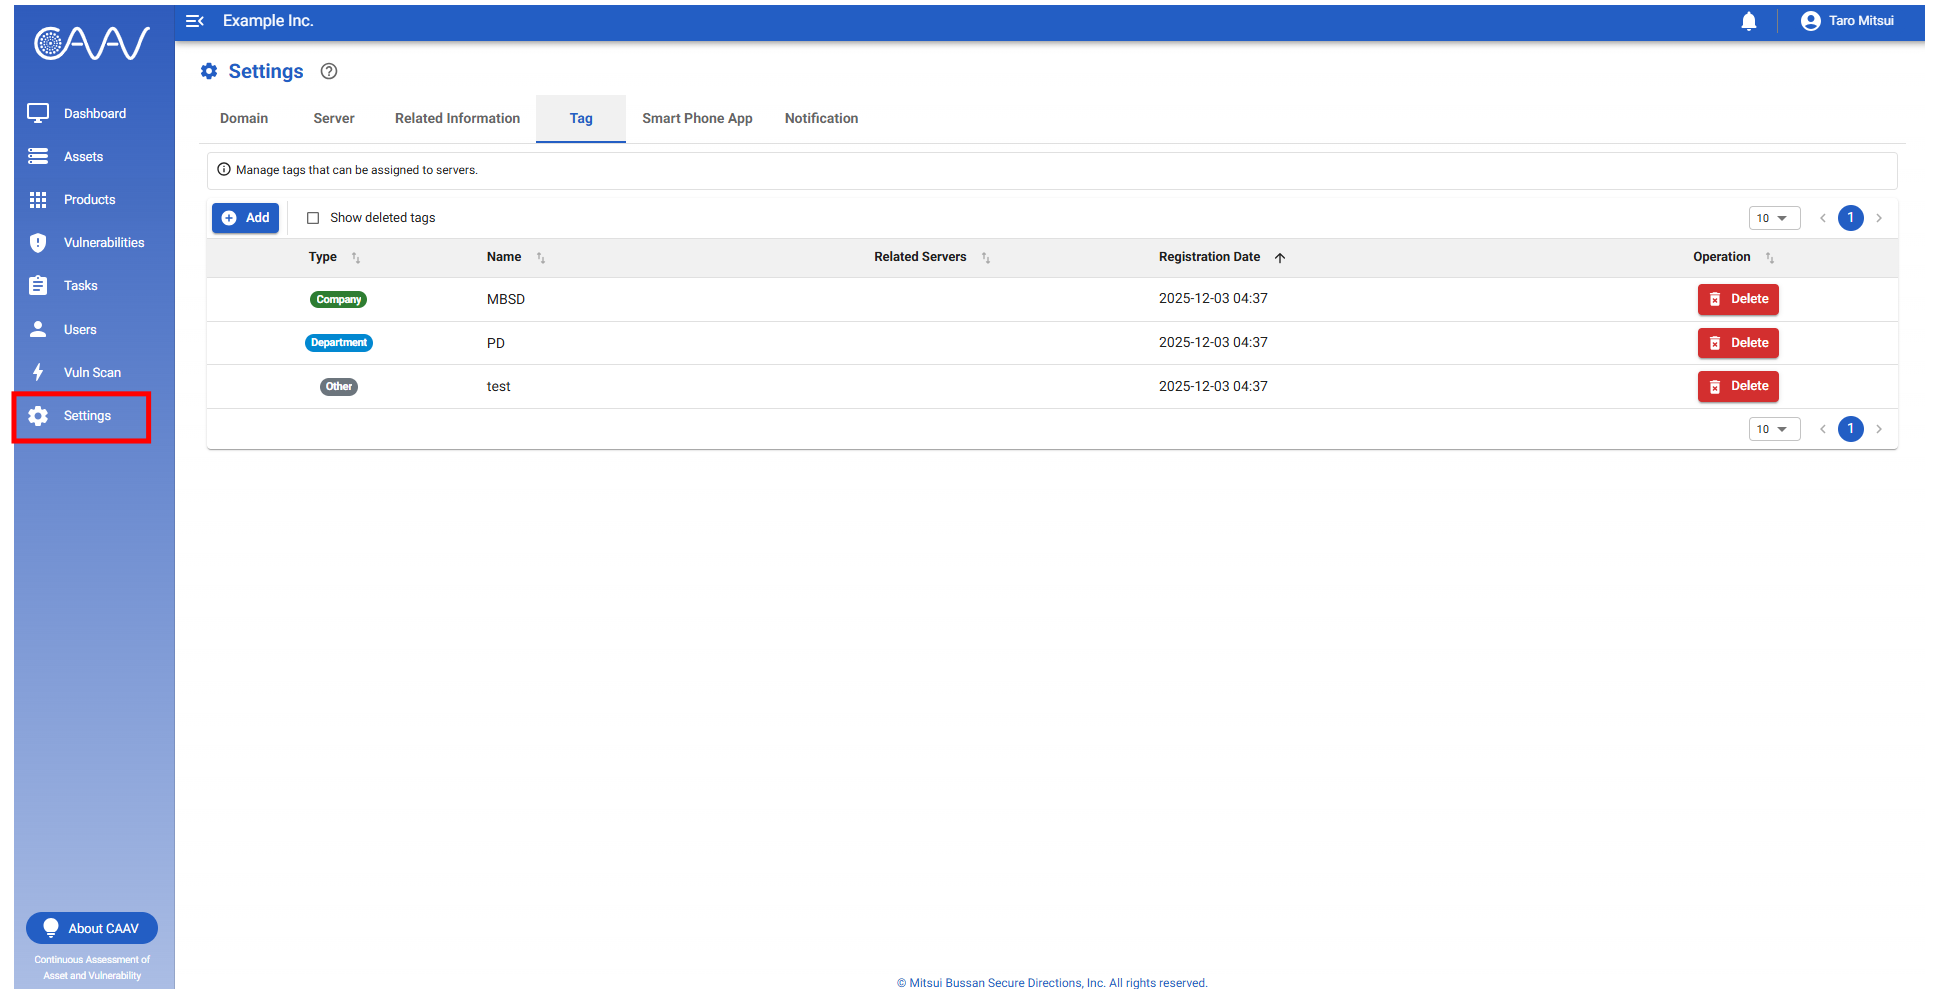
Manage tags (For administrators)
-
Tags can be managed in the "Tag" tab within the "Settings" menu.
-
The "Tag" tab allows you to view, register, or delete tags.
-
Tags that have been deleted can be restored using the same button.
Please note that deleting a tag will remove its association with the server.
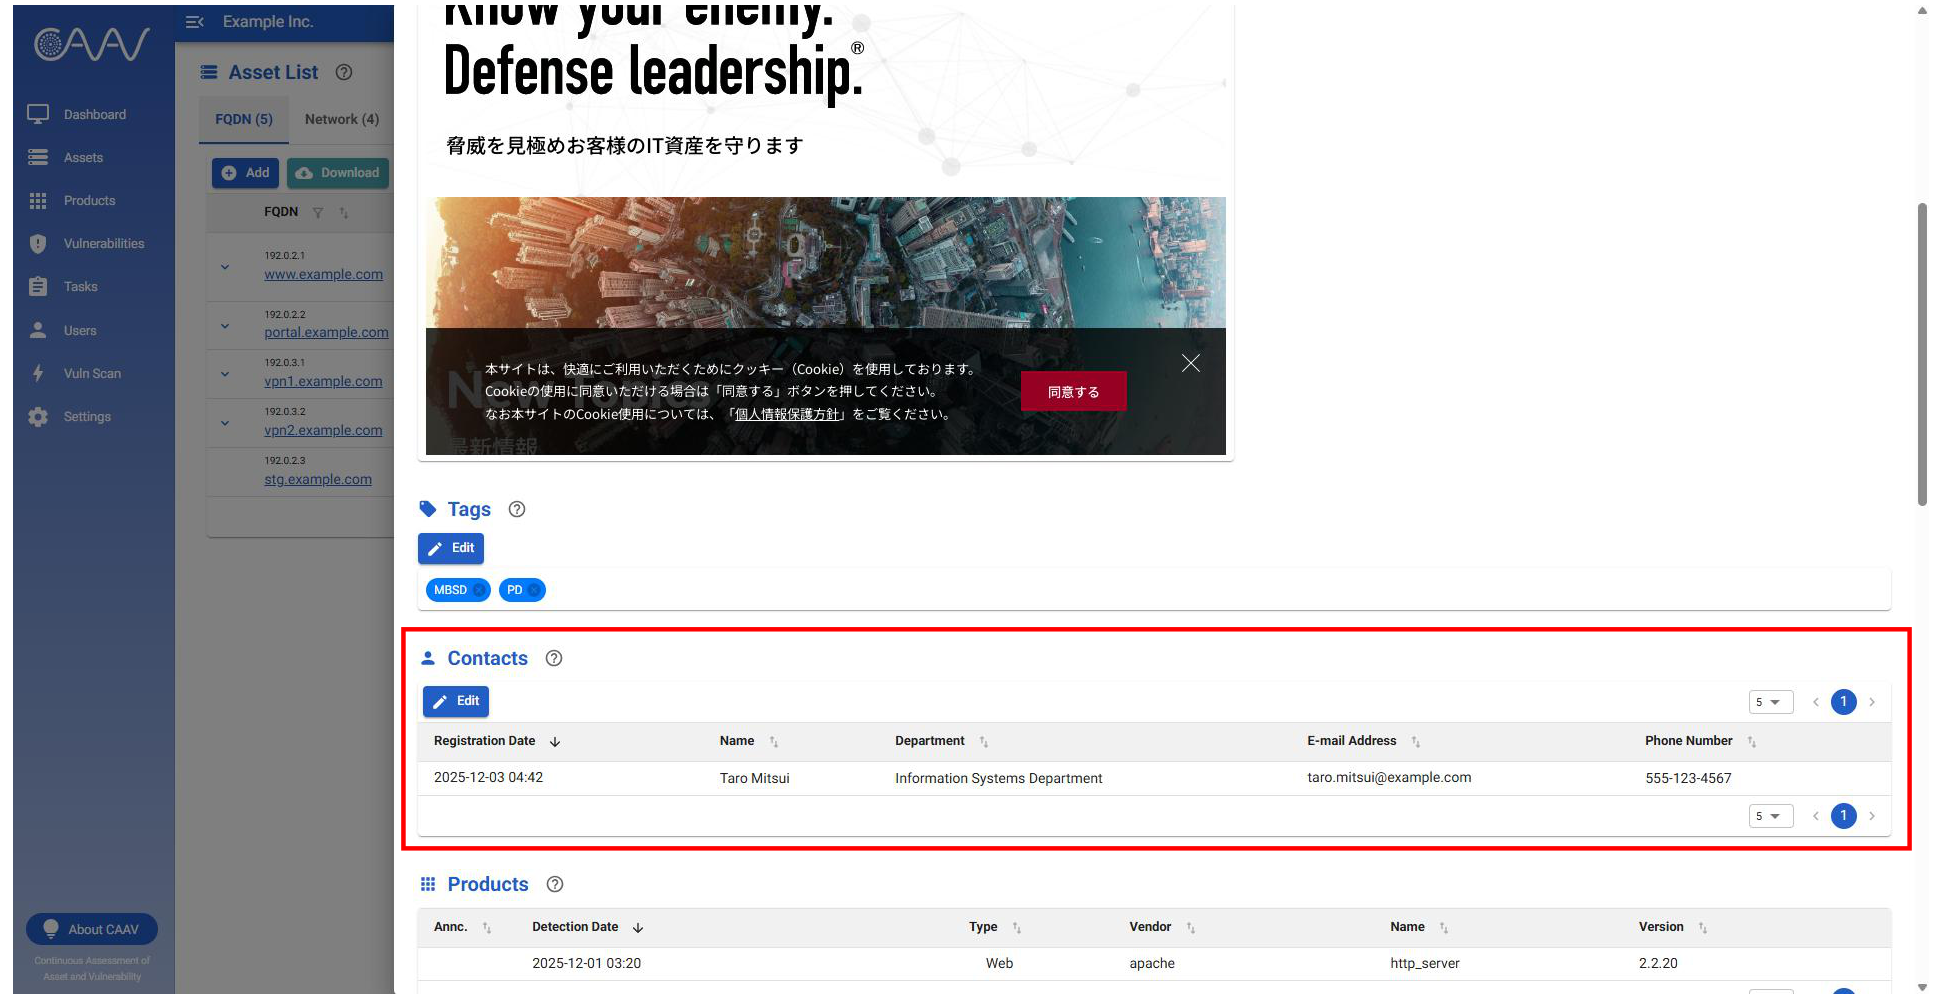
Assignment of contact
- Clicking the "Edit" button in the "Contacts" section of the server details allows you to view or edit the server's assigned contact person.
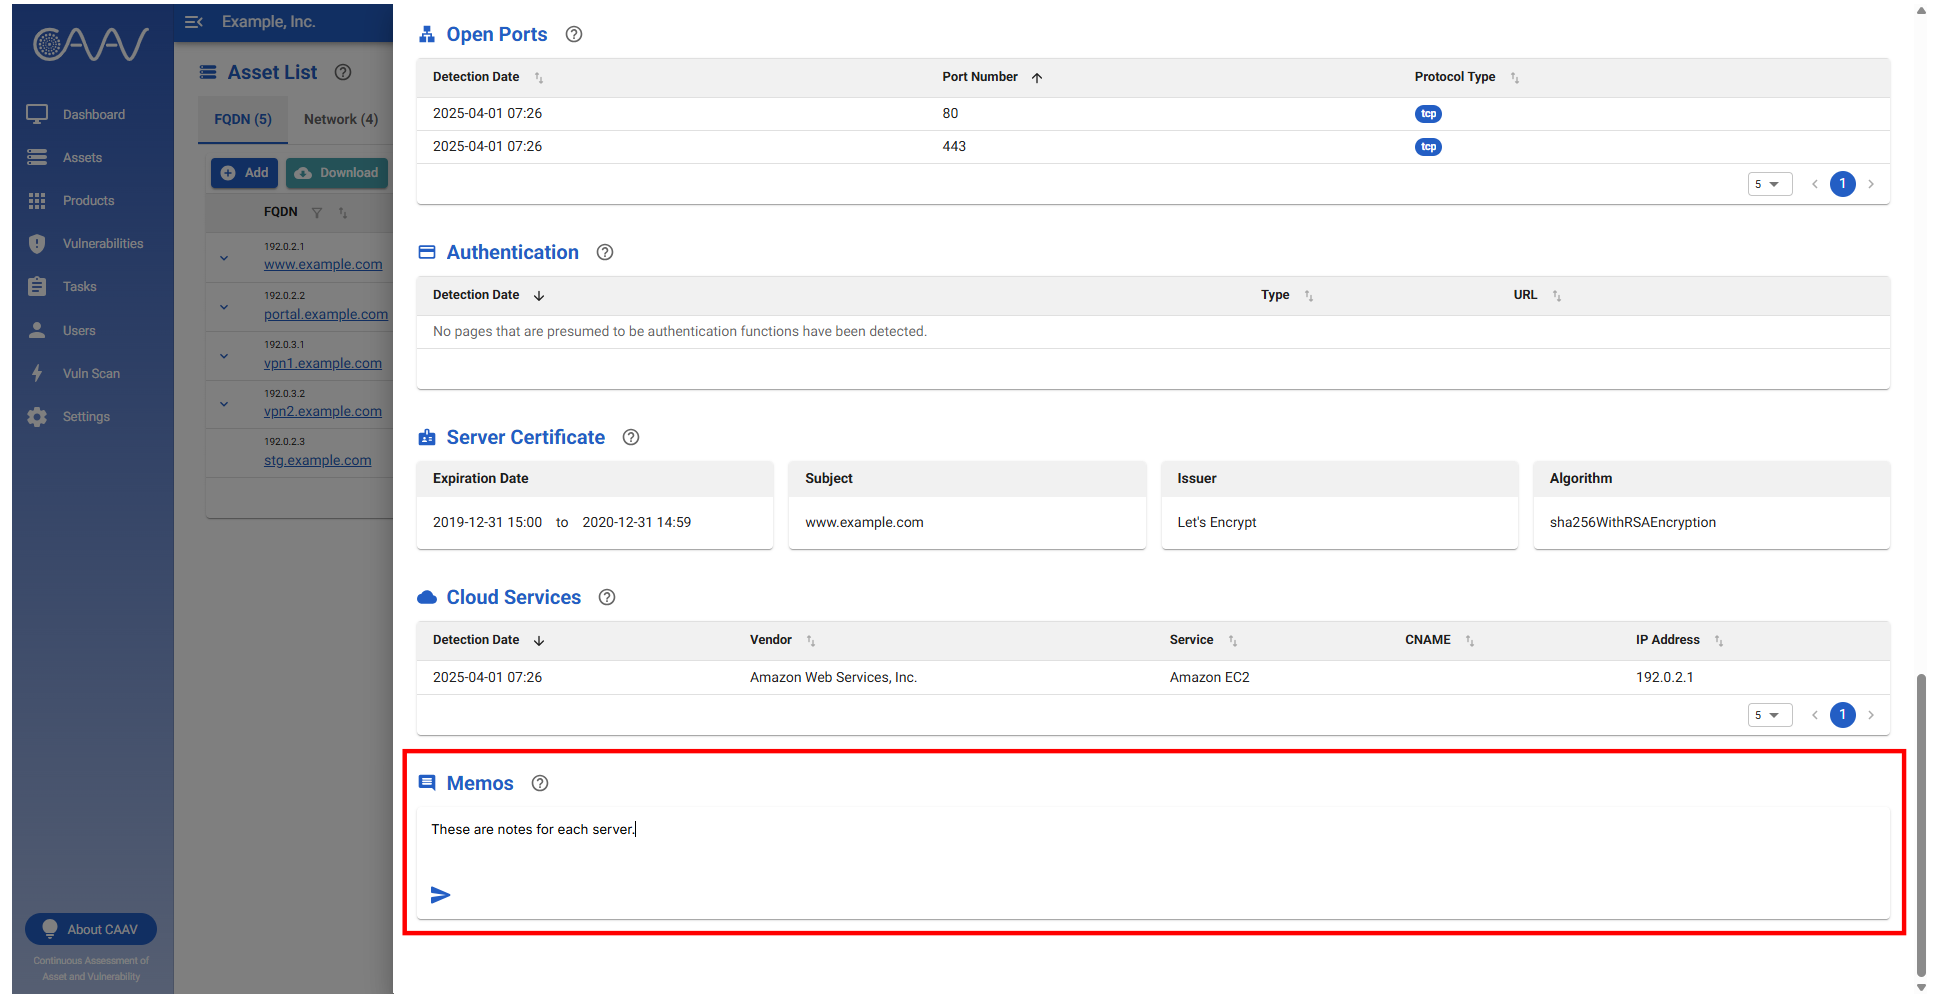
Registering notes
- You can register notes related to the server in the "Memos" section of the server details.
- Registered notes can be edited or deleted later.
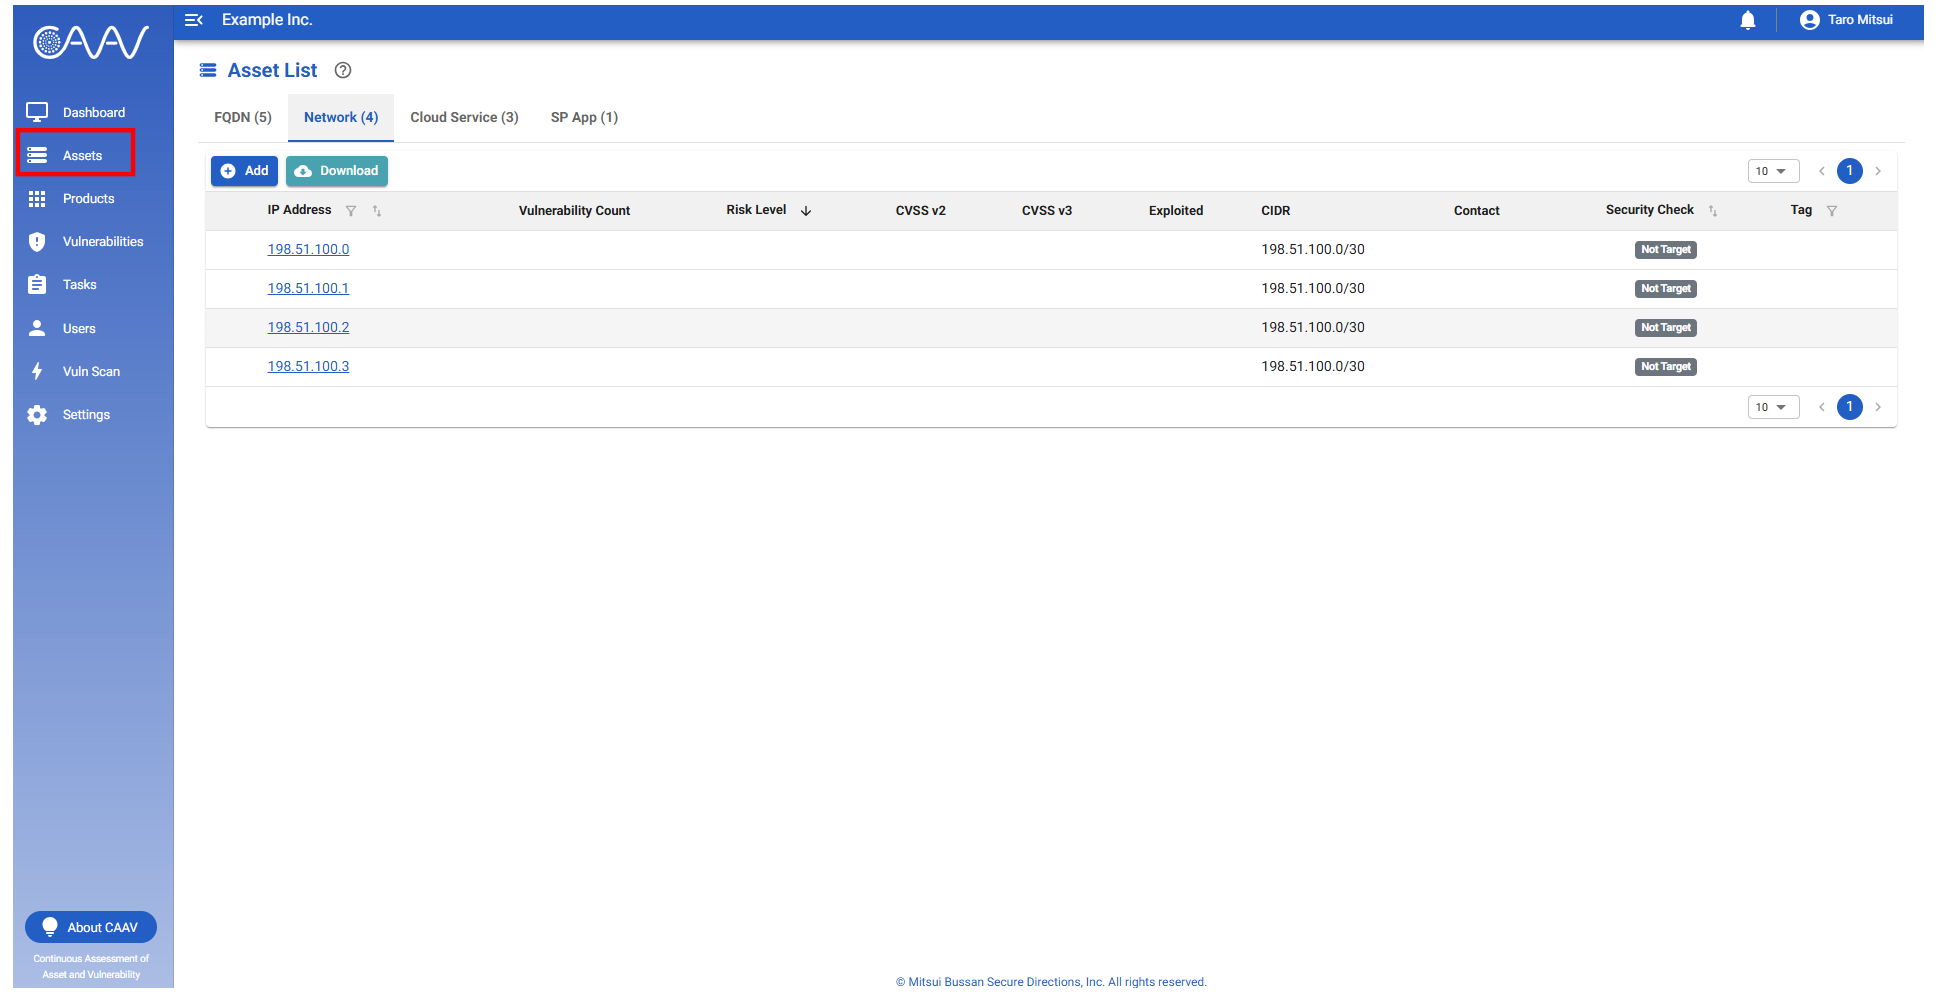
Network management
- The "Assets" menu also allows you to view a list of networks discovered during the inventory.
- Other operations are the same as those in the "FQDN" tab.
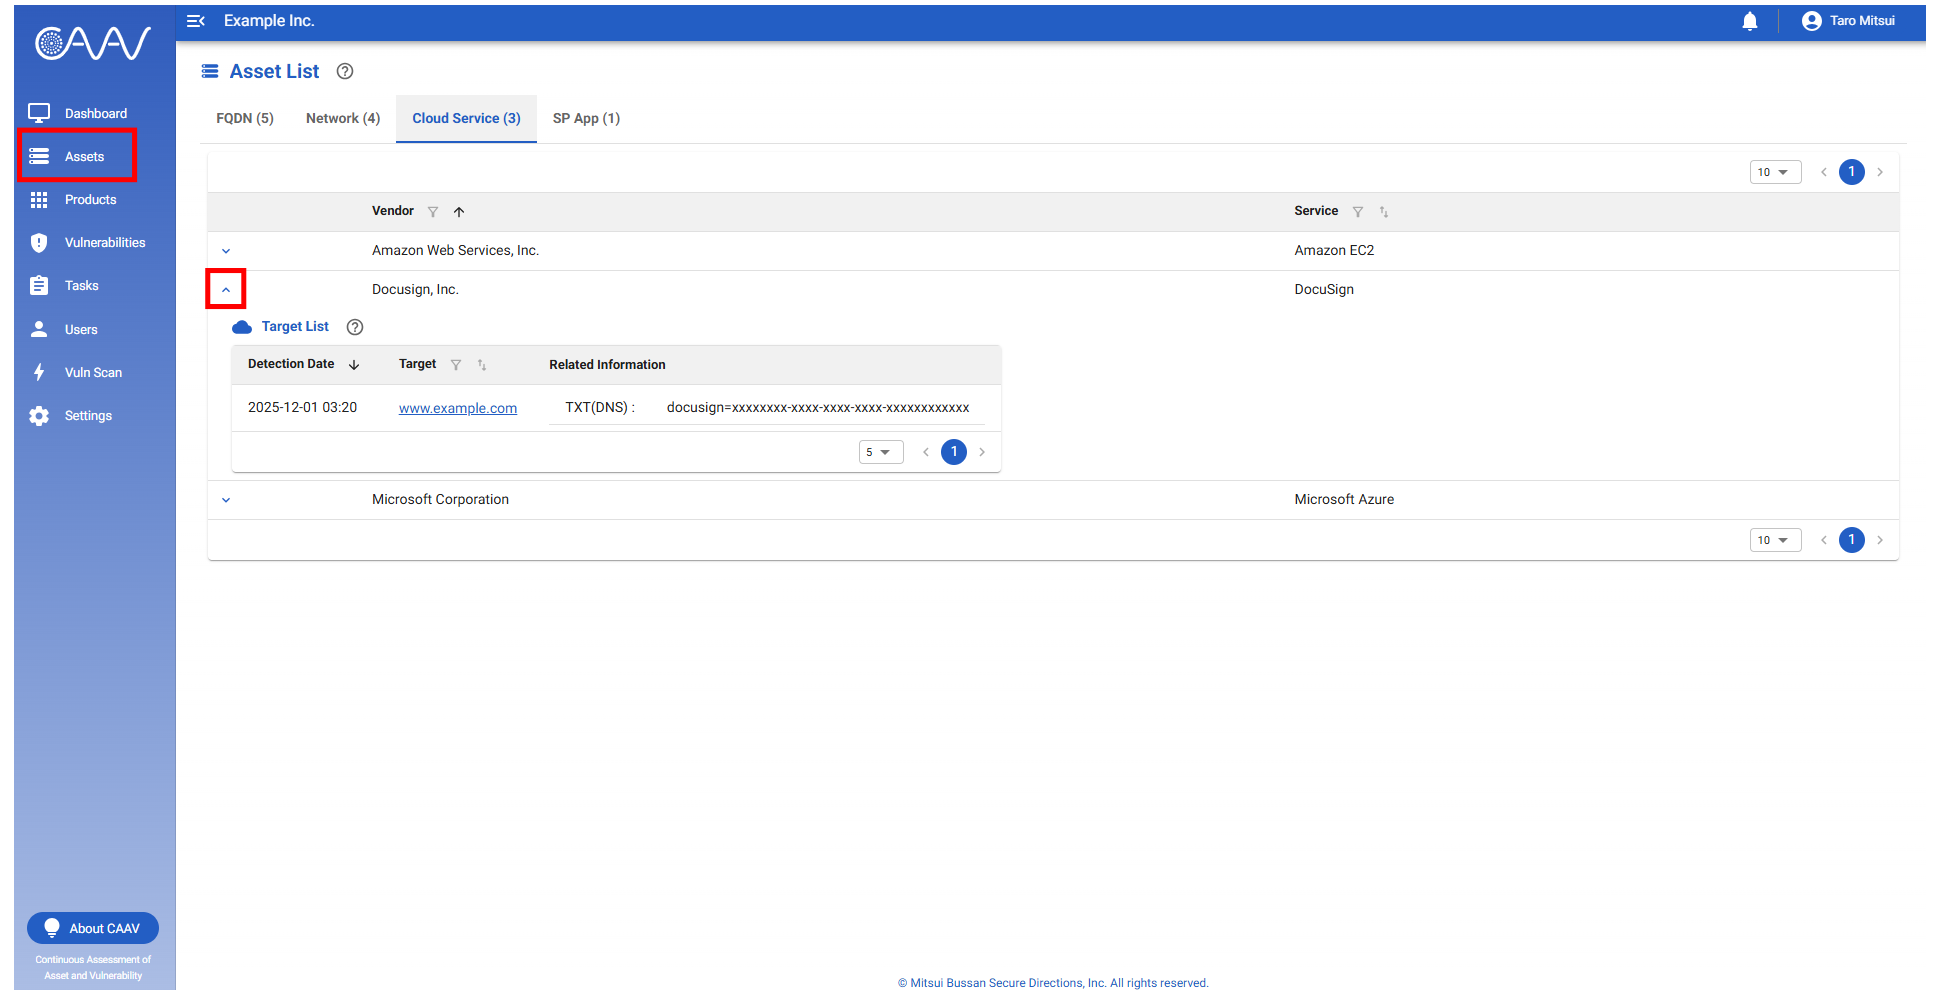
Cloud service management
- The "Assets" menu also allows you to view a list of cloud services discovered during the inventory.
- Expanding the arrow button on the left-hand side of the list allows you to view the list of detected targets for the relevant cloud service.
- For cloud services detected as running on the target server, you can also view them on the server's details screen.
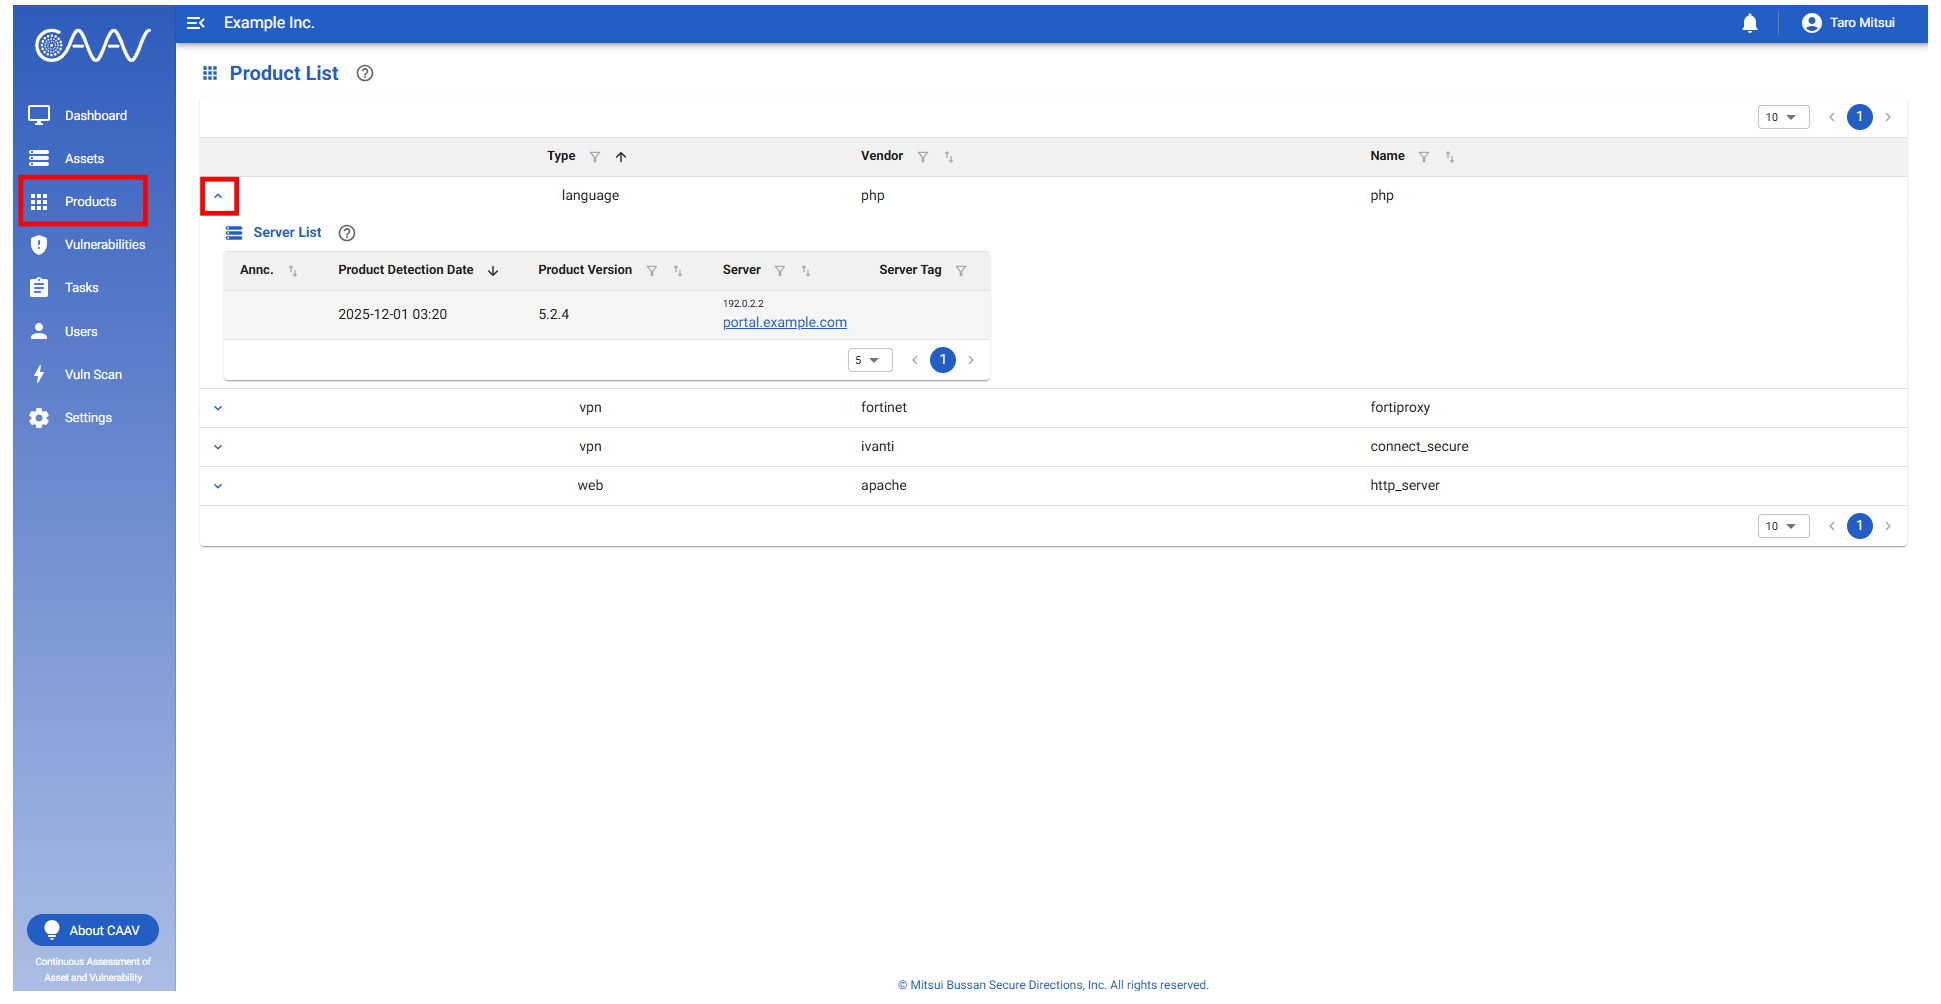
Product list
- The "Products" menu allows you to view a list of products detected as running on the security check target server.
- Expanding the arrow button on the left-hand side of the list allows you to view the list of servers where the relevant product has been detected.
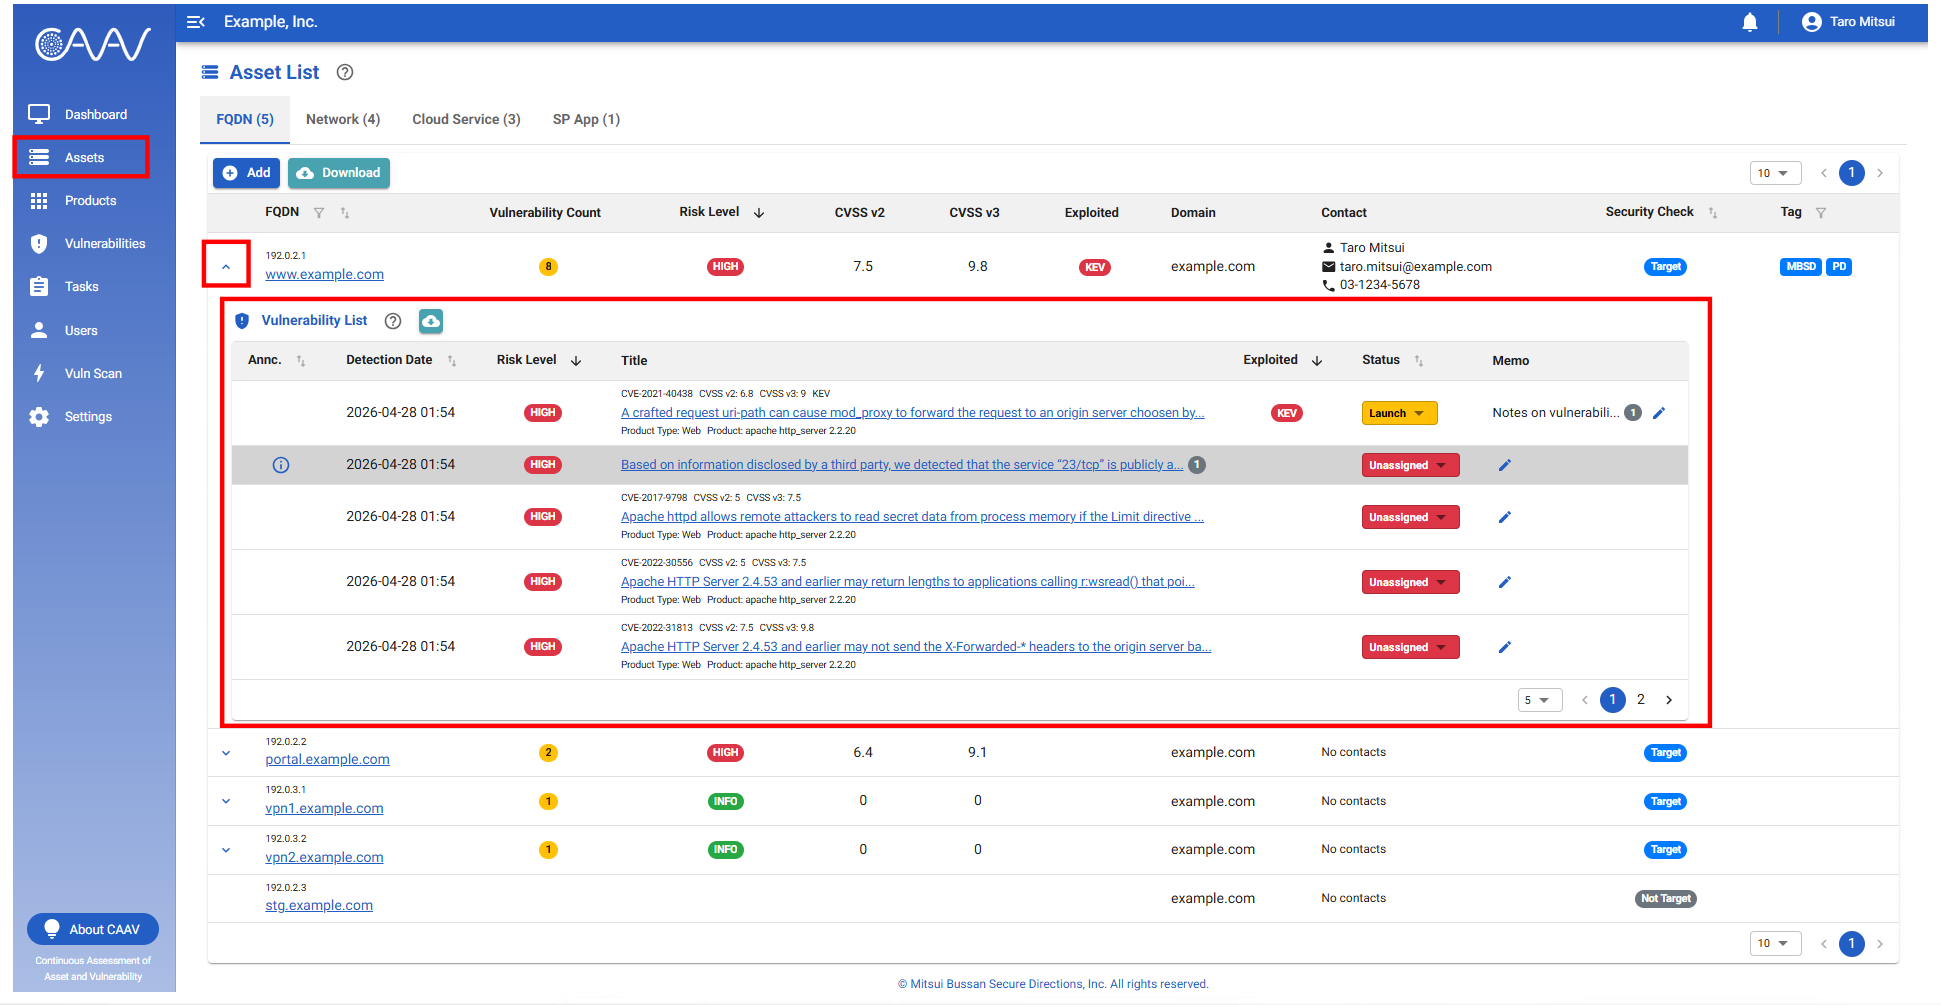
Check server vulnerabilities
Check server vulnerabilities
- In the "Assets" menu, clicking the arrow button on the left-hand side of the list will expand it to display a list of vulnerabilities present on the server. Clicking on a vulnerability title will allow you to view detailed information about that vulnerability.
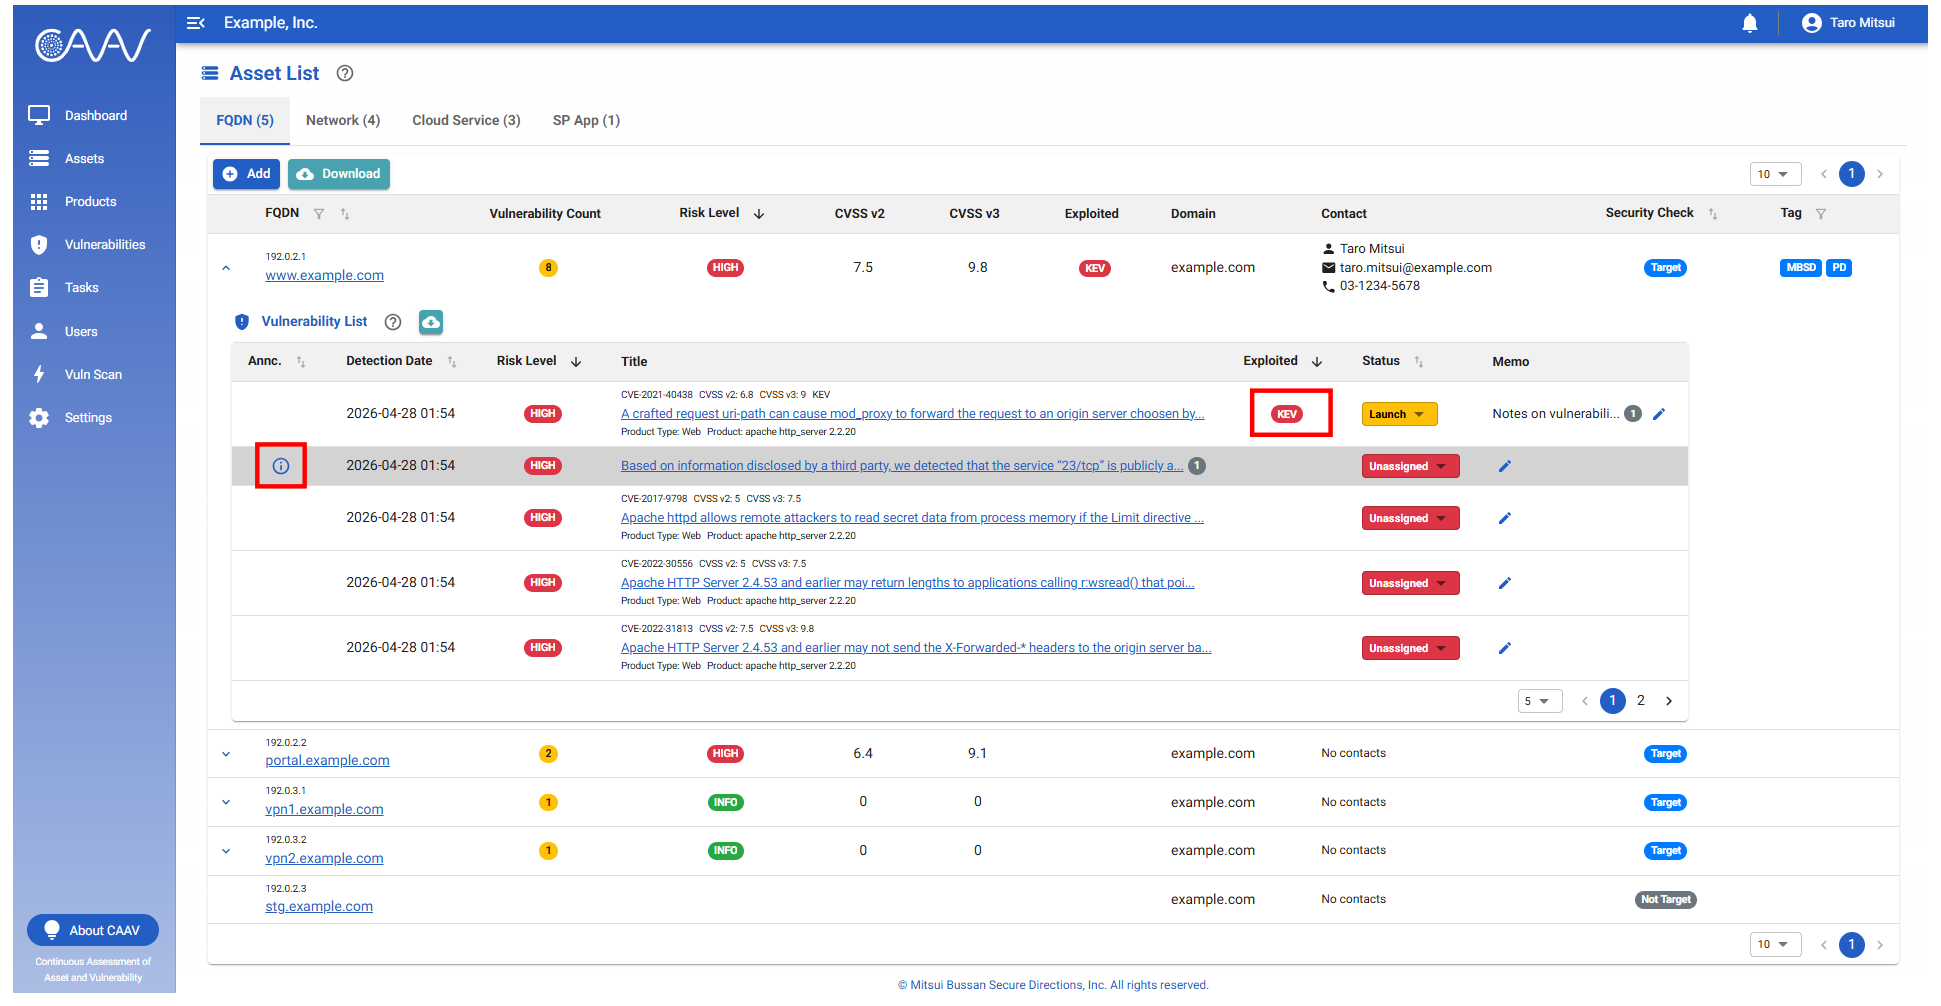
- Vulnerabilities listed in the CISA KEV (Known Exploited Vulnerabilities) catalogue are indicated by "
 ".
- Vulnerabilities no longer detected by the latest security checks will display as "
 " and appear greyed out.
Identify servers affected by the vulnerability
- In the "Vulnerabilities" menu, you can view a list of detected vulnerabilities.
- Vulnerabilities are categorized as either "CVE" or "Misconfiguration", each managing the following information.
| Type | Description |
|---|---|
| CVE | Vulnerabilities from product running on the server |
| Misconfiguration | Vulnerabilities from the server's own configuration |
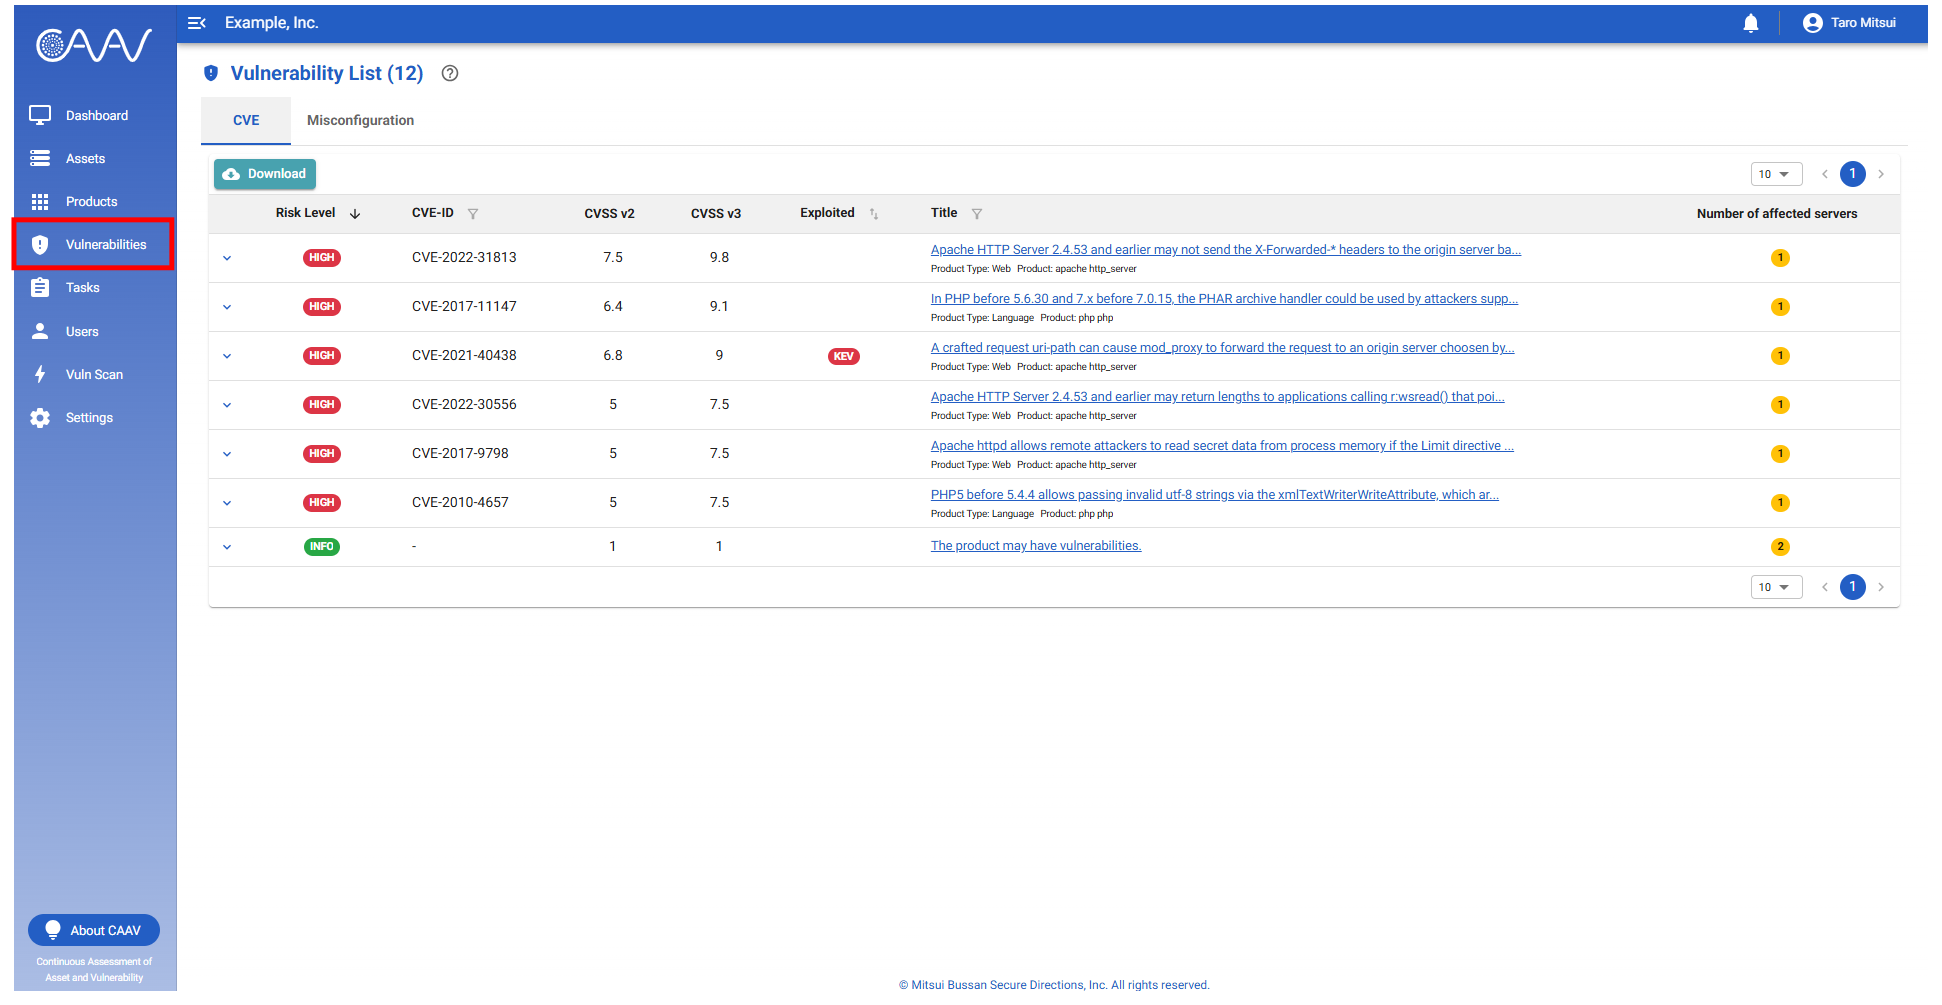
-
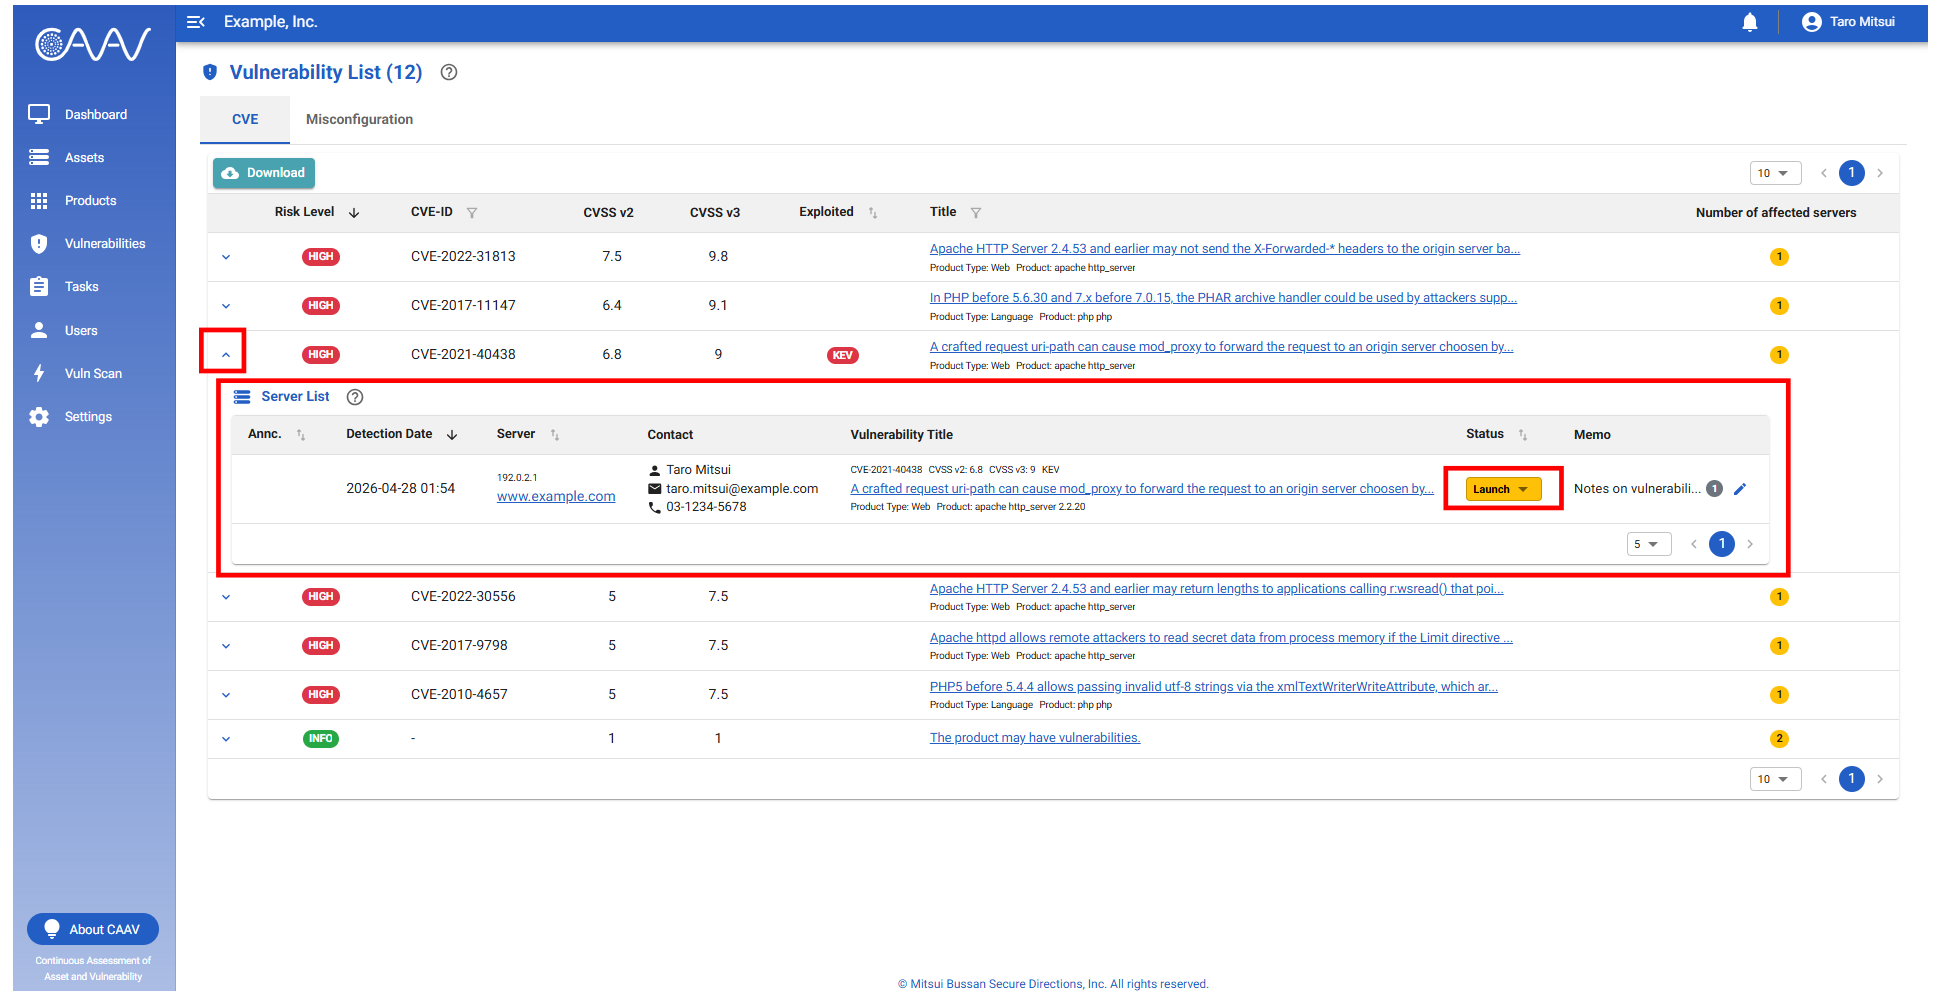
Expanding the arrow button allows you to view a list of servers affected by the vulnerability.
Furthermore, clicking the status button and selecting "Launch" allows you to instruct the server's contacts to address the vulnerability.
Tasks are generated according to the instructions.
Vulnerability details
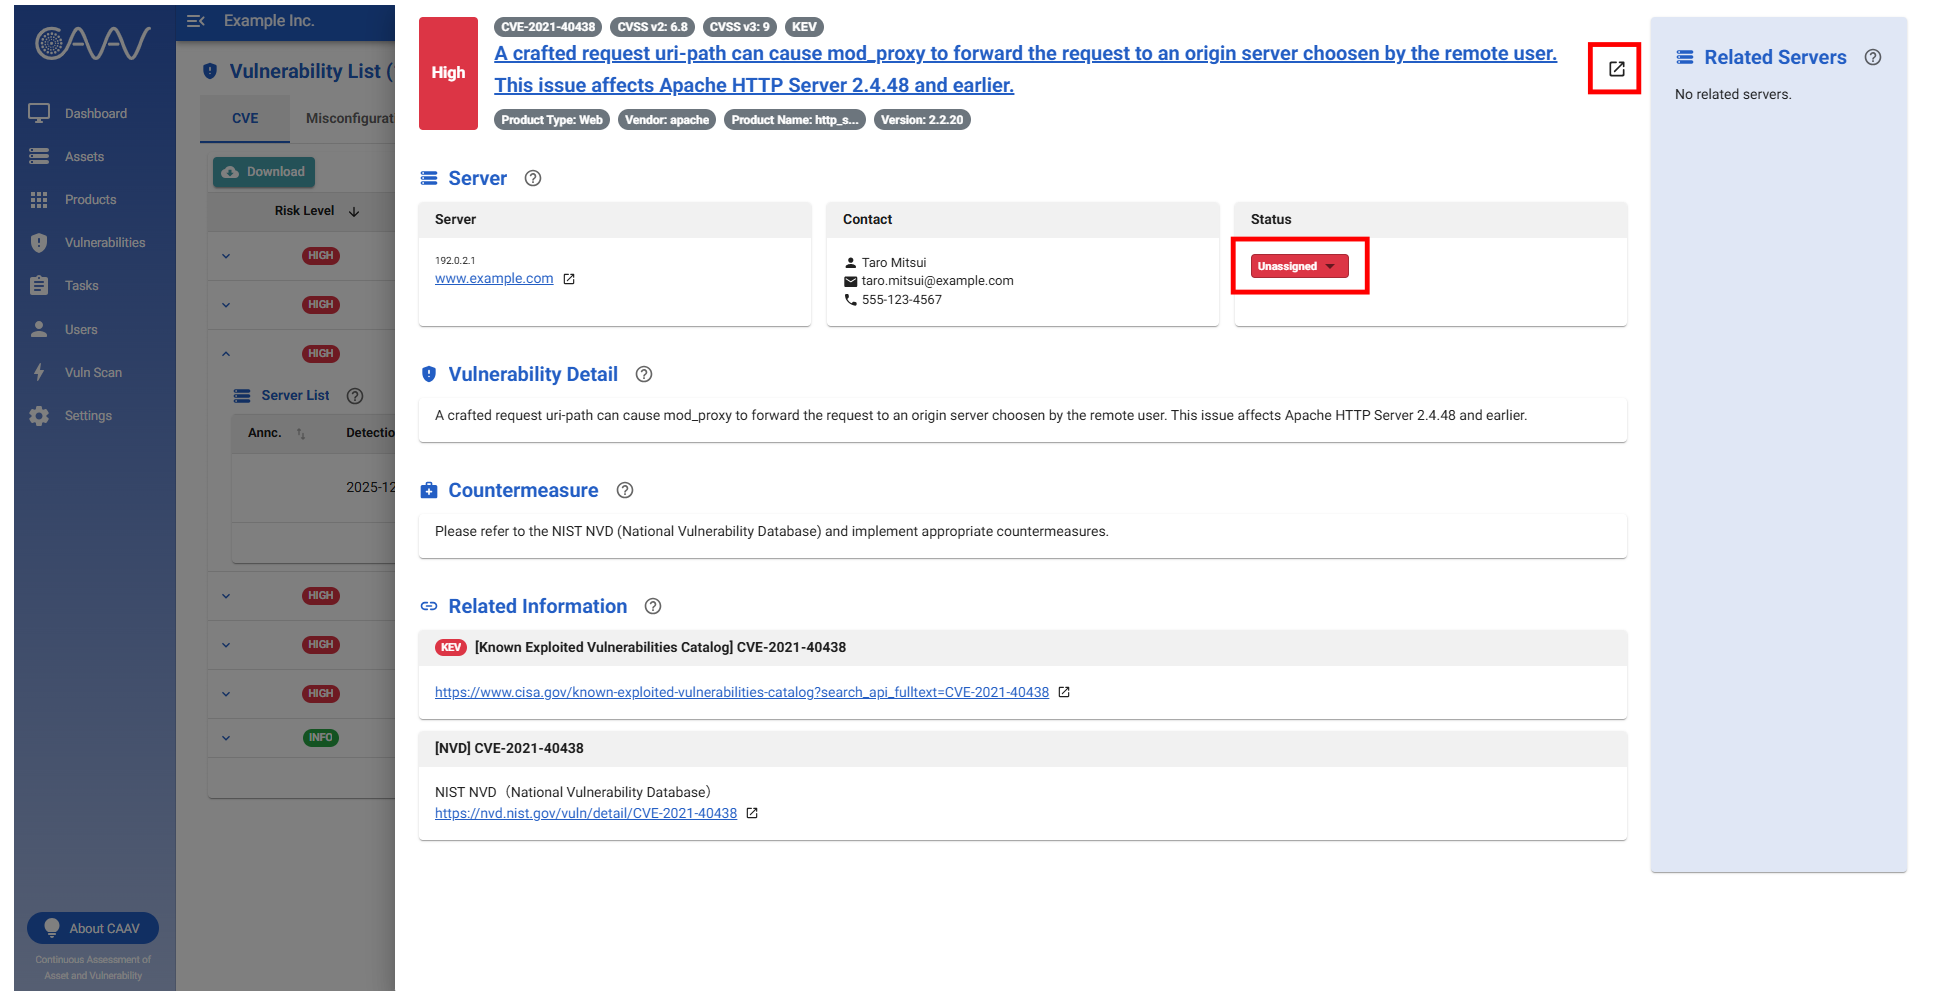
- Clicking the vulnerability title link will allow you to view detailed information, countermeasures, and related material.
- Additionally, it can reference other servers with the same vulnerability and provide instructions.
- Clicking the pop-up icon to the right of the title will allow you to view the vulnerability details in a new tab.
Registering vulnerability notes
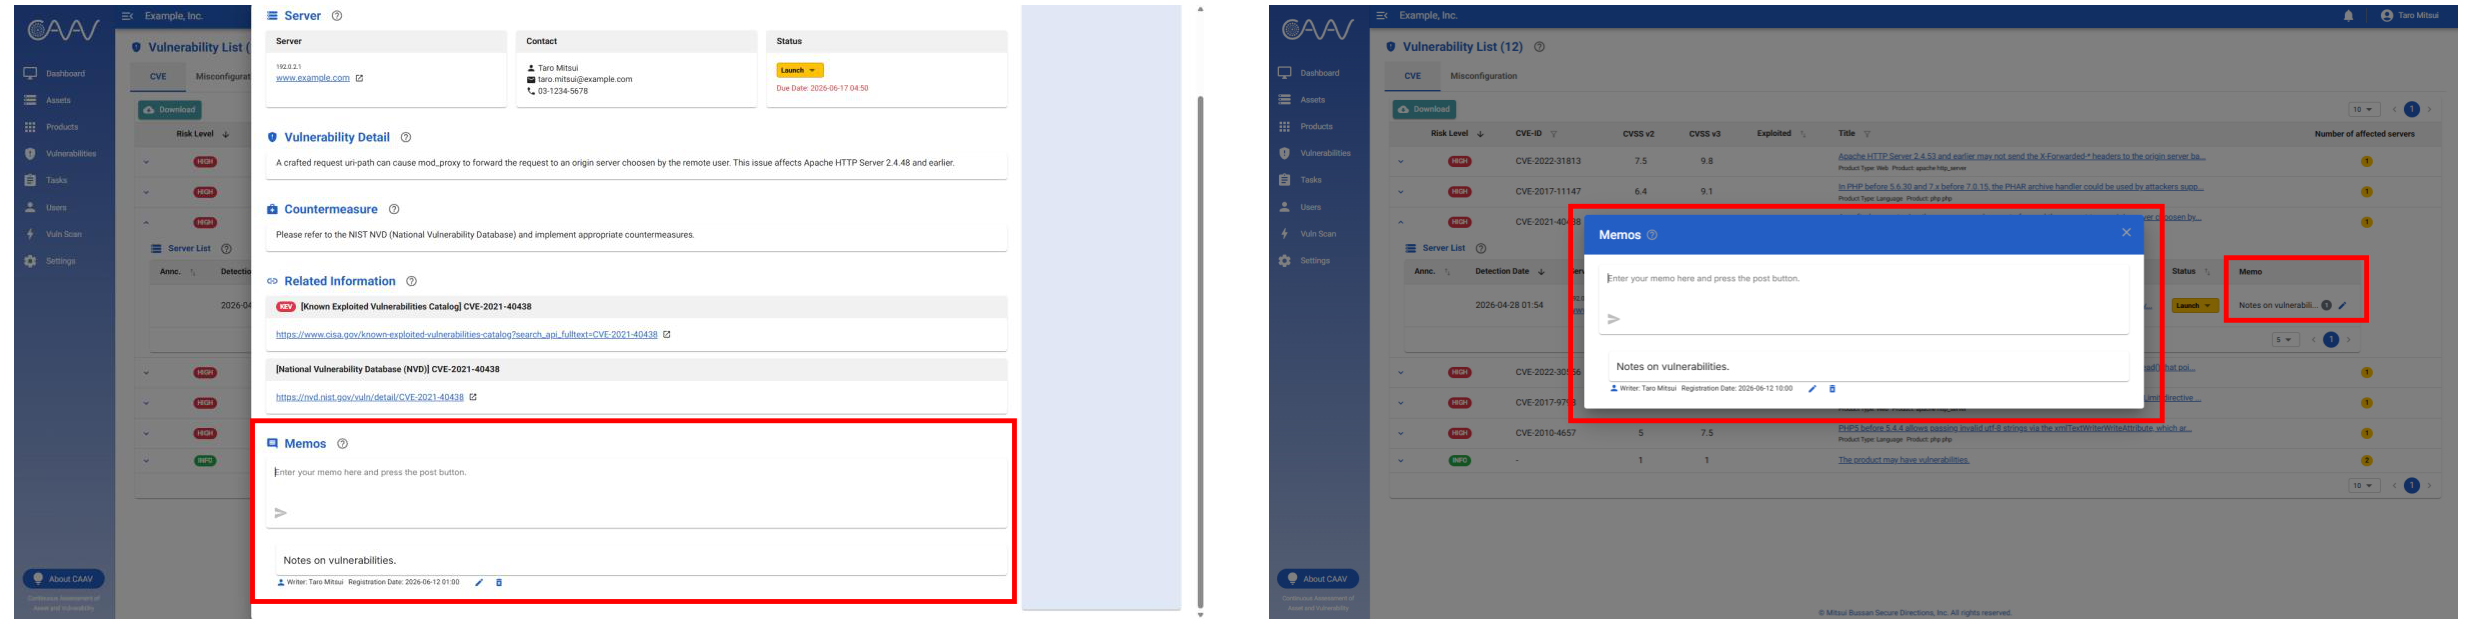
- You can register notes related to the vulnerability in the "Memos" section of the vulnerability details. You can edit or delete the notes only within 24 hours of adding them.
- You can display a dialog box that allows you to perform the same operation by clicking the "Memo" column on the list screen in each section.
Download vulnerability list
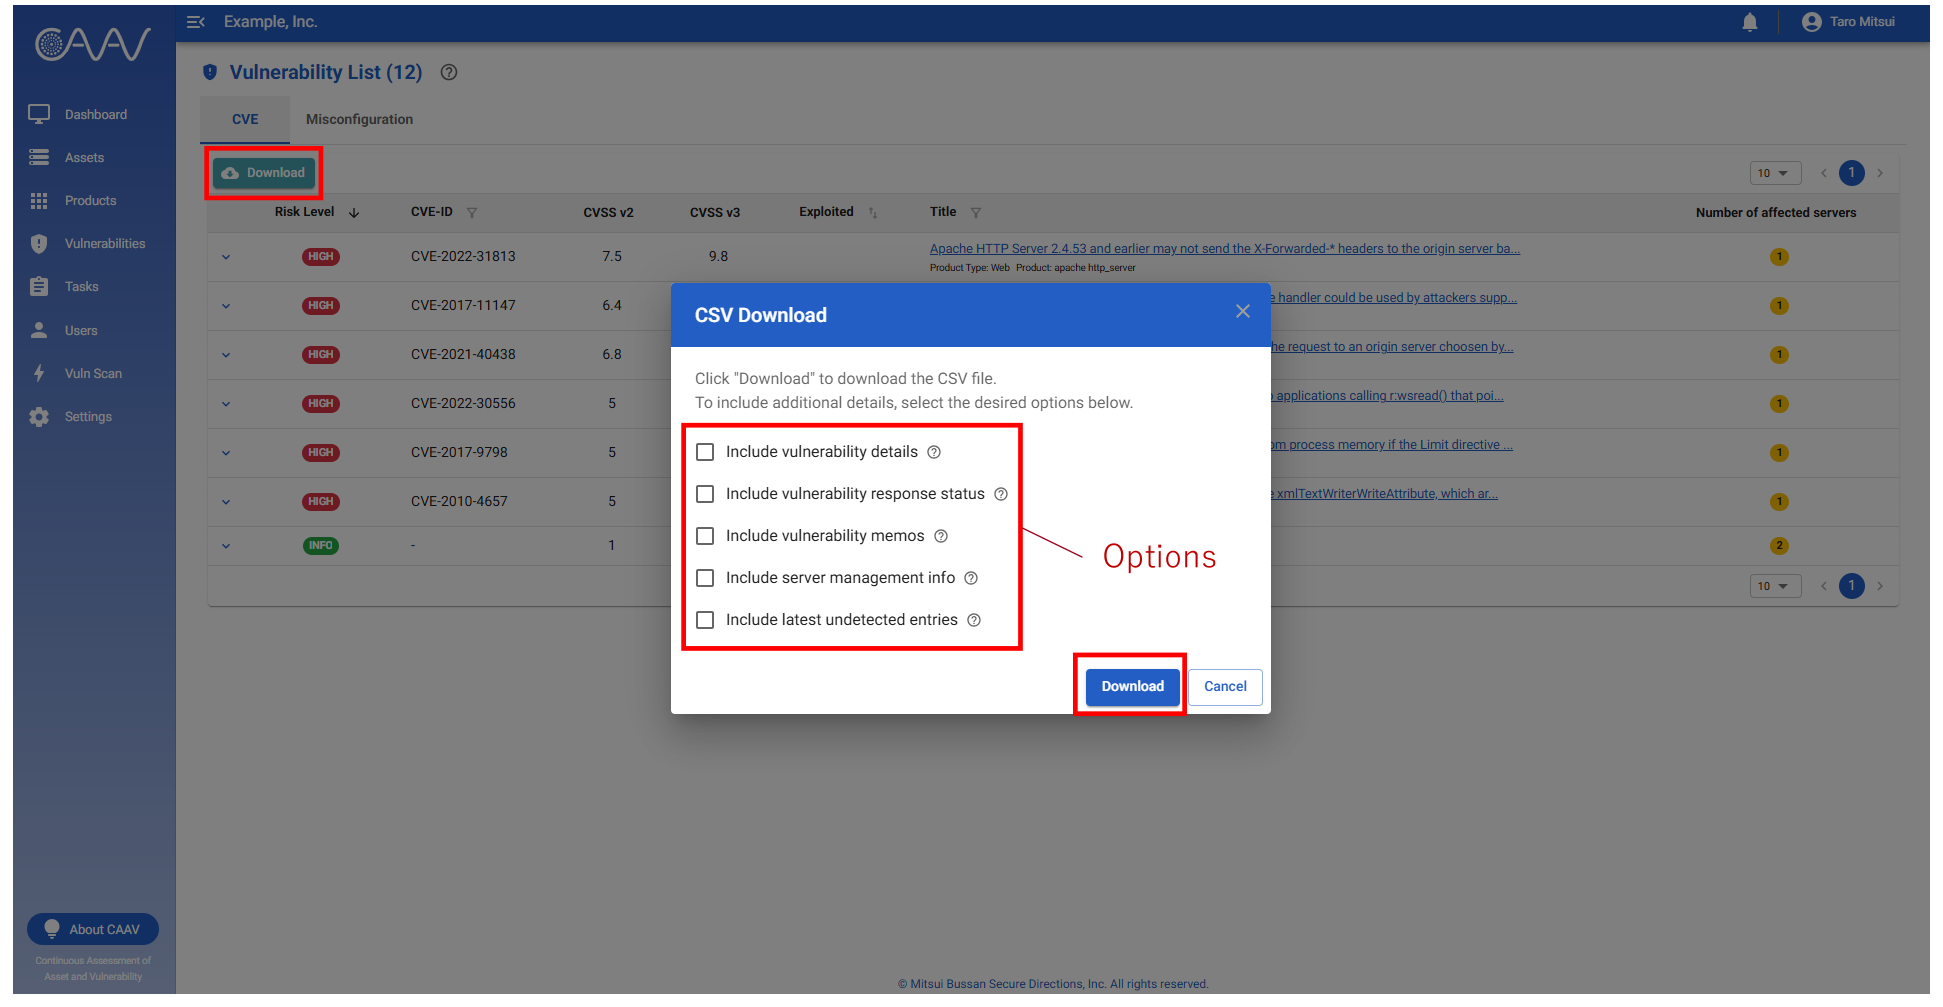
- To download the vulnerability list in CSV format, click the "Download" button at the top of the list.
- Select any required options, then click the "Download" button at the bottom of the screen to begin the download.
- Please note that selecting options increase download times and the size of CSV files.
Check server misconfigurations
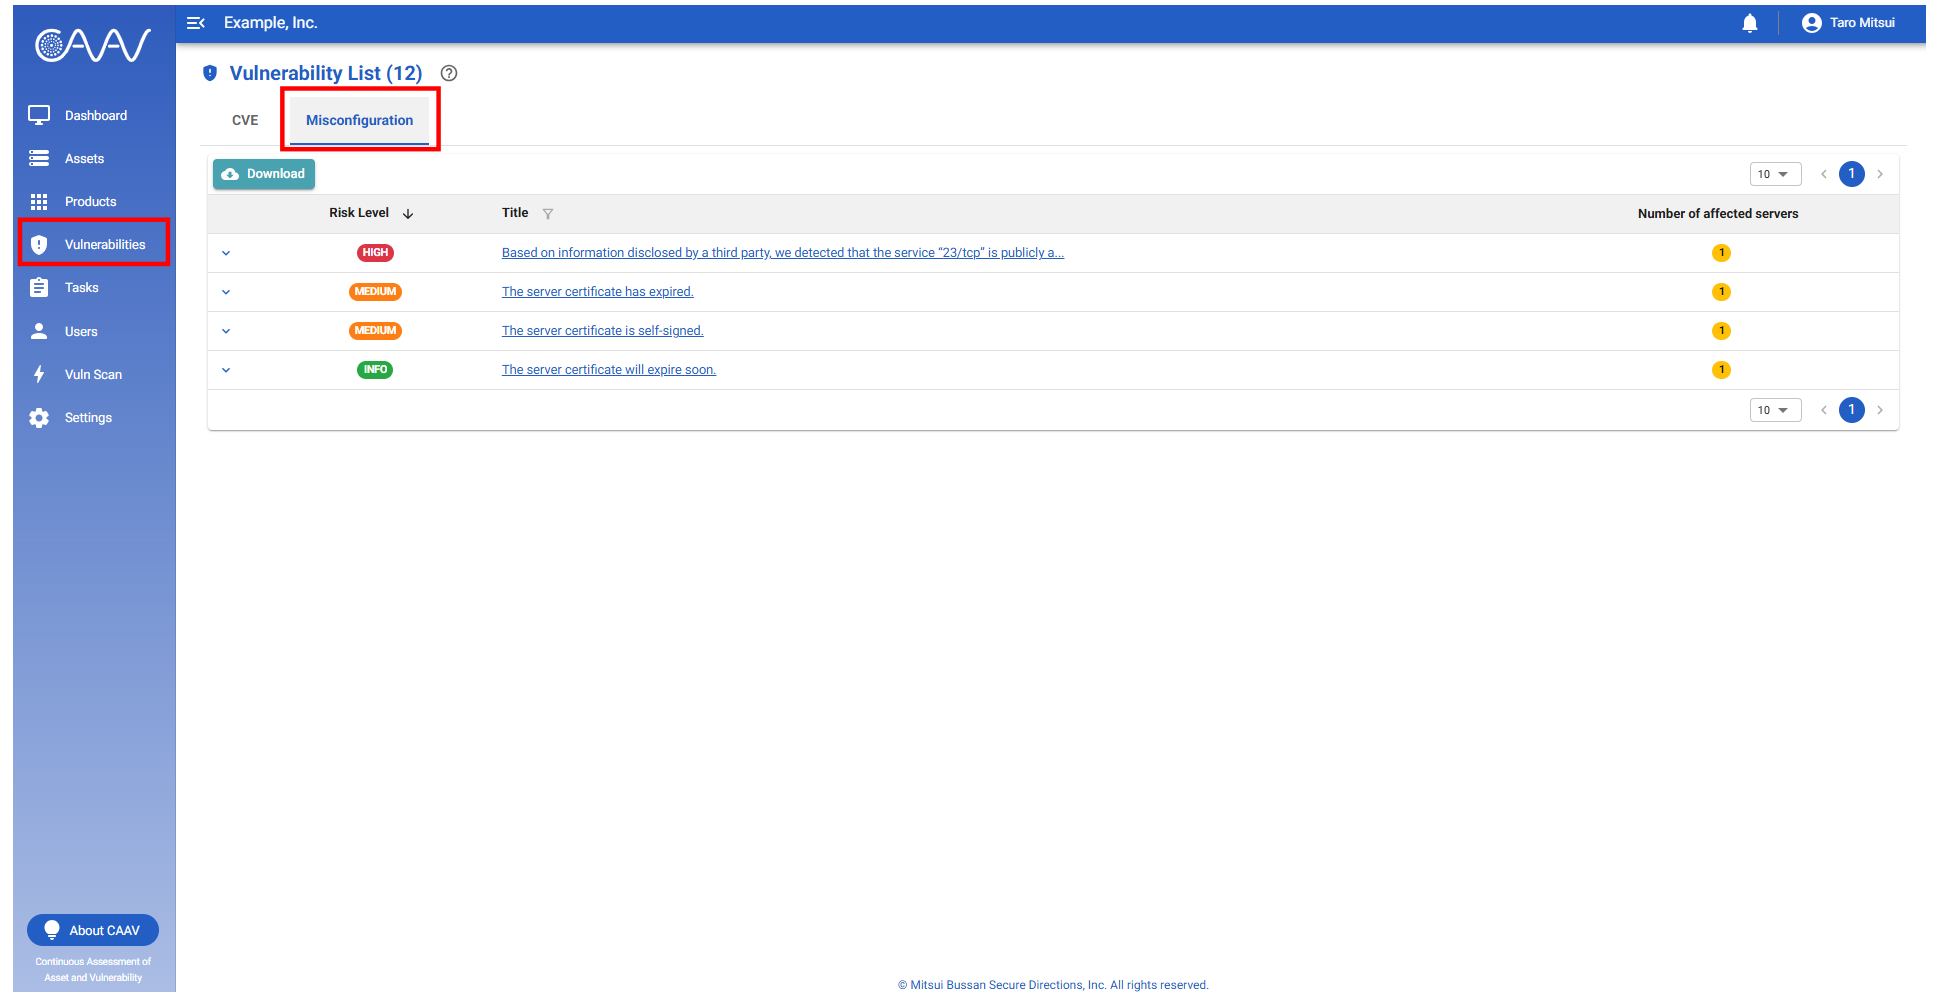
- The "Vulnerabilities" menu also allows you to view a list of vulnerabilities from the server's own misconfiguration.
- Other operations are the same as in the "CVE" tab.
Download misconfiguration list
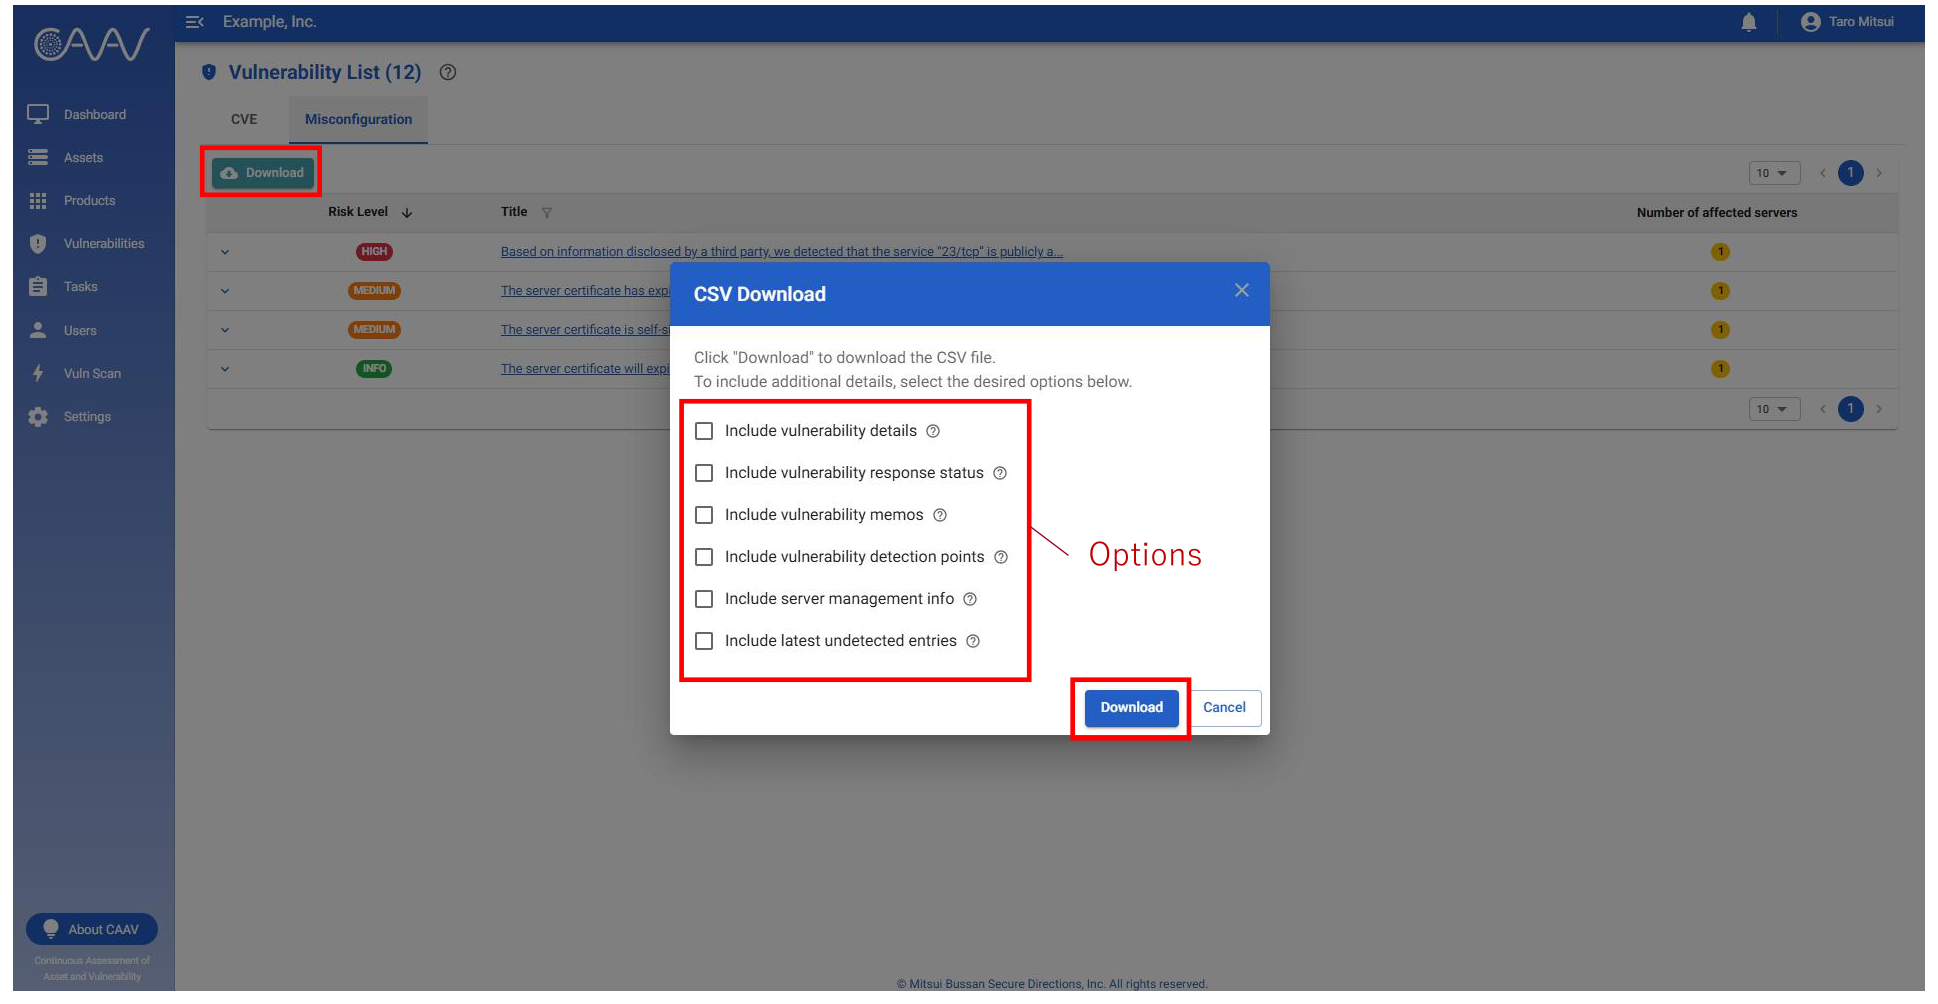
- To download the misconfiguration list in CSV format, click the "Download" button at the top of the list.
- Select any required options, then click the "Download" button at the bottom of the screen to begin the download.
- Please note that selecting options increase download times and the size of CSV files.
Assign tasks to manage vulnerabilities
Launch instructions for addressing vulnerabilities
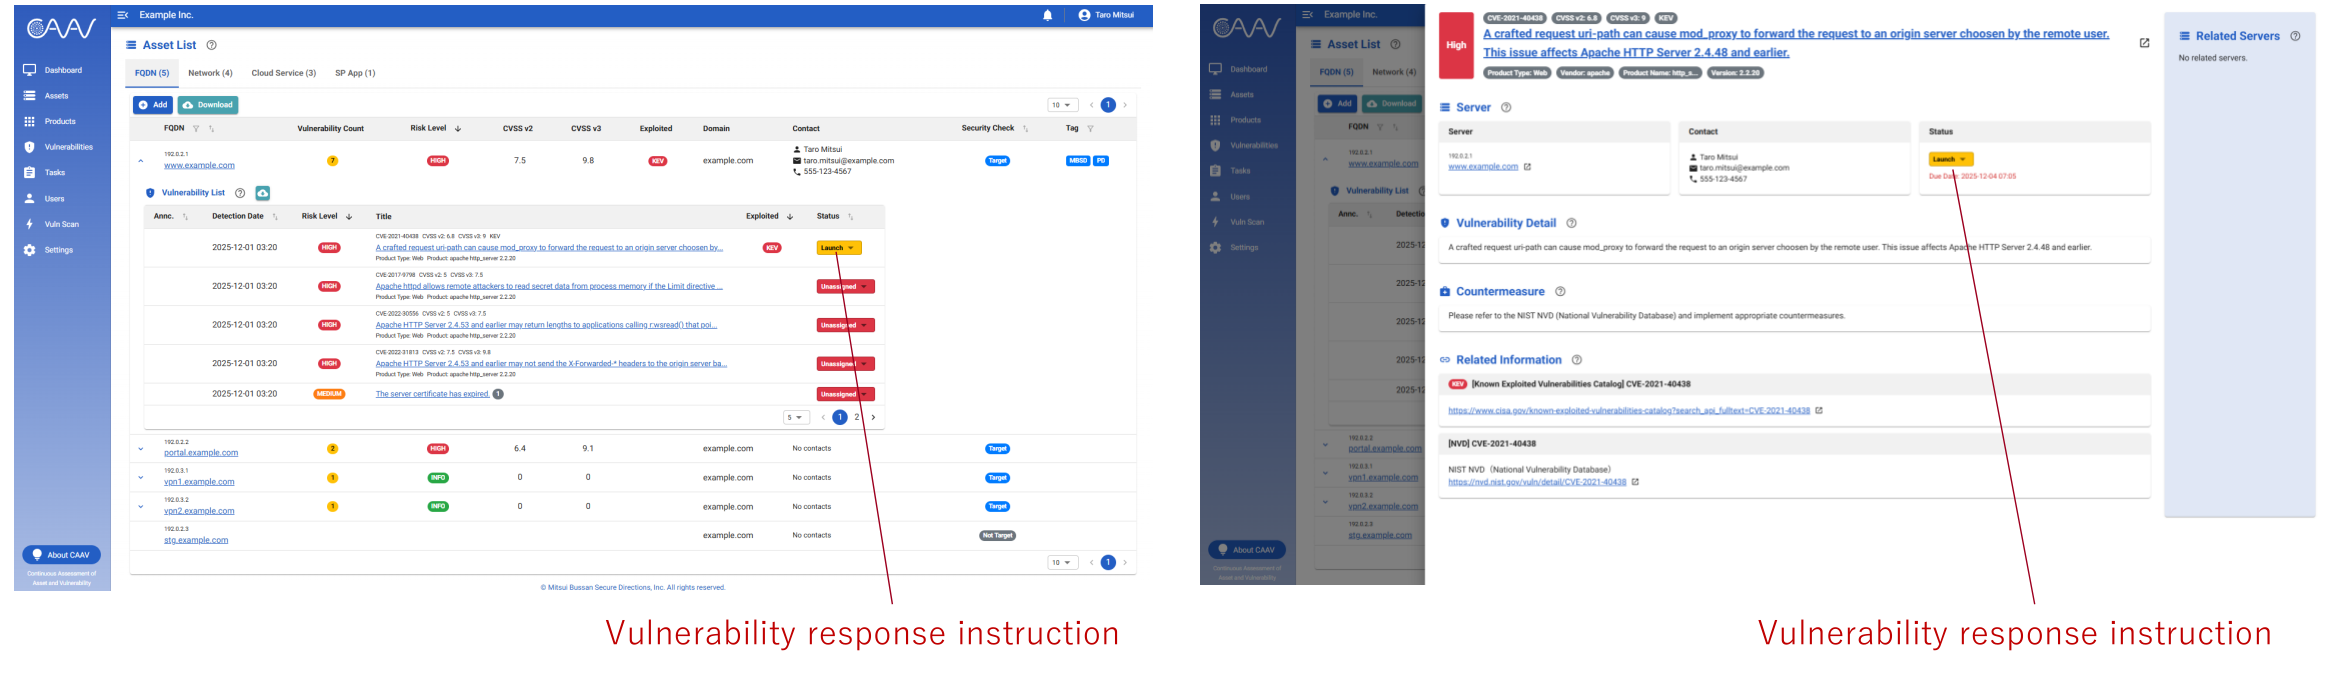
- You can issue response instructions for vulnerabilities from the vulnerability list or the vulnerability details screen.
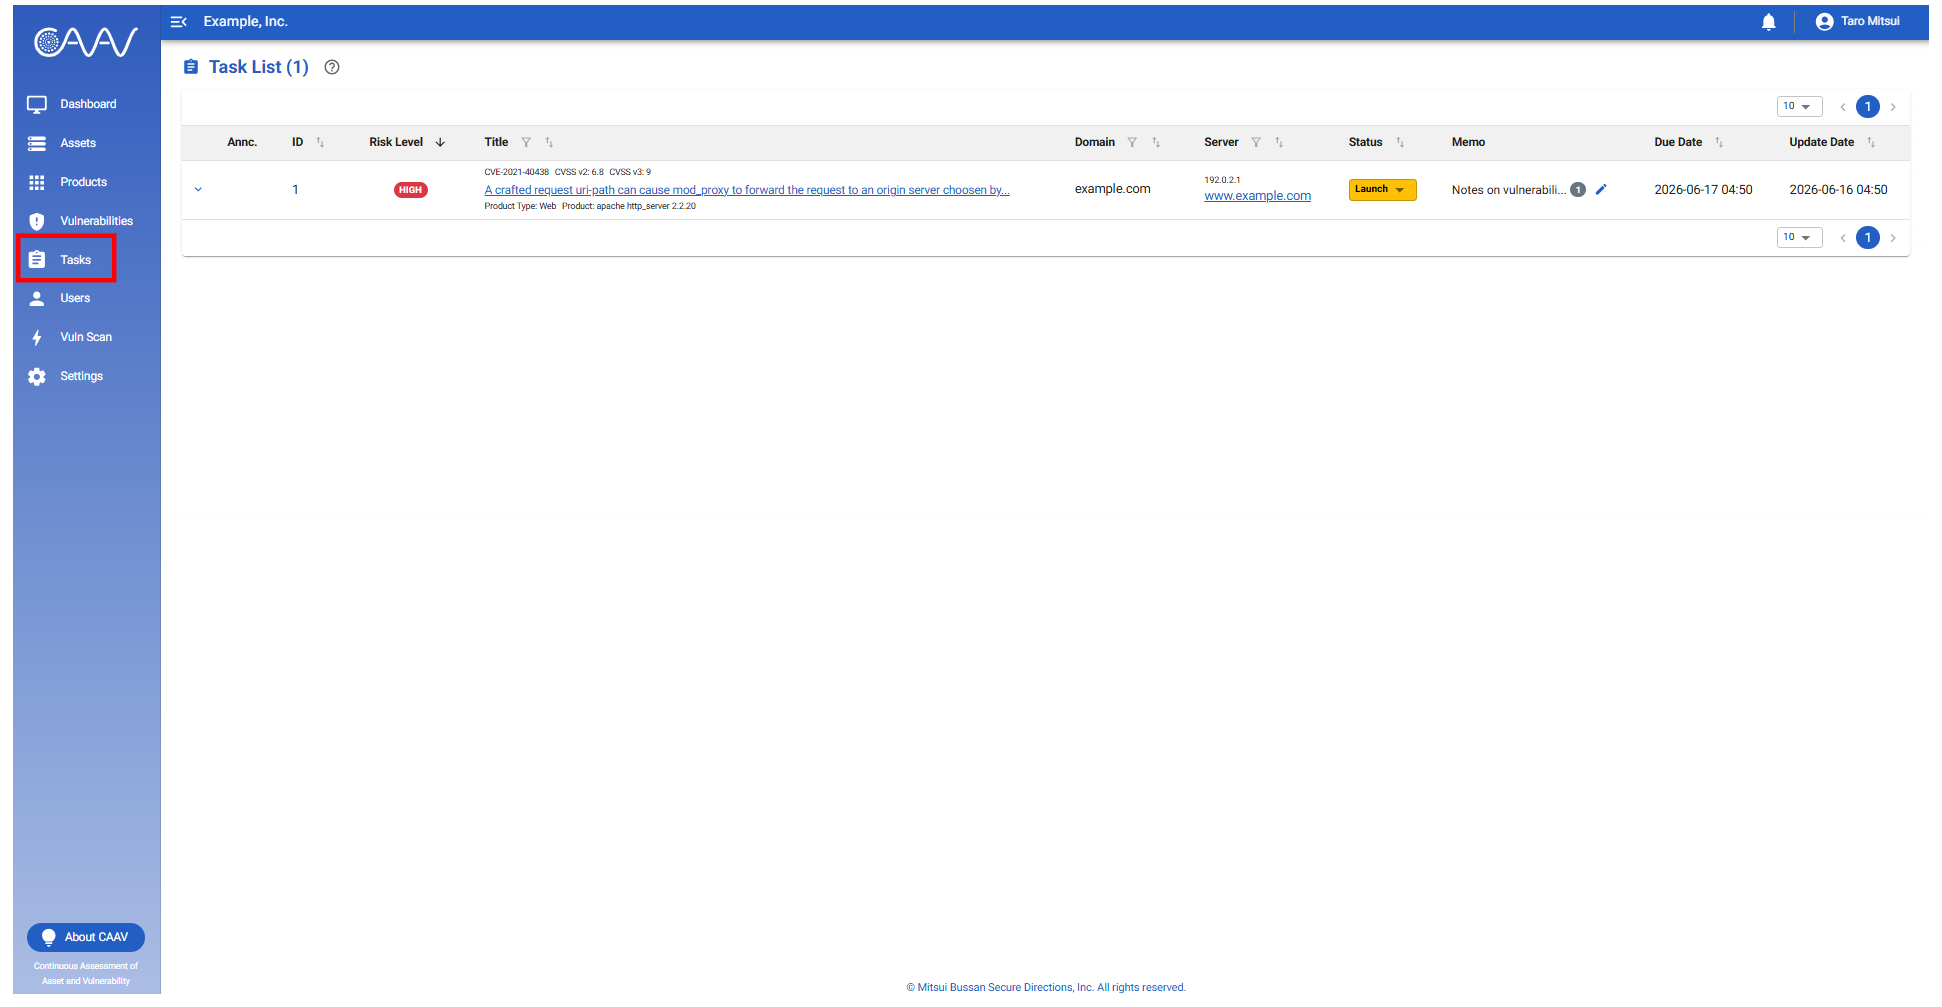
Manage task status
- Launched tasks are displayed as a task list and can be managed.
Vulnerability scan
Vulnerability scan overview
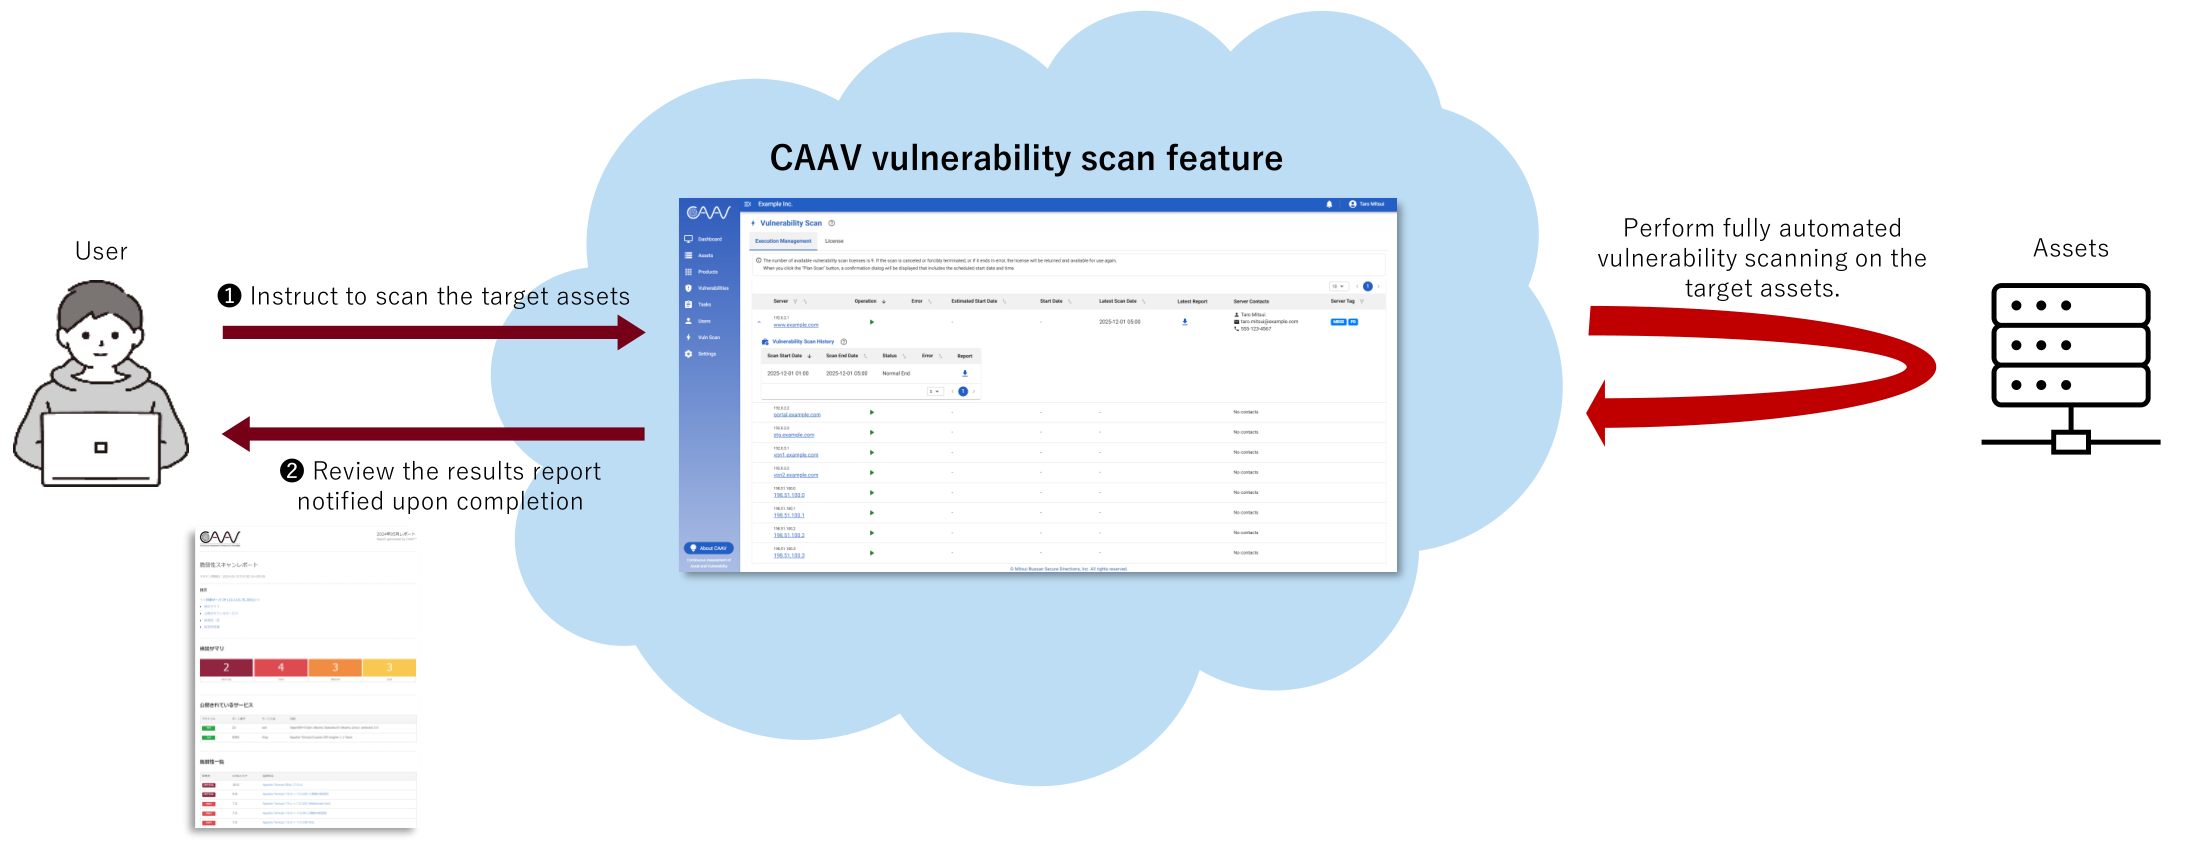
- This feature performs vulnerability scans on publicly accessible assets.
- By simply selecting the target asset from the CAAV interface, you can utilize the vulnerability scanning feature, which goes beyond security checks to detect vulnerabilities from an attacker's perspective (involving simulated attack packets).
- When utilizing the vulnerability scan, a separate dedicated license must be purchased.
- For license pricing and terms, please contact us (see "Contact").
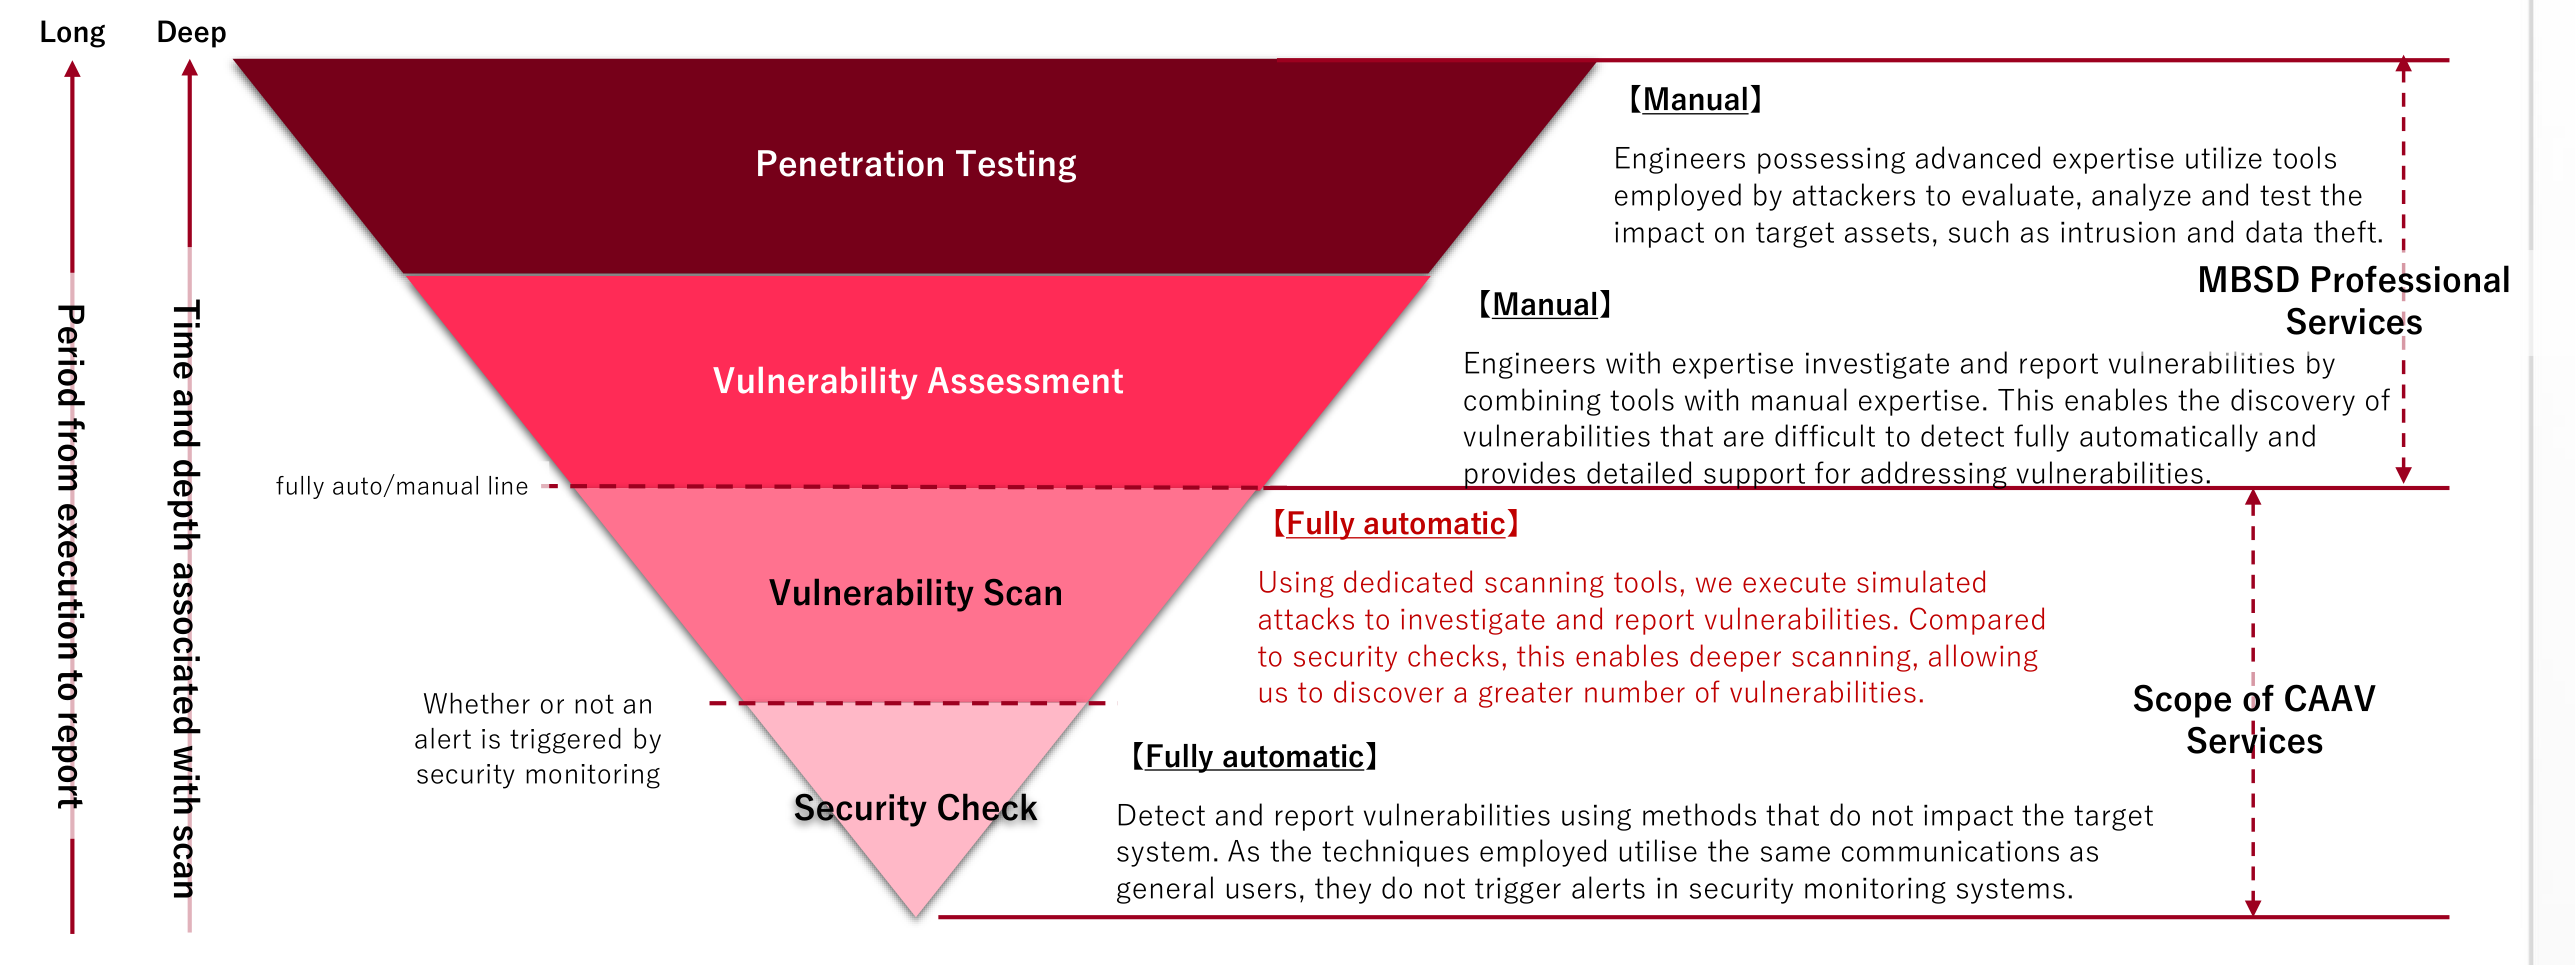
Vulnerability scan positioning
- Vulnerability scanning employs dedicated scanning tools to perform high-precision vulnerability checks from an attacker's perspective and in a fully automated manner.
- Consequently, it can perform a deeper scan than security checks, enabling the detection of more vulnerabilities.
- Please note that vulnerability scans involve simulated attack packets, which may trigger security monitoring alerts.
Vulnerability scan target list
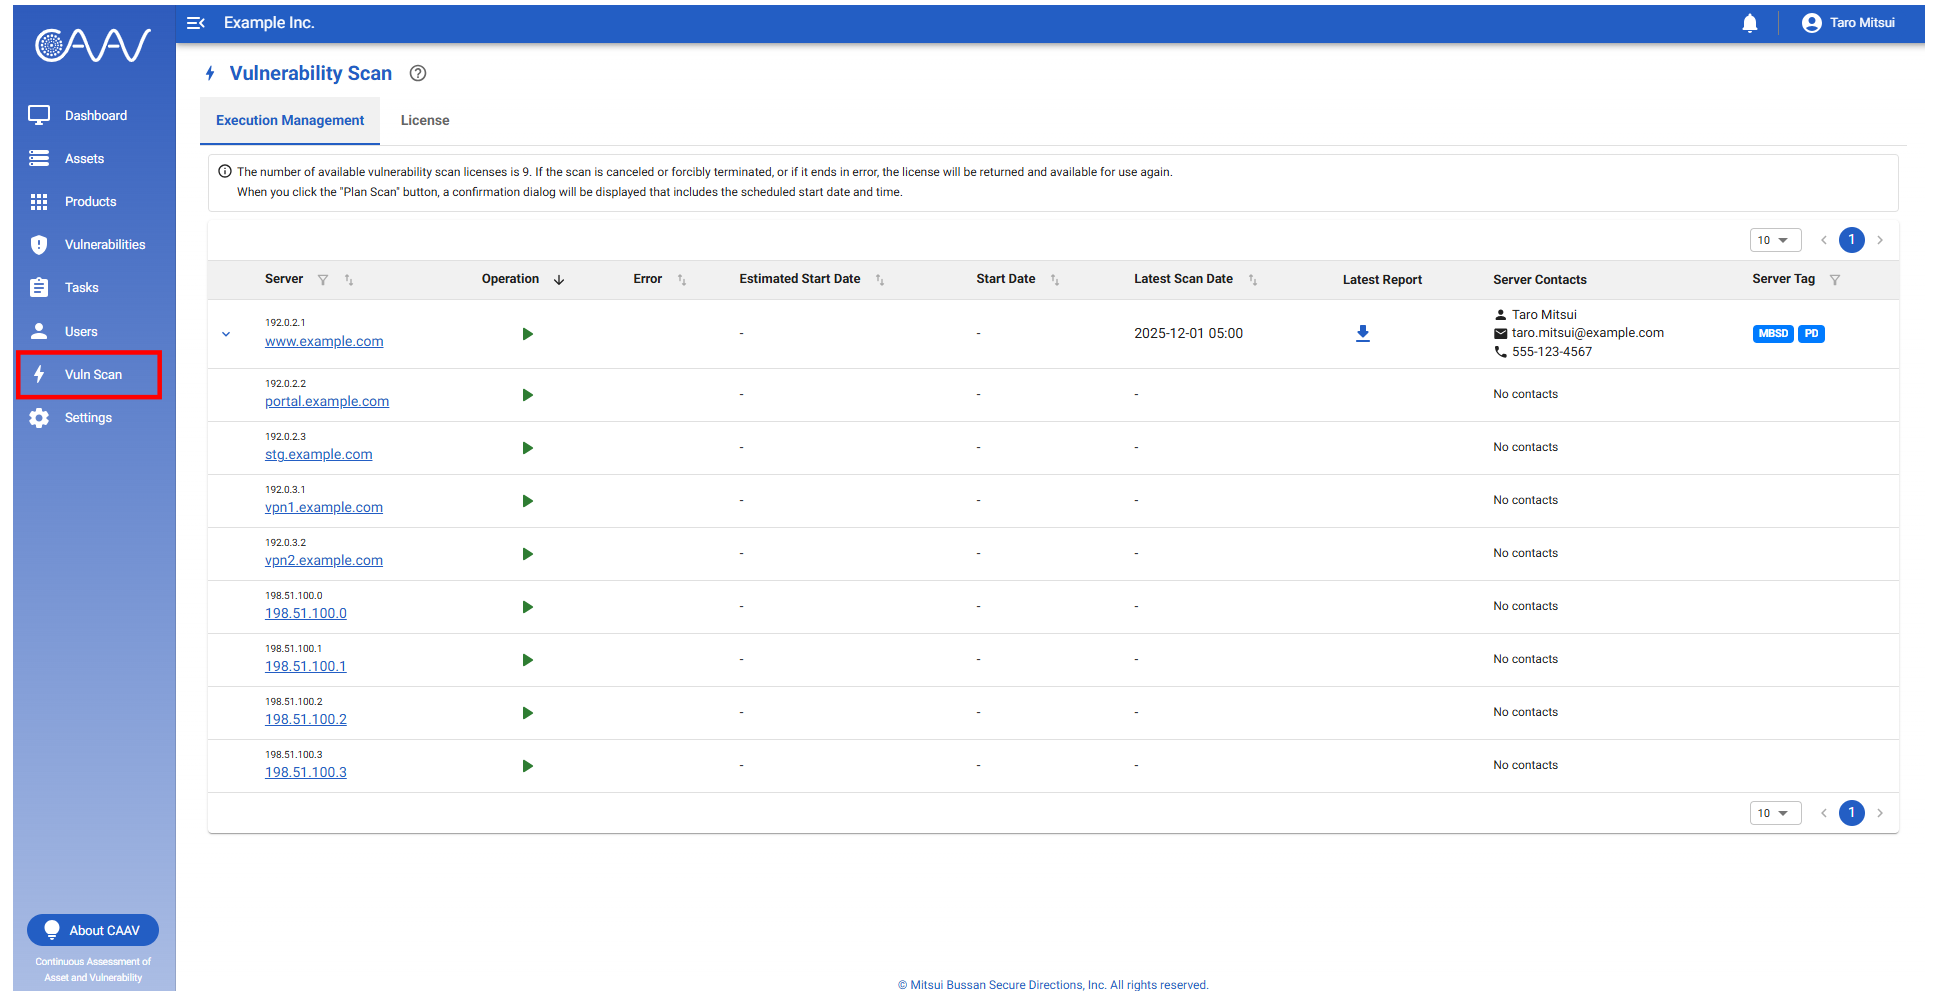
- You can view the list of target servers from the "Execution Management" tab in the "Vuln Scan" menu.
- You can execute vulnerability scans by selecting the target servers from this screen.
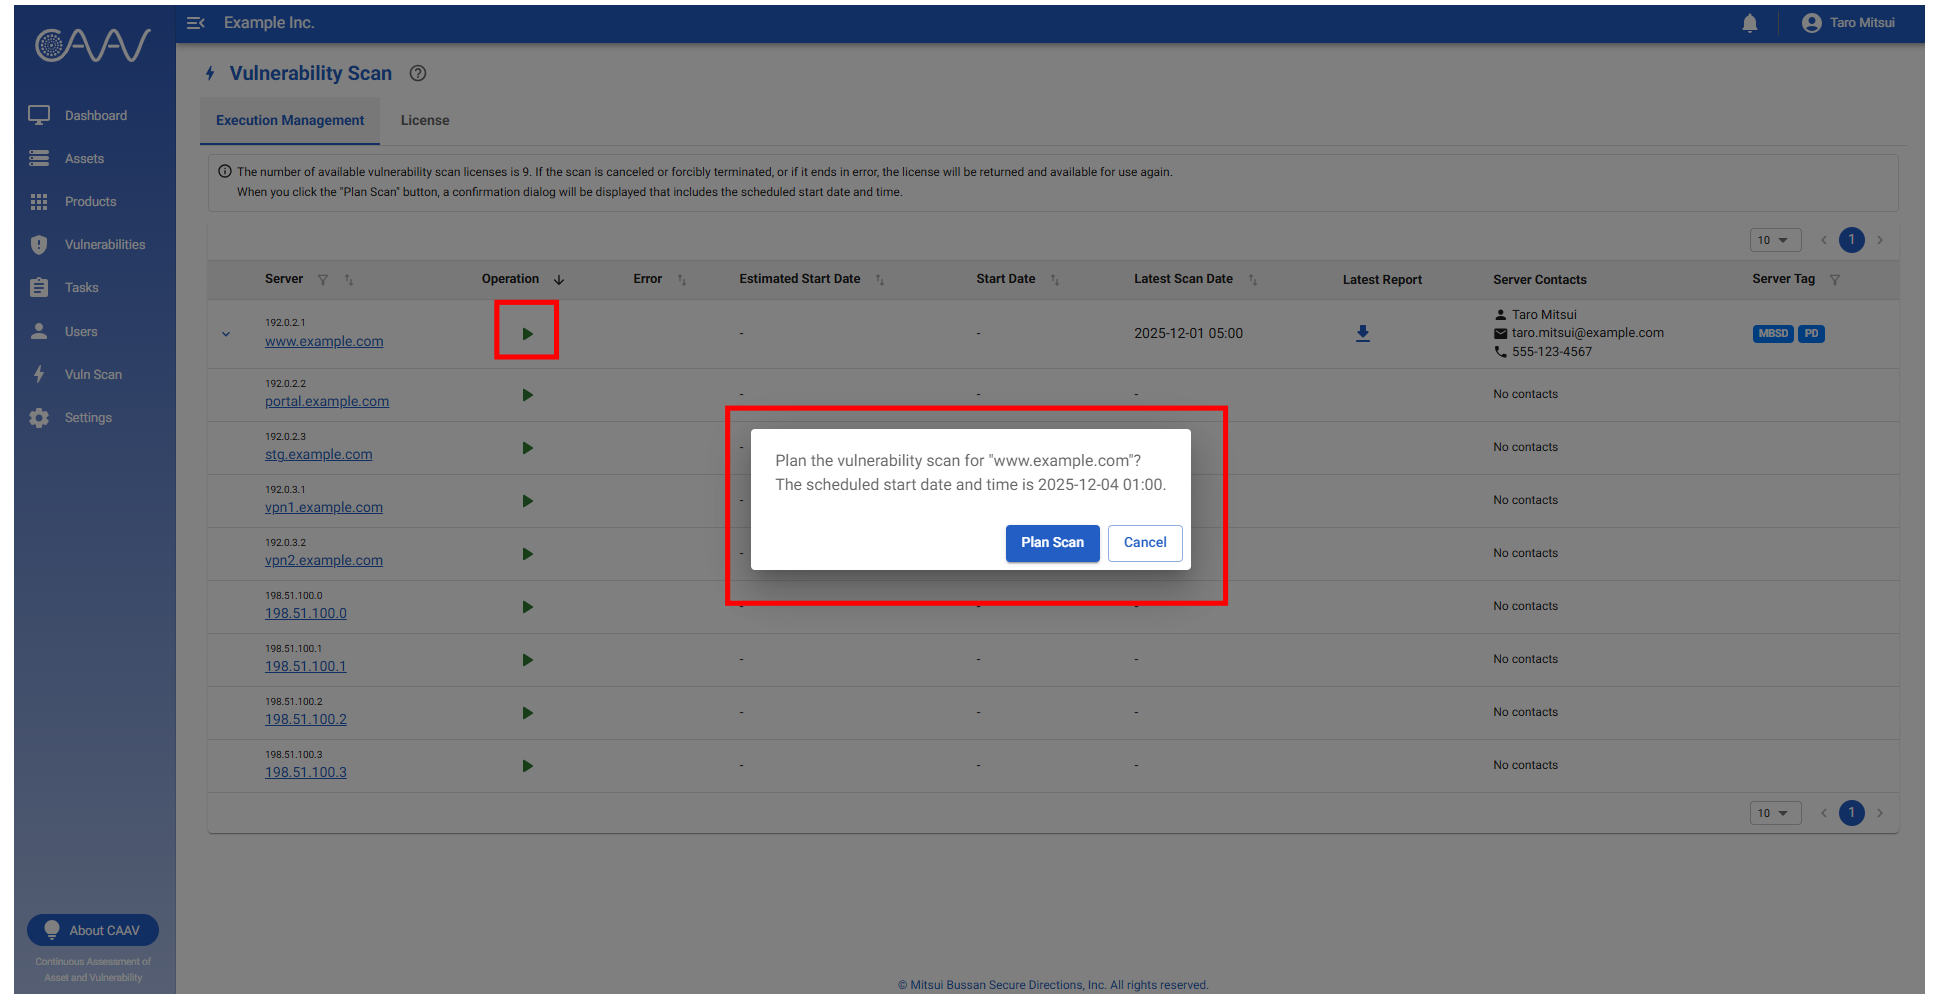
Vulnerability scan execution reservation
- Clicking the button (▶) in the "Operation" column will display a confirmation screen.
- Clicking the "Plan Scan" button on the confirmation screen allows you to schedule the scan. The scan will then run automatically when the scheduled start date and time arrives.
- The earliest scheduled start time for scanning is 1:00 am (UTC) on the next business day. This depends on booking availability.
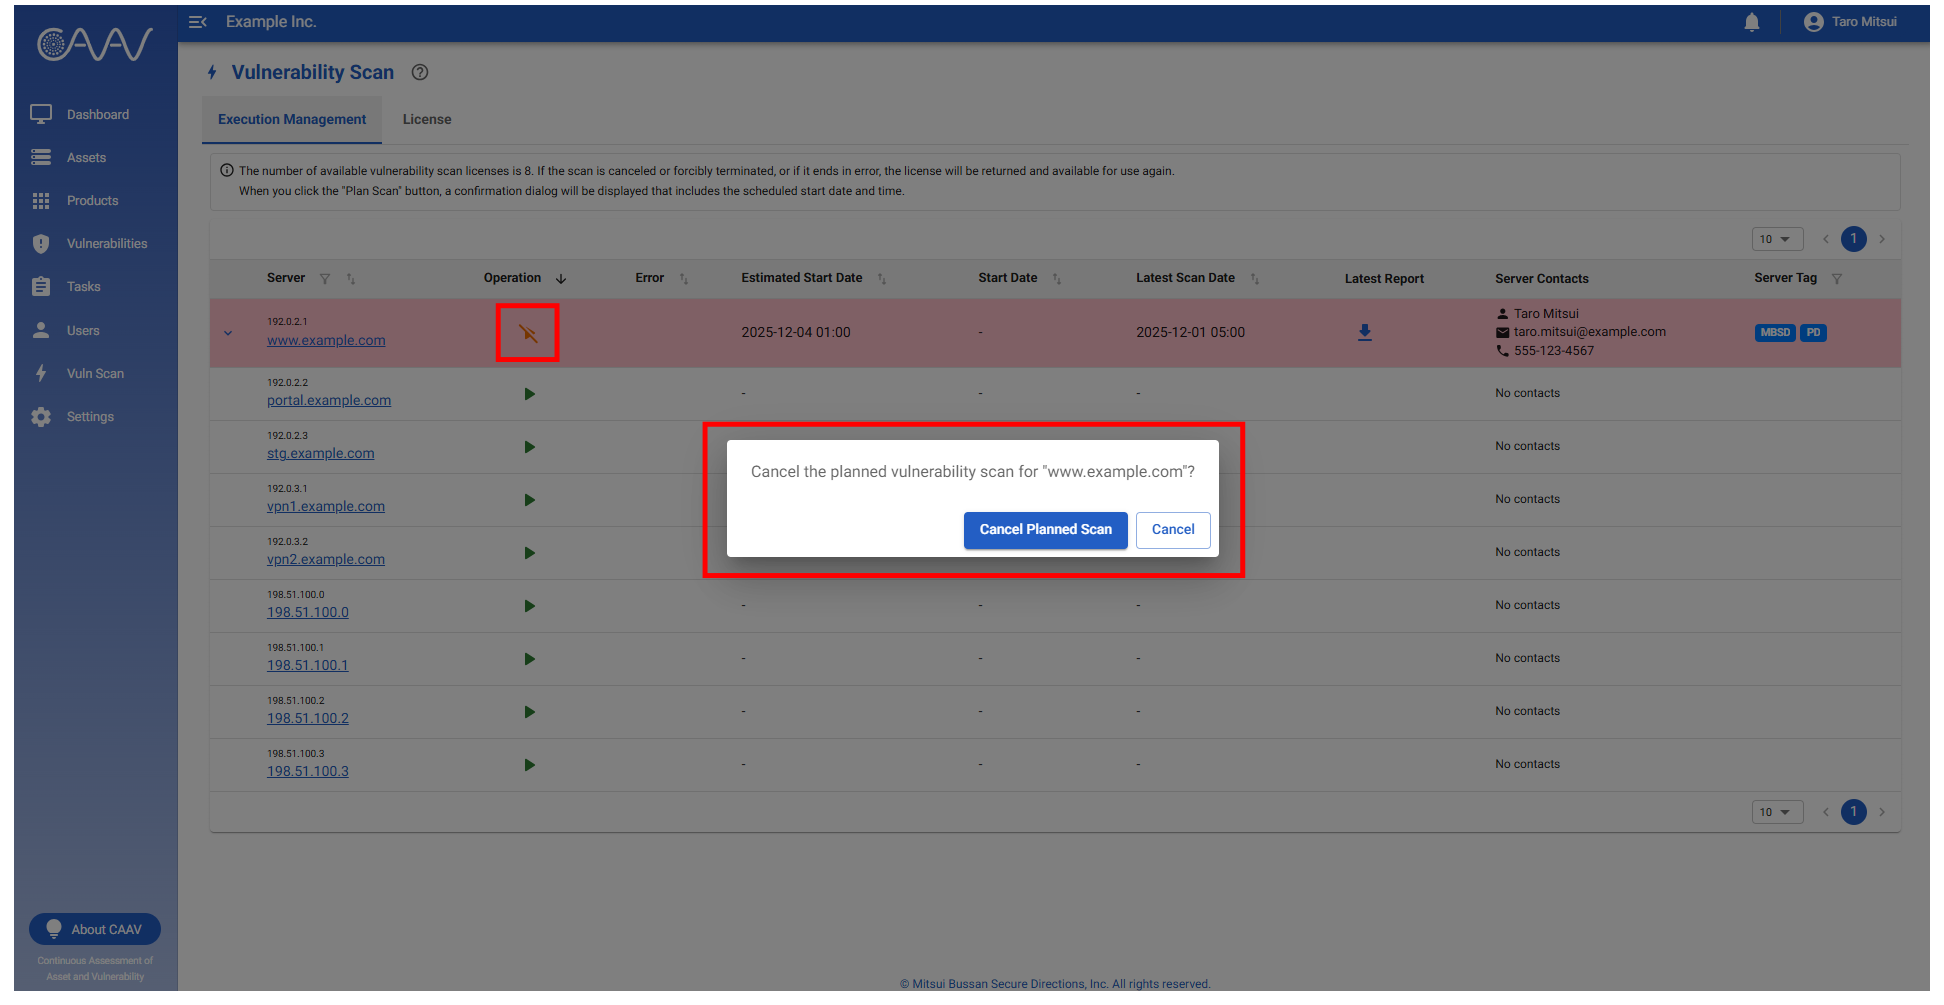
Vulnerability scan execution reservation cancellation
- Clicking the button in the "Operation" column for which a scan has been scheduled will display a confirmation screen.
- Clicking the "Cancel Planned Scan" button on the confirmation screen will cancel the scheduled scan.
- Cancellations can only be made before the scheduled start time of the scan. Upon cancellation, the license will be returned.
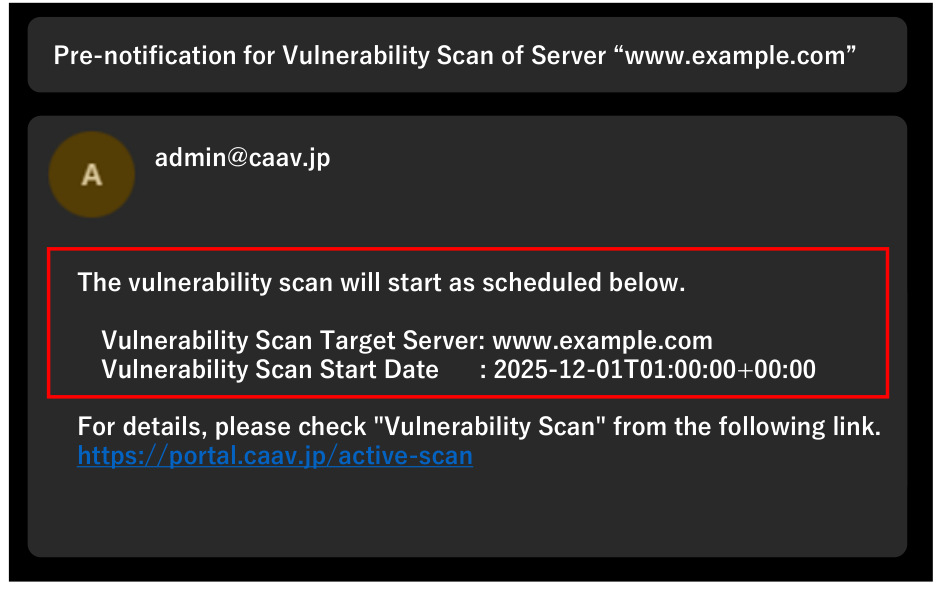
Vulnerability scan pre-execution notification
- Prior to start the vulnerability scan, advance notification emails will be sent to the supervisors, server contacts, and those who initiated the vulnerability scan.
- To cancel a vulnerability scan, please log in to CAAV and follow the steps in "Vulnerability scan execution reservation cancellation" to cancel.
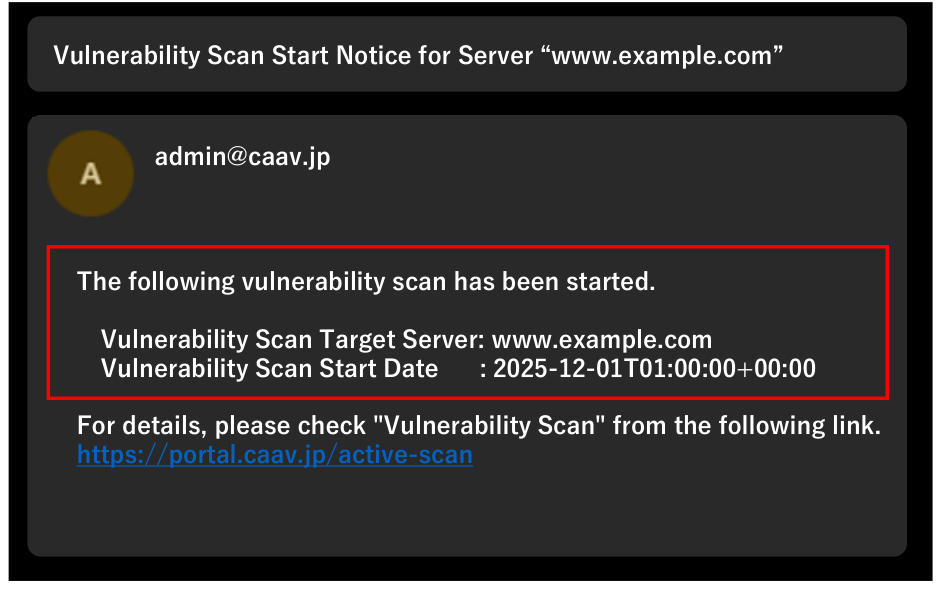
Vulnerability scan start notification
- When the vulnerability scan starts, notification emails will be sent to the supervisors, server contacts, and those who initiated the vulnerability scan.
Vulnerability scan execution forced termination
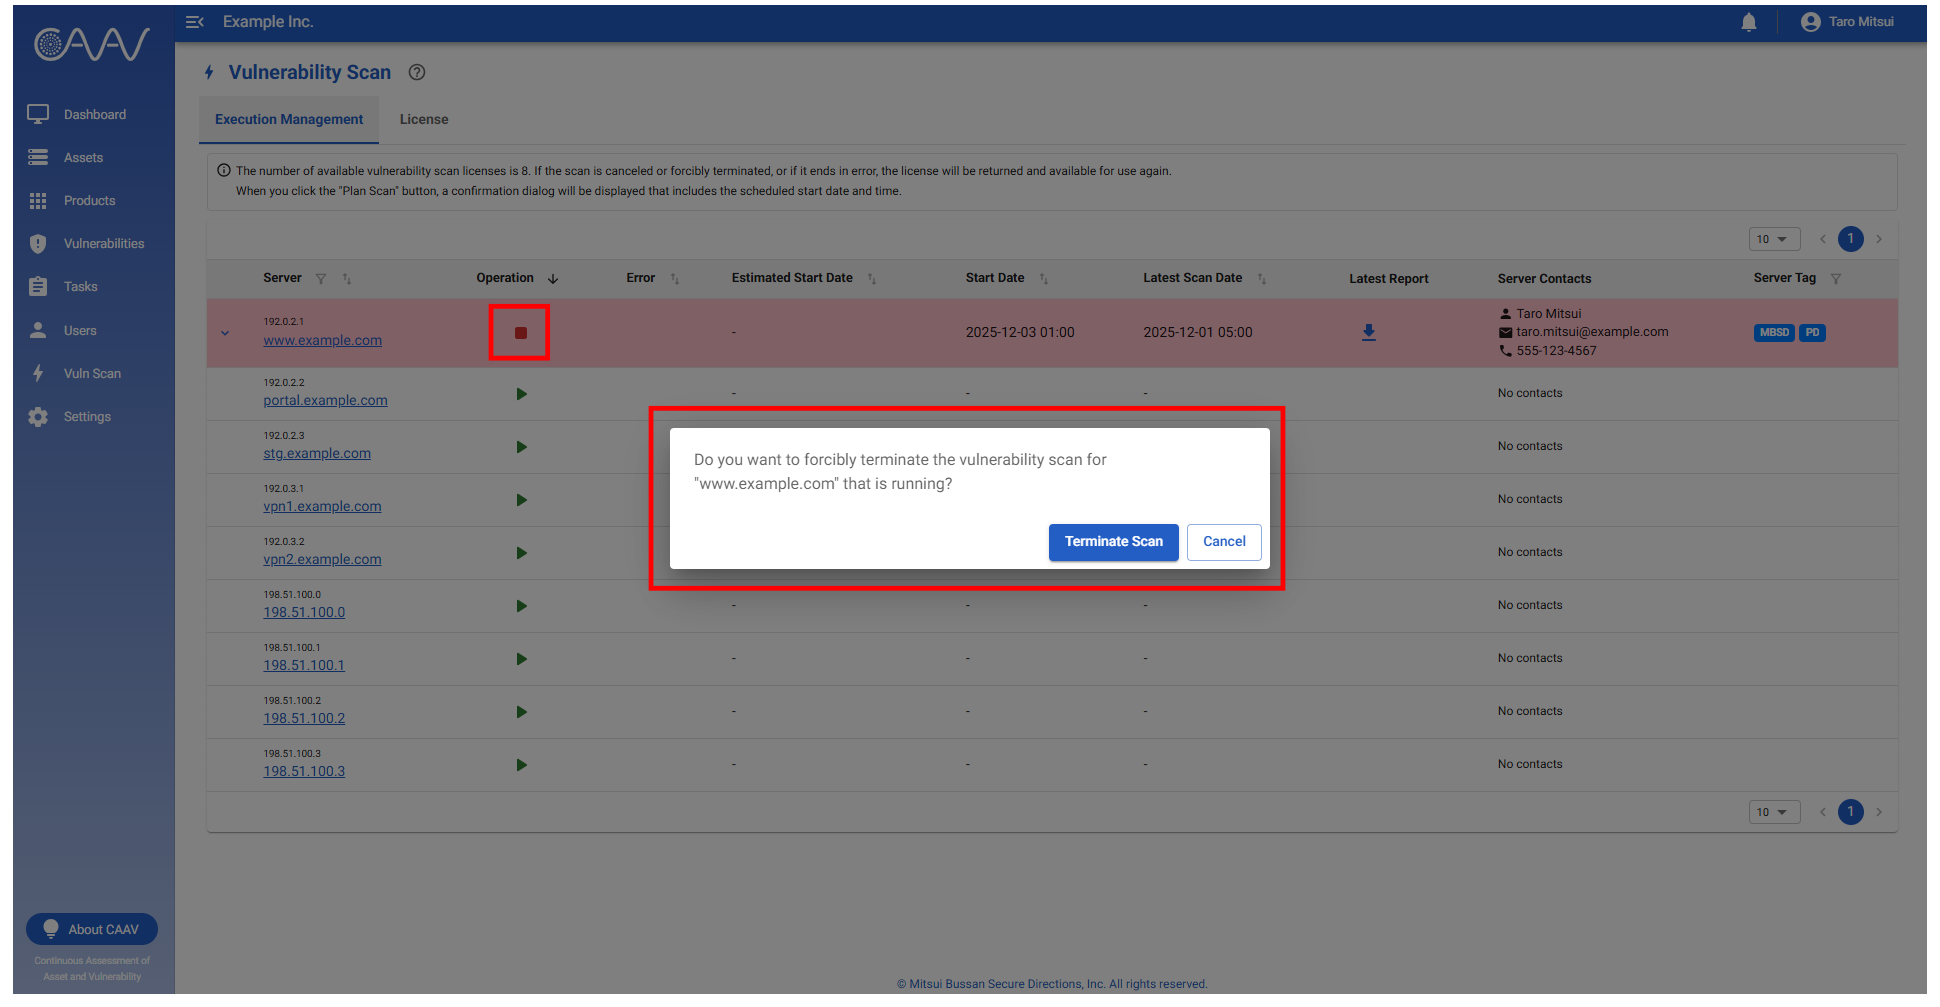
-
Clicking the button (■) in the "Operation" column displays a confirmation screen.
-
Clicking the "Terminate Scan" button on the confirmation screen will force the scan to terminate.
Upon forced termination, the license will be returned.
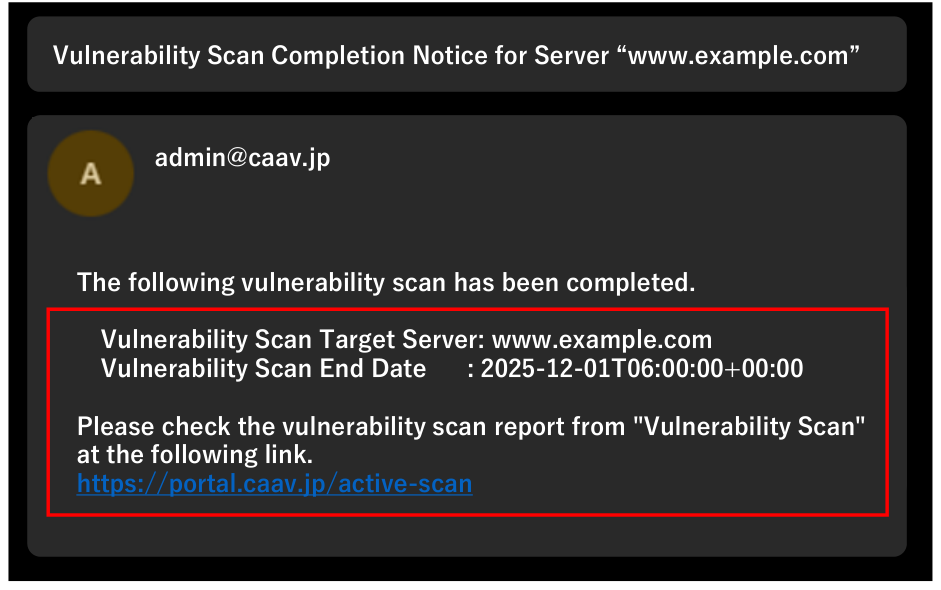
Vulnerability scan completion notification
-
Upon completion of the vulnerability scan, notification emails will be sent to the supervisors, server contacts, and those who initiated the vulnerability scan.
-
Upon completion notification, you may view the vulnerability scan results report (refer to "Vulnerability scan report").
Once the vulnerability scan is complete, license consumption will be finalized.
Vulnerability scan report
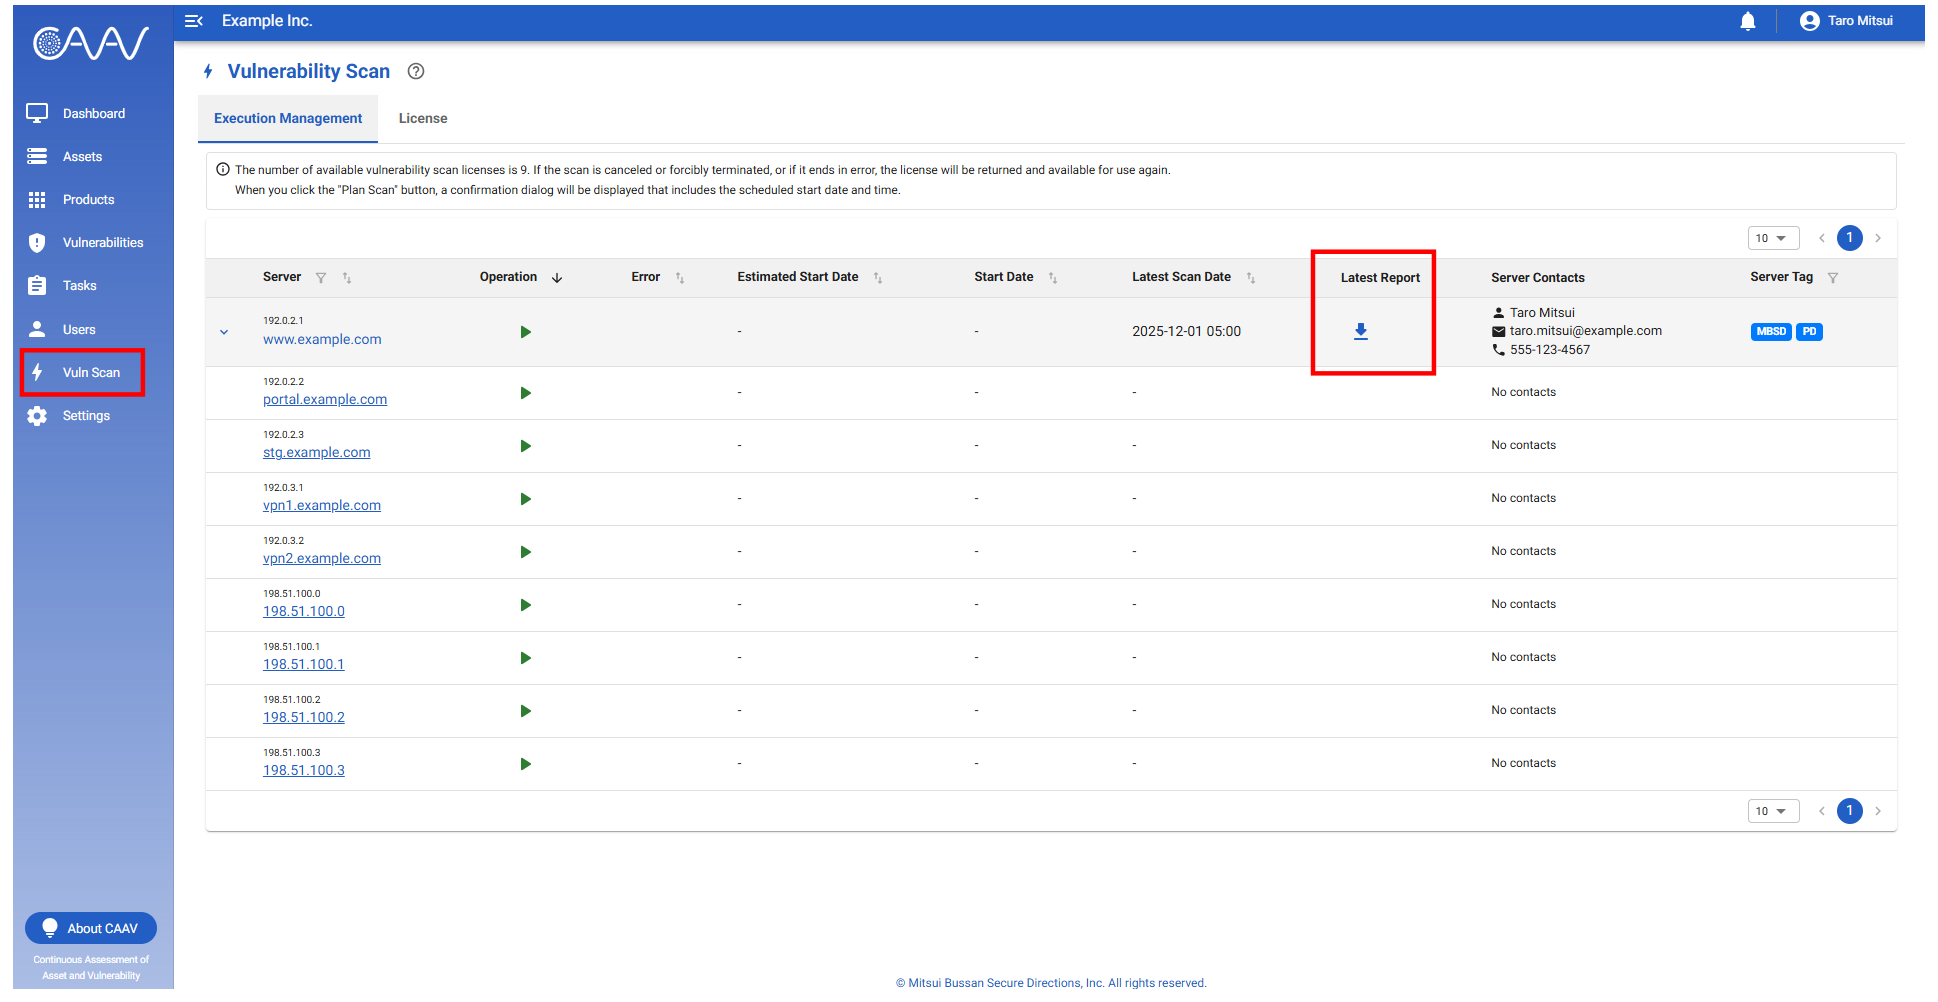
Referenced from "Vuln Scan" menu
- Once the vulnerability scan is complete, an arrow icon will appear in the "Latest Report" column.
- Clicking the arrow icon allows you to download the report in HTML format.
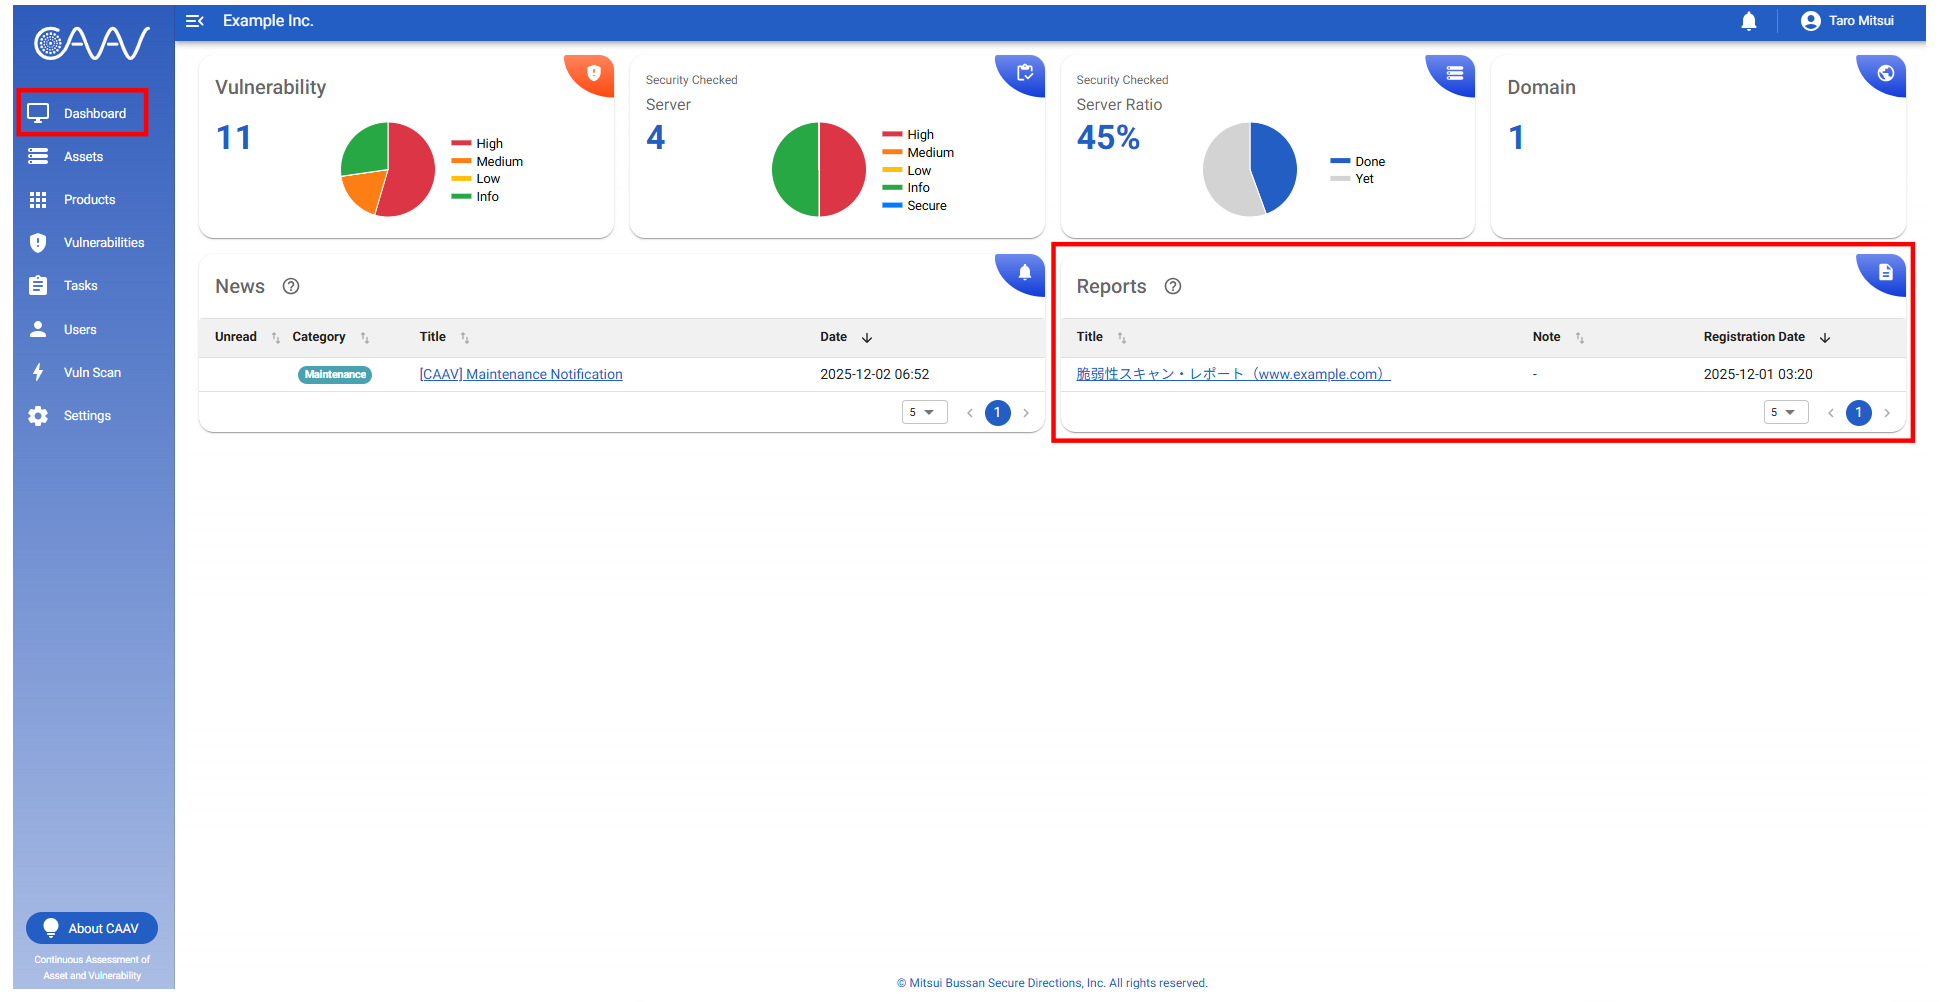
Referenced from "Dashboard" menu
- Reports can also be downloaded from the "Reports" section within the "Dashboard".
- Clicking the "Title" of the report will allow you to download the report in HTML format.
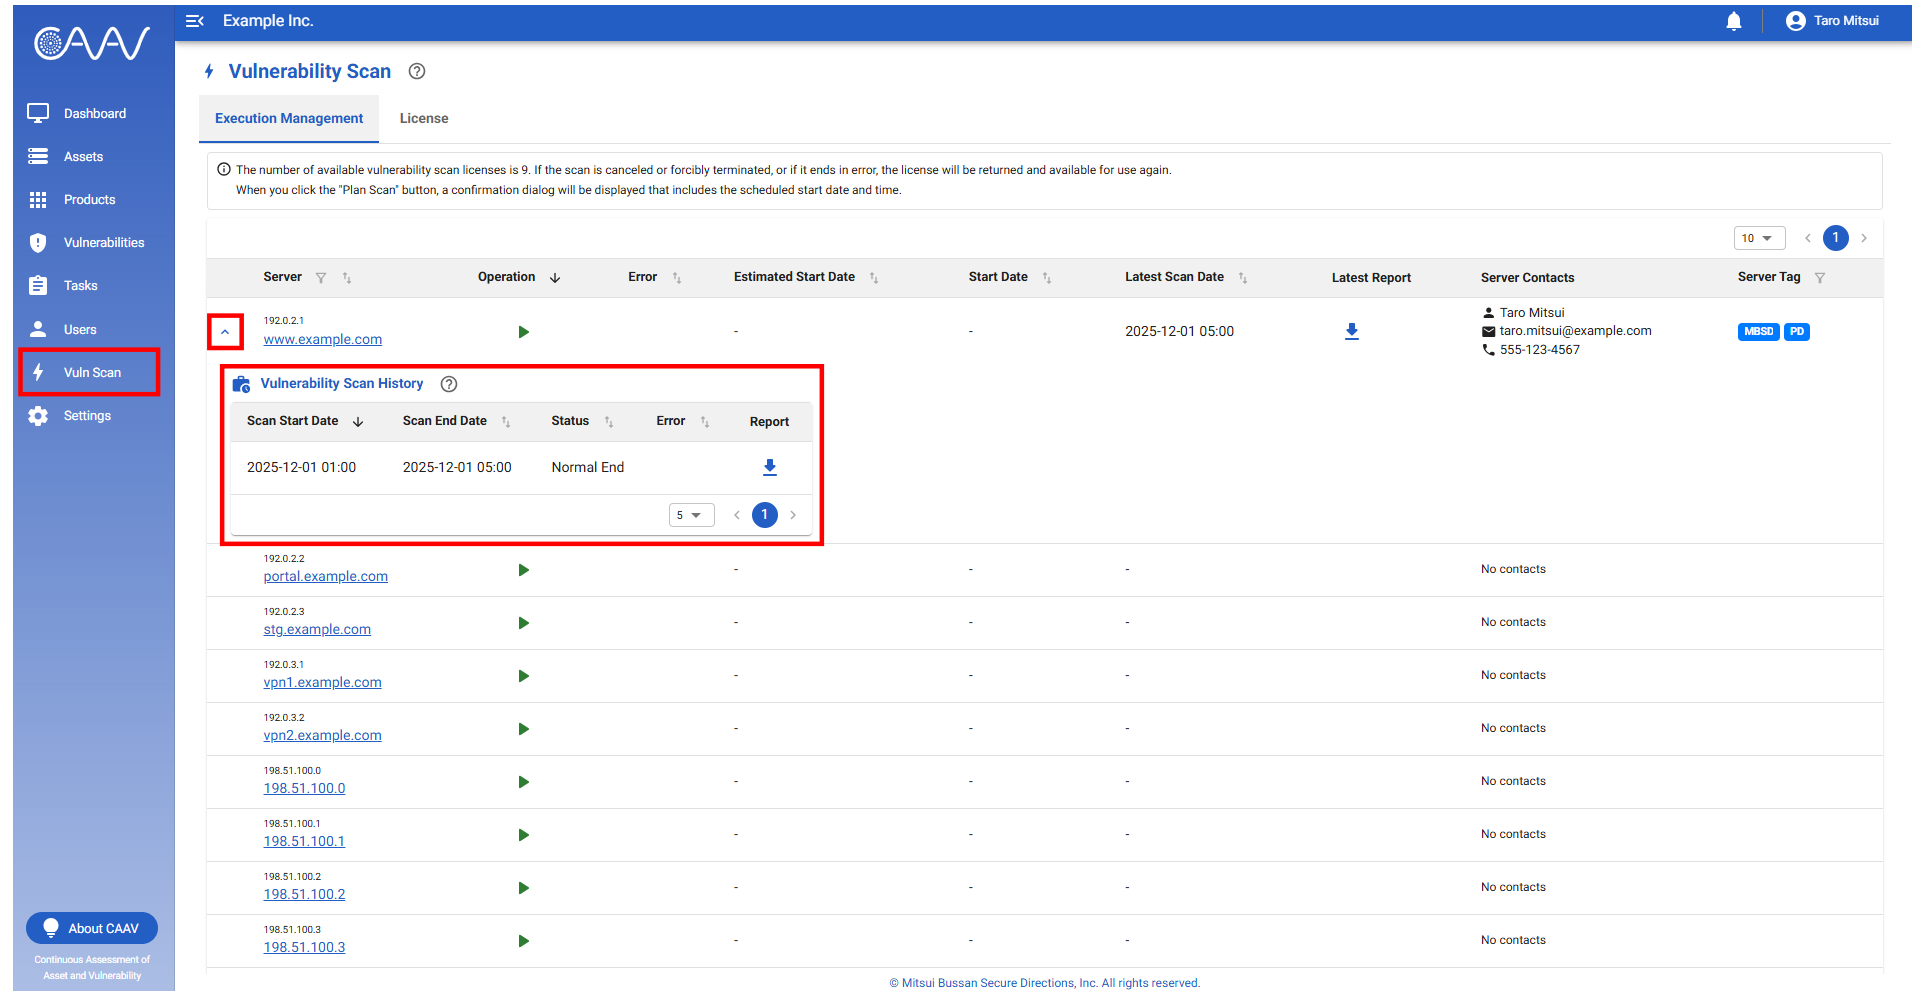
Vulnerability scan history
- Click the arrow button to view the server's vulnerability scan history.
- From this history, you can view the execution dates and times of past vulnerability scans and their reports.
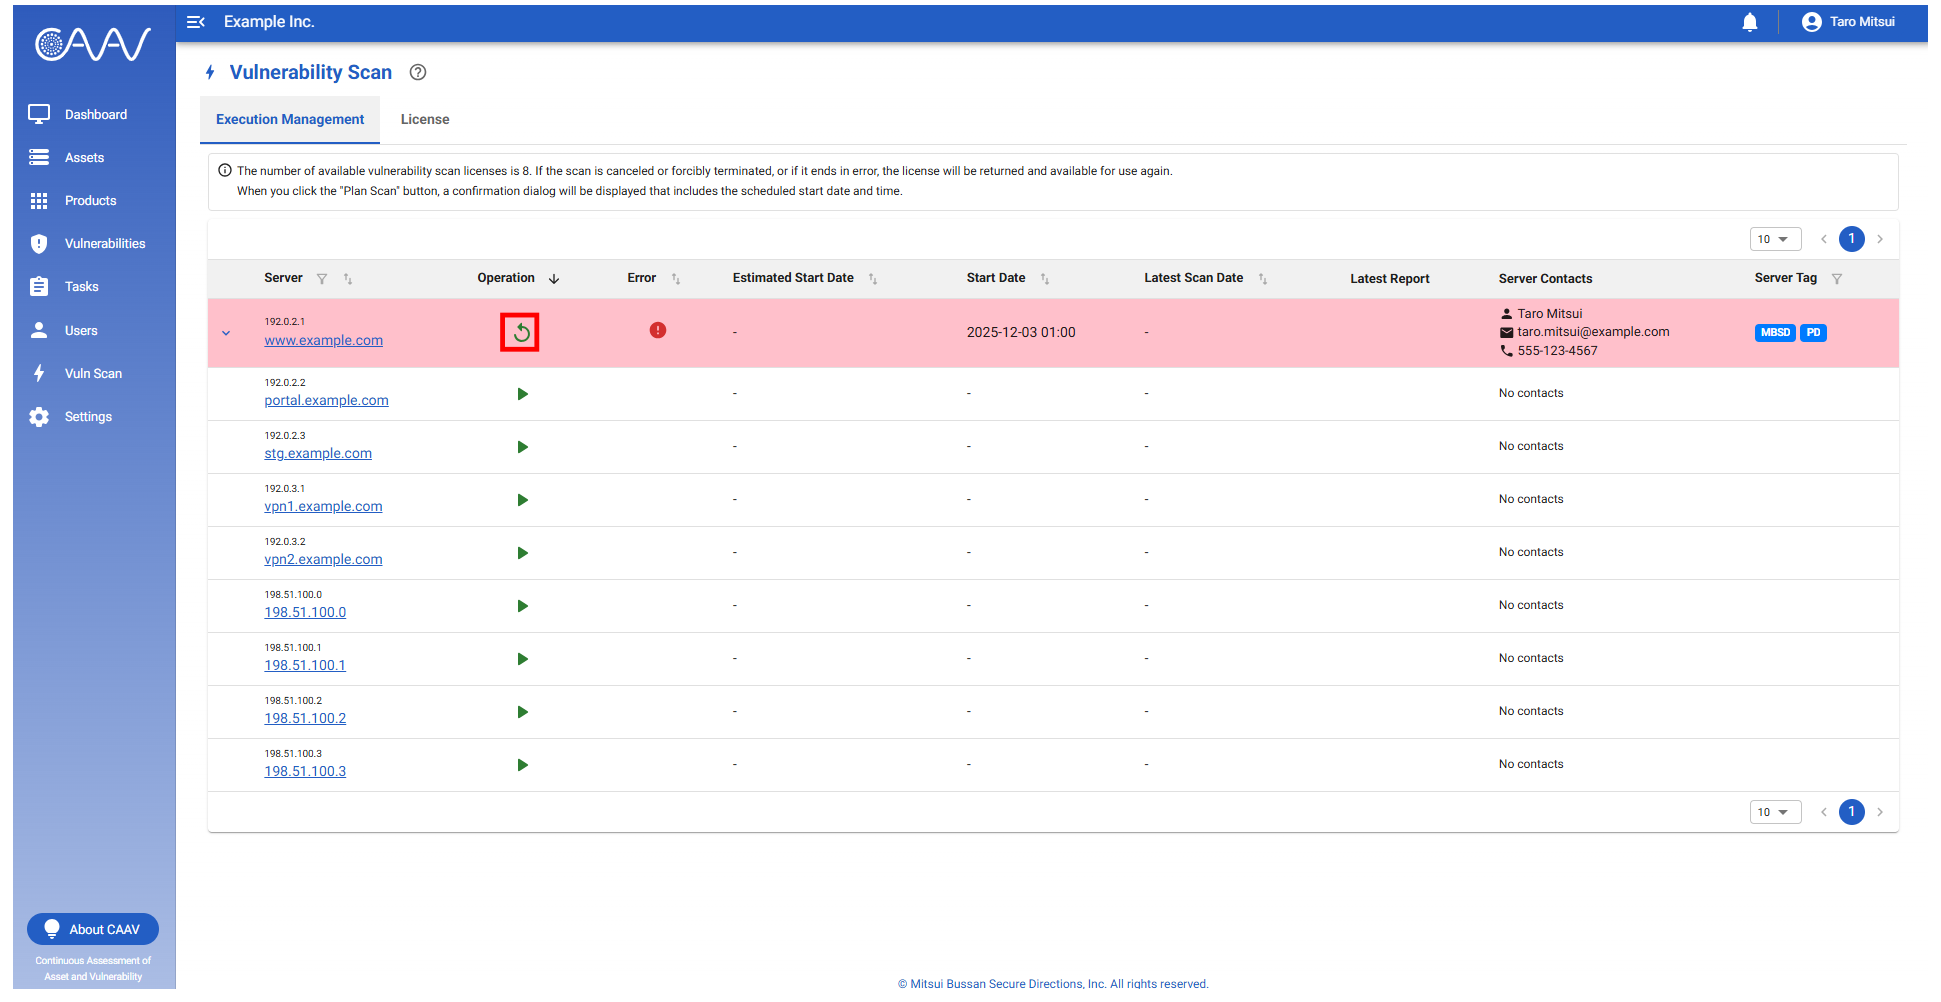
Action to take when a vulnerability scan encounters an error
-
Should the vulnerability scan encounter an error for any reason, a red icon will appear in the "Error" column.
-
Clicking the button in the "Operation" column allows you to schedule the scan to run again.
Should the vulnerability scan encounter an error, the license will be returned.
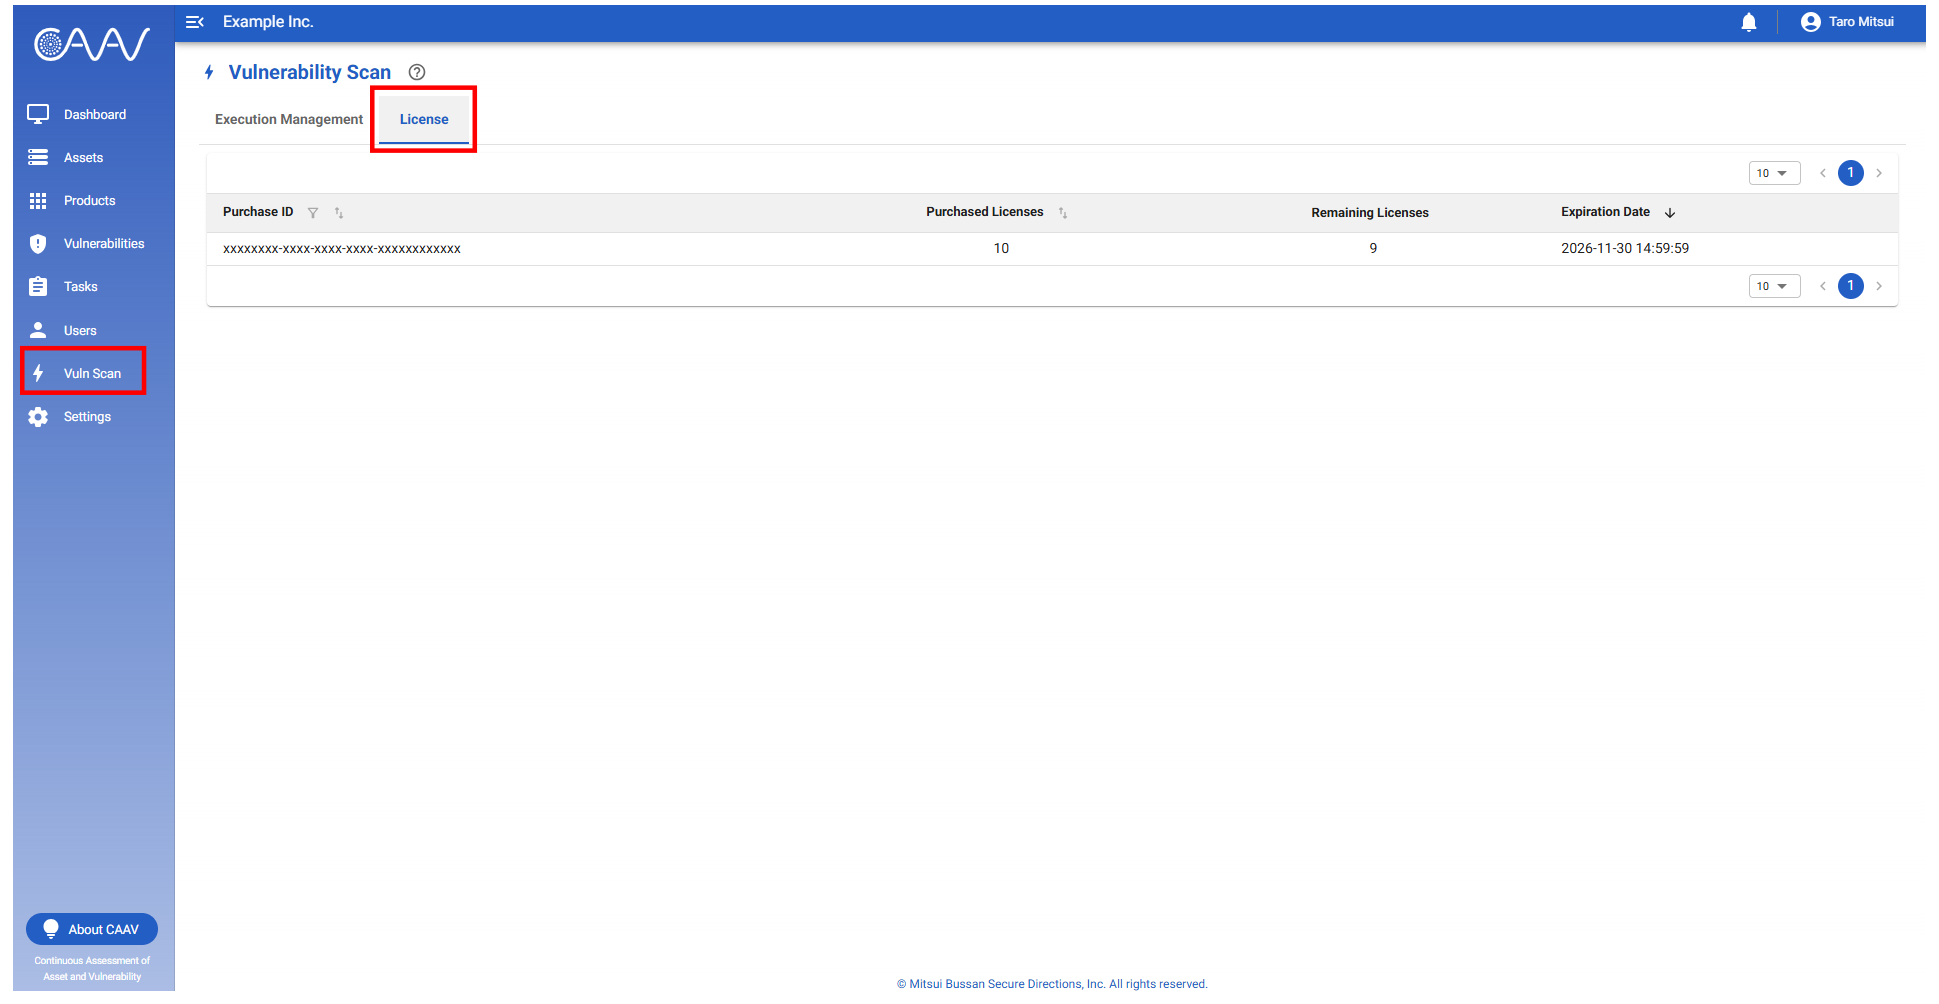
Vulnerability Scan License
- You can check your current license status from the "License" tab.
- Please note that once the license expiry date has passed, you will no longer be able to run vulnerability scans.
Other
Permissions for each role
- CAAV defines user roles as "Supervisor", "Chief", and "Worker". The permissions for each role are outlined below.
| Screen Name | Path | Feature | Supervisor | Chief | Worker | Overview |
|---|---|---|---|---|---|---|
| Dashboard | /dashboard | View dashboard | ✓ | ✓ | ✓* | Screen for viewing summaries, news, and so on. |
| Assets | /assets | View server list | ✓ | ✓ | ✓* | Screen for viewing the server list. |
| Assets | /assets | CSV download of FQDN/network list | ✓ | ✓ | ✓* | Feature to output FQDN list and network list to CSV. |
| Assets | /assets | Register servers | ✓ | ✓ | – | Feature to register servers manually. |
| Assets | /assets | Tag-based server search | ✓ | ✓ | ✓* | Feature to filter servers based on tags assigned to them. |
| Products | /products | View product list | ✓ | ✓ | ✓* | Screen for viewing a list of products detected. |
| Vulnerabilities | /vulnerabilities | View vulnerability list | ✓ | ✓ | ✓* | Screen for viewing the vulnerability list. |
| Vulnerabilities | /vulnerabilities | CSV download of vulnerability list | ✓ | ✓ | ✓* | Feature to output Vulnerability list to CSV. |
| Tasks | /tasks | View task list | ✓ | ✓ | ✓* | Screen for viewing task list. |
| Users | /users | View user list | ✓ | – | – | Screen for viewing user list. |
| Users | /users | Invite users | ✓ | – | – | Feature to invite users. |
| Users | /users | Bulk invite users | ✓ | – | – | Feature to bulk invite users. |
| Users | /users | Change user roles | ✓ | – | – | Feature to change user roles. |
| Users | /users | Disable/Enable users | ✓ | – | – | Feature to disable (prevent from logging in) / enable (grant login permission) users. |
| Users | /users | Unlock users | ✓ | – | – | Feature to unlock a locked user's account. |
| Settings | /settings | View settings | ✓ | ✓ | – | Screen for managing domain/server administration and domain-related information used by CAAV for inventory purposes. |
| Settings | /settings | Update domain hold status | ✓ | ✓ | – | Feature to manage hold status domains as either managed or unmanaged. |
| Settings | /settings | Update domain managed status | ✓ | ✓ | – | Feature to update status of domains as managed or unmanaged. |
| Settings | /settings | Update server managed status | ✓ | ✓ | – | Feature to update status of servers as managed or unmanaged. |
| Settings | /settings | Update security check target | ✓ | – | – | Feature to select/deselect servers subject to security checks. |
| Settings | /settings | Bulk update server settings | ✓ | – | – | Feature to bulk update server settings. |
| Settings | /settings | Delete/Restore domain-related Information | ✓ | ✓ | – | Feature to delete/restore domain-related information. |
| Settings | /settings | Register tags | ✓ | ✓ | – | Feature to register tags. |
| Settings | /settings | Delete/Restore tags | ✓ | ✓ | – | Feature to delete/restore tags. |
| Settings | /settings | Update Email notification settings | ✓ | – | – | Feature to configure email notification conditions for security check results. |
| Vulnerability Details | /vulnerabilities | View vulnerability details | ✓ | ✓ | ✓* | Screen for viewing vulnerability details, displayed when clicking the vulnerability title link. |
| Vulnerability Details | /vulnerabilities | View vulnerability problem points | ✓ | ✓ | ✓* | Feature to view all locations where the vulnerability was detected. |
| Vulnerability Details | /vulnerabilities | Register vulnerability notes | ✓ | ✓ | ✓* | Feature for register notes about the vulnerability. |
| Server Details | /assets | View server details | ✓ | ✓ | ✓* | Screen for viewing server details, displayed when clicking the server's name link. |
| Server Details | /assets | Attach/Detach tags | ✓ | ✓ | ✓* | Feature to attach/detach tags to servers. |
| Server Details | /assets | Assign/Remove server contacts | ✓ | ✓ | – | Feature to assign/remove server contacts. |
| Server Details | /assets | Register server notes | ✓ | ✓ | ✓* | Feature for register notes about the server. |
| Vulnerability Scan | /active-scan | View execution management | ✓ | ✓ | ✓* | Screen for viewing list of servers subject to vulnerability scan. |
| Vulnerability Scan | /active-scan | Plan execution | ✓ | – | – | Feature to schedule vulnerability scans. |
| Vulnerability Scan | /active-scan | Cancel execution | ✓ | – | – | Feature to cancel scheduled vulnerability scans. |
| Vulnerability Scan | /active-scan | Terminate execution | ✓ | – | – | Feature to force-terminate the execution of vulnerability scans. |
| Vulnerability Scan | /active-scan | View reports | ✓ | ✓ | ✓* | Feature to download vulnerability scan result reports. |
| Vulnerability Scan | /active-scan | View history | ✓ | ✓ | ✓* | Feature to view vulnerability scan history. |
| Vulnerability Scan | /active-scan | View license | ✓ | ✓ | – | Feature to view license information for vulnerability scans. |
*The "Worker" user has access only to information about servers to which they are assigned as the contact.
Contact
-
Please contact us via the inquiry page below, or contact your CAAV sales representative.
Mitsui Bussan Secure Directions, Inc.
CAAV Inquiry Desk
https://portal.caav.jp/inquiry
© Mitsui Bussan Secure Directions, Inc. All rights reserved.